>

Interior roof lining broken tabs - How to fix?? SOLVED!!

StudioWizard

Member
Los Angeles, CA, USA
Hey all

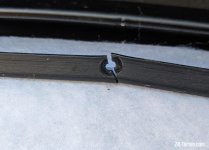
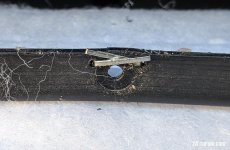
My soft top roof interior lining is not attached in a couple of spots and I could feel that there were tabs or posts that the lining would attach to (probably with a clip), but have broken off. Has anyone had any experience with this issue? Any suggestions for replacing the tabs/posts?

I can post pictures if necessary...

Thanks!

Paul
 
Have you found a way to fix it?, i noticed, that roof interior lining is saging on one side, it seems that it broke where the screw goes through.
 
I'm going to try to use epoxy to bond the broken clips back in place. It could get messy, but I'm going to practice a little bit first. I think I'll try putting a little blob between my thumb and finger, then rub it on the broken tab and hold it in place for a few minutes. We'll see what happens!
 
StudioWizard said:
I'm going to try to use epoxy to bond the broken clips back in place. It could get messy, but I'm going to practice a little bit first. I think I'll try putting a little blob between my thumb and finger, then rub it on the broken tab and hold it in place for a few minutes. We'll see what happens!
This sounds like one of those Mr Bean moments :lol:
 
LOL!! Like my hand gets permanently attached to the inside of the convertible? Later, somebody tries to "help" me by putting the top down thereby breaking my arm in two places. haha Wait... could this actually happen???
 
Did you already check this out https://z4-forum.com/forum/viewtopic.php?t=77459. I fixed (partially) mine over the weekend. There is a plastic tab with screws that holds the lining in place. As with all plastic, it becomes brittle with age. I had additional problem with the actual roof lining trim piece actually falling apart from the front as well. Very fragile, I guess the roof plastic takes a lot hit from the sun heat over the years...anyway when you open the roof midway as instructed in the above thread, you will see how bad or good the situation is in your case.
 
Thank you for that link!! I think that will solve the problem.

The other problem has to do with the plastic at the front of the roof that clips the plastic onto the whole roof assembly. One of those tabs is broken, so it slightly dangles on the passenger side. Not sure if I can actually fix that one - I may have to replace the whole piece... :-(
 
StudioWizard said:
The other problem has to do with the plastic at the front of the roof that clips the plastic onto the whole roof assembly. One of those tabs is broken, so it slightly dangles on the passenger side. Not sure if I can actually fix that one - I may have to replace the whole piece... :-(

Based on your description, I had the same issue. I was able to partially fix it by drilling new holes in the trim piece, where it wasn't broken.
 
Just in case anyone's needing to fix the headliner, here's how I finally fixed mine:

Basically, it turns out that all of the pre-drilled holes in the plastic (or nylon?) strip that holds up the liner were all broken through. It's amazing that any of the headliner was still held up at all! haha I finally decided to tackle the slamming roof problem, but when I opened it all up, I saw all the pre-drilled holes broken. So instead, I began coming up with ways to fix that strip.

I tried superglue. Immediately, that failed. Then I tried PlastAid, which I've used successfully to fix broken tabs, including my vent tabs on the dashboard. But this was a major PITA to try to apply and it just wasn't working. Then I started to think about sewing it or attaching another nylon strip. That led me to think about stapling the broken parts back together.

So, what I ended up doing was using thick metal staples - the type used in staple guns (see pic below) - as "stitches" basically. I drilled holes with a 1/16" drill bit on either side of the crack material, then bent the staple ends inward so that the screw would clamp down on them. On some of the cracks, I used a staple on the top and the bottom to give it extra strength. It worked like a charm!!
 

Attachments

  • PXL_20231106_224349924~2.jpg
    PXL_20231106_224349924~2.jpg
    118.8 KB · Views: 687
  • PXL_20231106_224401431~2.jpg
    PXL_20231106_224401431~2.jpg
    122.5 KB · Views: 687
  • PXL_20231107_032346479~2.jpg
    PXL_20231107_032346479~2.jpg
    235.1 KB · Views: 687
Back
Top Bottom