I broke the retaining pin on my arm rest - how best to fix it?

BeardyJon

Active member
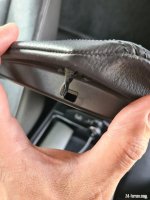
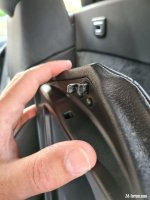
So as the title of the thread says, i was a little heavy handed closing the armrest and the retaining pin broke so i now cant close it.

I’m looking for ideas of what the best and least expensive way to replace this is, as i know that in order to replace the armrest, you need an entire new centre console which just seems so overkill for a small pin. I really wish the armrest was removable on its own!

Im going to try investigate prying the existing pin out with some trim removal tools, but has anyone had this problem and found an easy fix?
 
Anyone?

I’ve had a good look and attempted to separate the leather arm rest upper portion from the plastic underneath and its such a close fit i cant get any of the trim removal tools between them and im nervous im gonna butcher the lot and make it worse.

I thought i might be able to buy a cabinet roller catch and fit that in place of the broken plastic one, but im not gonna be able to get it fit in place. Only thing i can think of is cutting the broken plastic pin off with a dremel and glueing/screwing a new pin in, which seems a bit janky.

Any suggestions are welcome!
 
Could you glue some magnets in place. There are various types, some like pennies, some like polo mints.
Might not stop it sliding sideways though.
 
Can anyone please share a photo of the armrest closure clip when it's open? I've bought some epoxy putty to try mould a new one but just need a reference photo of an original closure to model one from. Just to give an idea of how big to make it. Also, if anyone wants to be extra kind, some guide measurements would be SUPER useful. Thanks!
 
BeardyJon said:
Can anyone please share a photo of the armrest closure clip when it's open? I've bought some epoxy putty to try mould a new one but just need a reference photo of an original closure to model one from. Just to give an idea of how big to make it. Also, if anyone wants to be extra kind, some guide measurements would be SUPER useful. Thanks!

Bit difficult to place a tape measure accurately but should give you an idea
39EC3271-896D-4DBD-9407-6286D36035DB.jpeg
Rob
 
This is the only latch replacement I can think of, but might be a struggle to fit flush. Could possibly file to fit the existing locating part?
https://www.screwfix.com/p/carlisle-brass-double-ball-cabinet-catch-satin-chrome-17-x-12mm/2026p
If not, as said, magnets. Again anything is gonna be difficult to get to sit flush.
 
Pondrew said:
This is the only latch replacement I can think of, but might be a struggle to fit flush. Could possibly file to fit the existing locating part?
https://www.screwfix.com/p/carlisle-brass-double-ball-cabinet-catch-satin-chrome-17-x-12mm/2026p
If not, as said, magnets. Again anything is gonna be difficult to get to sit flush.

I suppose a hole could be drilled for a round magnet to sit flush, held in with araldite etc?
Rob
 
I'll try and take some measurements if that would help
 

Attachments

  • 20210528_112107.jpg
    20210528_112107.jpg
    112.9 KB · Views: 2,291
  • 20210528_112118.jpg
    20210528_112118.jpg
    97.8 KB · Views: 2,291
Thanks a lot for the photos! Its no wonder it broke off! Much more delicate than I thought it would be. I'll give it a shot with the Epoxy Putty and update with photos when it's done.
 
Wilko have some cupboard latches with rollers and the wedge shape, that might fit. Wedge is sort of spring steel with two screw holes.
This sort of thing;
https://www.diydirect.com/double-roller-cupboard-cabinet-catch-bronzed?gclid=CjwKCAjwzMeFBhBwEiwAzwS8zEbZ4wTwrXn-gCNCNBnBuiQKMBJnJXnw7GWAA5HzZn-4DD-vvyw6ABoCpFwQAvD_BwE
Or make your own wedge.
 
Good luck with the fix, OP.

I had the same trouble and used magnets. The lid closes securely and opens with about the same pressure as before.

I used 15mm x 1mm adhesive magnets, a stack of 4 or 5 in the storage recess and one on the lid which gives a flush fit. You need a packet of both north sided and south sided for it to work, and you an get them here: https://www.amazon.co.uk/Magnet-Expert%C2%AE-Adhesive-15mm-Neodymium/dp/B008U9T9NW/ref=sxin_9_ac_d_rm?ac_md=1-1-YWRoZXNpdmUgbWFnbmV0cw%3D%3D-ac_d_rm&crid=2E7LH0A5XDQQ3&cv_ct_cx=self+adhesive+magnets&dchild=1&keywords=self+adhesive+magnets&pd_rd_i=B008U9T9NW&pd_rd_r=e5786ea3-238f-4c8a-bb56-08c75a8b757e&pd_rd_w=ll8uv&pd_rd_wg=vlQbk&pf_rd_p=73573abc-9548-43f0-87cb-a185286cee4c&pf_rd_r=FEG6BQ2Q0P6HJG6YHQ53&psc=1&qid=1622807351&sprefix=self+adhesive+magnets%2Caps%2C150&sr=1-2-fe323411-17bb-433b-b2f8-c44f2e1370d4

If you ever get a replacement lid from BMW or breakers it's easy enough to remove the magnets. Meantime, you'll quickly forget they're there.

Hope that's helpful
 
So i decided to go ahead with the epoxy putty and crafted a new latch and here’s the finished (*I might try neaten it up later) result:

443880-B2-CFC2-43-AD-A30-A-D54-D1-D53-B960.jpg

9-E2-F4572-1184-4-B29-B20-B-B880-EF9145-DB.jpg

EBBF43-E5-7674-4-F44-9-B9-E-2-BC9865-C4-A50.jpg

33-ADDD9-C-9-FF5-4-C34-98-B2-B5-E5480-F9292.jpg

F1-AB2-C8-E-D620-4-A28-8-B49-71-DD5-C81-B233.jpg


Its not absolutely perfect, but it closes and stays closed with a slightly snug fit that I expect might wear down a bit after some use. I basically just moulded a rough latch and let the putty set and cure and then carved it into shape. Slightly disappointed the black putty ended up going grey when i shaved it but I should have expected that tbh. Pretty happy to be able to close the armrest again though!
 
BeardyJon said:
So i decided to go ahead with the epoxy putty and crafted a new latch and here’s the finished (*I might try neaten it up later) result:....
....Its not absolutely perfect, but it closes and stays closed with a slightly snug fit that I expect might wear down a bit after some use. I basically just moulded a rough latch and let the putty set and cure and then carved it into shape. Slightly disappointed the black putty ended up going grey when i shaved it but I should have expected that tbh. Pretty happy to be able to close the armrest again though!

Hey@BeardyJon - I'm in the same situation, so was searching for a solution and came across your post. I hadn't thought of going down this route, but what a great idea! Unfortunately, I can't tell how old this post is (although it's probably something obvious that I cant see for looking), so how long ago is it since you did this, and how's the repair holding up?
 
McBoxer said:
BeardyJon said:
So i decided to go ahead with the epoxy putty and crafted a new latch and here’s the finished (*I might try neaten it up later) result:....
....Its not absolutely perfect, but it closes and stays closed with a slightly snug fit that I expect might wear down a bit after some use. I basically just moulded a rough latch and let the putty set and cure and then carved it into shape. Slightly disappointed the black putty ended up going grey when i shaved it but I should have expected that tbh. Pretty happy to be able to close the armrest again though!

Hey@BeardyJon - I'm in the same situation, so was searching for a solution and came across your post. I hadn't thought of going down this route, but what a great idea! Unfortunately, I can't tell how old this post is (although it's probably something obvious that I cant see for looking), so how long ago is it since you did this, and how's the repair holding up?

Well, I'm sad to say it didn't hold up for long. I think that could be due to the curing time for the Epoxy and not letting it cure for long enough. It pretty soon broke off again. I suspect it might have survived longer if I'd given it 24 hours.

The next solution was to get adhesive magnets and I'm pleased to say that's worked and continues to work.
 
BeardyJon said:
Well, I'm sad to say it didn't hold up for long. I think that could be due to the curing time for the Epoxy and not letting it cure for long enough. It pretty soon broke off again. I suspect it might have survived longer if I'd given it 24 hours.

The next solution was to get adhesive magnets and I'm pleased to say that's worked and continues to work.
Hey @BeardyJon, thanks for responding. Well, if that's the case I might go straight to adhesive magnets and not bother with epoxy resin!

The annoying thing (for me) is that I have an arm rest lid with a good pin from my old interior but I've done a colour change and my 'new' interior has the broken pin, If I could work out how to split the leather part from the plastic base that I assume the pin is attached to, I could fix it. But, whilst they are clearly two separate parts, they were never designed to be separated and' like yourself, I cannot see a way to get them apart without risking damage to both
 
Back
Top Bottom