How to properly restore your headlights - tutorial

Sim_Simma

Senior member
#### GUIDE ON HOW TO OPEN A Z4 HEADLIGHT ON PAGE 2 PICS INCLUDED####

I've noticed how common cloudy headlights are so I thought I'd post a how-to on whats needed to properly restore the lenses to as new condition.
Just polishing can make a big difference but isn't strong enough to fix the problem properly. So what you need to do is sand them down first. The trick is to work up the grades. If you skip a grade you will likely see scratches from the previous grade you used.

This headlight wasn't particularly cloudy but had a fair few deep scratches and little stone marks etc which are actually harder to get rid of. So the grades I used were:
320
500
800
1500
3000
Then a 3 stage machine polish with 3m green yellow then blue pads with the corresponding compounds. Fast cut plus, extrafine then ultrafina. On to the pics:
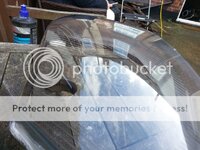
20131020_122443_zpsb6fc91bb.jpg
after 320
20131020_123505_zps25e43371.jpg
after 500

20131020_123817_zpsafe8def4.jpg
after 800
20131020_124257_zpsb57fd835.jpg
after 1500
20131020_130841_zps7bc2415e.jpg
after 3000
20131020_131504_zps0f236cc3.jpg20131020_131515_zps5666222c.jpg
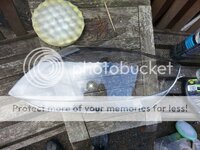
After the 3 stage machine polish. (the last polishing stage doesn't do much so a 2 stage does almost as good a job)
20131020_133028_zps8e09a034.jpg20131020_133103_zpsae55863c.jpg20131020_133407_zps8f4ed6e5.jpg

For cloudy lenses that dont have any deep scratches or marks I would start with 500 not 320. I used an air powered da sander for this but other sanders will works as well as doing it by hand. I mostly use 3m products so grades 800 1500 and 3000 are all 3m as well as the polishes and pads used.
 

Attachments

  • 20131020_133103_zpsae55863c.jpg
    20131020_133103_zpsae55863c.jpg
    117.7 KB · Views: 0
  • 20131020_133028_zps8e09a034.jpg
    20131020_133028_zps8e09a034.jpg
    159.8 KB · Views: 0
  • 20131020_131504_zps0f236cc3.jpg
    20131020_131504_zps0f236cc3.jpg
    73.3 KB · Views: 0
Brilliant results :thumbsup:
Fortunately mine don't need doing but if they did I'd never attempt that myself, well done.
 
Nelly Welly said:
How did you remove the lens so successfully I had heard it was a nightmare to do ?

Its not too hard to do but you can't do it the conventional way by heating it up as the glue doesn't melt. Also the casing wont melt either as with some headlights with the same glue problem you can heat the casing up and bend it back so you can cut the glue out. You cant do that with zed headlights either.

Imagine the lens sits in a u shape groove. You cut the top half of the groove off then run a graft knife under the lens to cut the glue. Both halves remain completely usable as the bottom (most important) part of the groove is still intact which allows you to locate and glue the lens back on. It wont look a mess either as long as you cut the top neatly and maybe smarten the edge up with some sandpaper after.

I'll get some pics for you later on when I get home.

I'd reply to everyone but I cant figure out how to multi-quote on this forum :rofl: if anyone would care to enlighten me it would be appreciated :)
 
Nelly Welly said:
How did you remove the lens so successfully I had heard it was a nightmare to do ?

This is the only pic I have atm. Ignore the heatgun, I tried another method before which wouldn't work.
20131007_174244_zps80e8f1d6.jpg
 
Great info, thanks. This is something I've been considering for some time now as a way of freshening up my soon to be 100K mile Mr. Z. I was considering buying the 3M kit that's on Amazon though as a starter to see how I got on.
 
Great job very informative :thumbsup:

I do plan on stripping mine and giving them a refurb in the new year. Those 3m polishing pads do they fit onto a standard air powered orbital sander?
 
Machine monkey said:
Great job very informative :thumbsup:

I do plan on stripping mine and giving them a refurb in the new year. Those 3m polishing pads do they fit onto a standard air powered orbital sander?

They'll fit anything with a velcro backing plate. You can get the pads in 3inch and 6inch versions :)
 
seanodwyer said:
Great info, thanks. This is something I've been considering for some time now as a way of freshening up my soon to be 100K mile Mr. Z. I was considering buying the 3M kit that's on Amazon though as a starter to see how I got on.
Do it! Theres nothing to worry about id be suprised if managed to damage anything! The lens is thick so you can sand it as much as necessary. And if you don't get the results you expect you'll just need to redo a step or 2 :)
 
ZeeFore said:
You're a brave man, Sim_Simma!

Terrifying job beautifully done. :thumbsup:

Not at all! I know these lights are expensive but whatever you do it would be difficult to do any permanent damage. It's like sanding a polishing paint without the risk or going through with the lens being so thick. So if it goes wrong you just do it again! All you can do wrong really is not be thorough enough with one of the stages so you just have another go until you perfect the technique.

Thanks everyone. If anything is unclear let me know :)
 
Sim_simma

A fabulous post and the only thing that is unclear are my headlights but seeing such detailed instructions I think they may be clear very soon.

Thanks for a great "How to"

:D :rofl: :D :rofl: :D
 
Back
Top Bottom