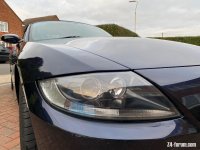
When I bought the car, the headlights had a darker shade of tint film. The tint was already getting old, bubbling up and pealing off on some places, this weekend had some spare time and the weather was amazing, so decided to remove the film and restore it.
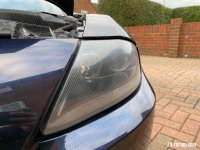
I used Autoglym headlight restoration kit, the instructions were pretty straight forward. Start with 800 sanding paper, and go down all the way to 3000 (everything was included in the kit). Took me around 30-45 mins per headlight.
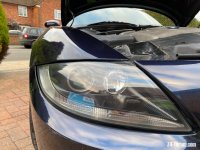
Looks better than before, and definitely recommend it as a cheap mod / fix up. However, be aware it doesn't make your headlights all brand new shiny. With the lights on, you can still see some haziness in plastic.
The headlights were in pretty descent condition after removing the tints, so for me I only saw 30% to 40% improvement in terms of colour, but the blemishes/chips on the plastic were all gone - 90% improvement.
Some photos attached:
I used Autoglym headlight restoration kit, the instructions were pretty straight forward. Start with 800 sanding paper, and go down all the way to 3000 (everything was included in the kit). Took me around 30-45 mins per headlight.
Looks better than before, and definitely recommend it as a cheap mod / fix up. However, be aware it doesn't make your headlights all brand new shiny. With the lights on, you can still see some haziness in plastic.
The headlights were in pretty descent condition after removing the tints, so for me I only saw 30% to 40% improvement in terms of colour, but the blemishes/chips on the plastic were all gone - 90% improvement.
Some photos attached:
- the cloudy headlight is sanded down. I didn't take before photos unfortunately


") Just gotta be careful you do not put too much pressure.
Just gotta be careful you do not put too much pressure.
