You are using an out of date browser. It may not display this or other websites correctly.
You should upgrade or use an alternative browser.
You should upgrade or use an alternative browser.
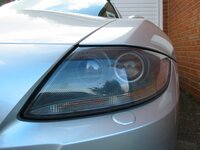
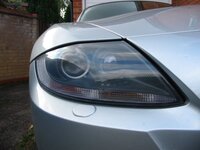
Front bumper panel gap?
- Thread starter cyrusir
- Start date
That's because the headlight is not correctly positioned before the bumper cover was fitted. Just needs the bumper removing, headlight moving by a few mm and cover back on.
Right pita to adjust, so I usually have the bumper on and off a couple of times to get it all spot on.
Right pita to adjust, so I usually have the bumper on and off a couple of times to get it all spot on.
cyrusir said:ah ok, is this a common thing or am i just unlucky, is it worth my while messing about with it??
Of course not.
If it bothers you fix it. If not leave it alone 
cj10jeeper said:That's because the headlight is not correctly positioned before the bumper cover was fitted. Just needs the bumper removing, headlight moving by a few mm and cover back on.
Right pita to adjust, so I usually have the bumper on and off a couple of times to get it all spot on.
CJ, did you mean by adjusting the height of the headlight to close the gap between the headlight and bumper cover? Can xenon headlights be adjusted without problem?
From the pictures, 2 headlights are perfectly aligned with both wings, just the gaps between headlights and bumper are different.

The gap between the left headlight and bumper cover is bigger. If I drop the left headlight by 3-4mm, it may increase the gap between the headlight and the wing?

Very difficult to tell from photographs, but the headlights can be adjusted in all planes such that they are flush and/or correct relative to all the adjoining surfaces.
Looks to me as if the first photo the light needs to come more forward and in the second one to be raised in the inside lower corner, but it could be camera angle
When you get it right you know it as they are correct to all the panels
Looks to me as if the first photo the light needs to come more forward and in the second one to be raised in the inside lower corner, but it could be camera angle
When you get it right you know it as they are correct to all the panels
cj10jeeper said:Very difficult to tell from photographs, but the headlights can be adjusted in all planes such that they are flush and/or correct relative to all the adjoining surfaces.
Looks to me as if the first photo the light needs to come more forward and in the second one to be raised in the inside lower corner, but it could be camera angle
When you get it right you know it as they are correct to all the panels
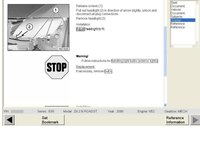
Do you simply adjust the 4 screws to correct the position of the whole headlight unit? Any difference between xenon headlight unit and halogen headlight unit?

Yes, use the 4 adjuster to move the whole unit around until it's correct. Remember before you took the bumper cover of where you feel a change is needed, mark the lugs if it helps, then work to that.
Tighten the adjustable outside one last.
Xenon and halogen are identical as far as this is concerned
Tighten the adjustable outside one last.
Xenon and halogen are identical as far as this is concerned
cj10jeeper said:Yes, use the 4 adjuster to move the whole unit around until it's correct. Remember before you took the bumper cover of where you feel a change is needed, mark the lugs if it helps, then work to that.
Tighten the adjustable outside one last.
Xenon and halogen are identical as far as this is concerned
Thanks, CJ. One last question: Can the bumper be taken off the car easily/safely with only 1 person?
IK. said:Mine is also ever so slightly different. Has never bothered me though; even with my OCD.
I think my OCD is getting worse after fitting the OEM diffuser (it triggered me to check the symmetry of the front). I was checking diffuser again this afternoon. The difference is no bigger than 1.5 mm between left and right, but it is just annoying me.
Yes - it a one person job. I recommend a large blanket or carpet on the floor in front of the car to stand it on. My suggestion is you remove the top bots take off the metal strip then hand tighten one torx back a few turns. This stops it dropping off until you are all set and ready. Remember to disconnect foglights and washers as tou pull the bumper away.
My OCD of getting it just right got a bit of a lift when someone stood by my car in the pits at Silverstone today for a photo and commented this car was 'so cool they'd trade their Mrs for it'.....
Kinda makes it worht doing, especially as there was a Zonda 20 metres away
My OCD of getting it just right got a bit of a lift when someone stood by my car in the pits at Silverstone today for a photo and commented this car was 'so cool they'd trade their Mrs for it'.....
Kinda makes it worht doing, especially as there was a Zonda 20 metres away
cj10jeeper said:Yes - it a one person job. I recommend a large blanket or carpet on the floor in front of the car to stand it on. My suggestion is you remove the top bots take off the metal strip then hand tighten one torx back a few turns. This stops it dropping off until you are all set and ready. Remember to disconnect foglights and washers as tou pull the bumper away.
My OCD of getting it just right got a bit of a lift when someone stood by my car in the pits at Silverstone today for a photo and commented this car was 'so cool they'd trade their Mrs for it'.....
Kinda makes it worht doing, especially as there was a Zonda 20 metres away
Trackday at Silverstone? Fun.
Not a trackday - I hang around with the Lotus on Track guys and they happened to have various other groups like the GT Cup competing today
I'll write a post later, but the Zonda was nothing - I was sat in a Caparo T1 at the invitation of the company owner.... Something else. I had my cheque book out but then the base price of £207,000 with options taking it to a little nearer £300 made me hesitate
Edit:


Miss CJ junior sat in said car:

I'll write a post later, but the Zonda was nothing - I was sat in a Caparo T1 at the invitation of the company owner.... Something else. I had my cheque book out but then the base price of £207,000 with options taking it to a little nearer £300 made me hesitate
Edit:


Miss CJ junior sat in said car:

I assume you refer to the clips under the wings. Push the pin right through (or pull it our depending upon design) then with a flat bladed screwdriver lever out the body of the clip. You need to take them all out, the hex bolts all the way across the underneath and then the 5 or 6 torx bolts under the bonnet. Ten minute job.
It took me 4 hours to take the bumper off, remove the diffuser, put the diffuser back, and put back the bumper back on. It was the first and biggest DIY job I did in my life. I think the problem cannot be fixed due to the design. I was trying to fix the diffuser, not the headlights this afternoon. I was so worried that I could not put the rear bumper and diffuser back together at a point. Now the diffuser is back to the original position.
I thought you were working on the front bumper cover? I'm confused now. 4 hours??
Similar threads
- Replies
- 0
- Views
- 133
- Replies
- 13
- Views
- 401