
You are using an out of date browser. It may not display this or other websites correctly.
You should upgrade or use an alternative browser.
You should upgrade or use an alternative browser.
cover in engine bay
- Thread starter navid.v
- Start date
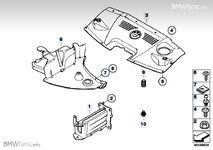
Well you've got to check the cover is fully pulled down. It needs to lock into the rad, etc. I've seen the big fixing on top of the rad too tight pushing it up on one Zed
If that's good then check the bonnet height against the wing crease lines. If they are good then deeper investigation into what's bent is needed
If that's good then check the bonnet height against the wing crease lines. If they are good then deeper investigation into what's bent is needed
Looking at your diagram posted you need to look at the rad anchoring points on the raised areas of the cover near to where iten '4' points. They hold down springs '9' iirc.
Take the whole cover off too and check all the surface are true and that the plastic cover is straight too, especially wherever it's touching the bonnet.
Take the whole cover off too and check all the surface are true and that the plastic cover is straight too, especially wherever it's touching the bonnet.
CJ,
tried taking the cover off,didn't completely succeed,as the screw which is no.4 in the photo on the right side of the cover is completely stuck on,the left one came off easily but the right one,won't budge.
any ideas how to remove it?also,something silly what sort of a screw-driver do you use to remove the screws (no.5 in photo)?
thanks in advance.
tried taking the cover off,didn't completely succeed,as the screw which is no.4 in the photo on the right side of the cover is completely stuck on,the left one came off easily but the right one,won't budge.
any ideas how to remove it?also,something silly what sort of a screw-driver do you use to remove the screws (no.5 in photo)?
thanks in advance.
navid.v said:bump
I do have real work to do sometimes

You need torx drivers for these 'screws' I'm sure witht heh correct tools they will come out easily
I removed this plastic panel yesterday as my radiator was leaking (being replaced as I type). Regarding those torx bolts left and right (No.4) I had to put pliers on my torx driver to turn them because they were really stuck in there. Try some WD40 and leave it to penetrate for 5-10 mins before trying.
I also rounded off a few of the plastic screws and had to use pliers to turn them. Going to replace them all with new ones I think.
I know this might be obvious but it caught me out, don't forget to take out the plastic lugs and screws (No. 5). At first I thought the lug was part of the panel.
I also rounded off a few of the plastic screws and had to use pliers to turn them. Going to replace them all with new ones I think.
I know this might be obvious but it caught me out, don't forget to take out the plastic lugs and screws (No. 5). At first I thought the lug was part of the panel.
Col_B said:I removed this plastic panel yesterday as my radiator was leaking (being replaced as I type). Regarding those torx bolts left and right (No.4) I had to put pliers on my torx driver to turn them because they were really stuck in there. Try some WD40 and leave it to penetrate for 5-10 mins before trying.
I also rounded off a few of the plastic screws and had to use pliers to turn them. Going to replace them all with new ones I think.
I know this might be obvious but it caught me out, don't forget to take out the plastic lugs and screws (No. 5). At first I thought the lug was part of the panel.
I'd buy some quality torx sockets as they do a much better job that the bent wire versions. Halford professional range has them as individual or various sizes in some sets
The plastic screws are push in so don't unscrew - just lift the cover and they pop out


Interesting, mine are definitely screws, with threads, with posi heads.The plastic screws are push in so don't unscrew - just lift the cover and they pop out
Col_B said:Interesting, mine are definitely screws, with threads, with posi heads.The plastic screws are push in so don't unscrew - just lift the cover and they pop out
You can never be sure what's fitted over the lifetime of a car as anything in the parts bin gets fitted over time for repairs. Mine may or may not be oem as yours may or may not be. Certianly those on mine look like screws, have a posidrive head but are actually concentric gripping rings to push into the cross member.