Broken cupholder - passenger side

z4pilot

Senior member
Lytham, Lancs
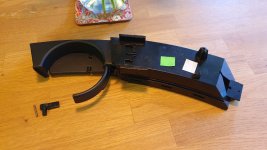
Managed to get round to replacing my defective passenger side cupholder this afternoon. The arm was no longer adjusting. No good to me, but given the recent posts with folk 3D printing replacement bits, it might be of use to someone?

Free to anyone that wants it for a small donation to the forum?

The end plate with the embossed drink icon isn't included, but the broken bits are :)
 

Attachments

  • 20200524_184859.jpg
    20200524_184859.jpg
    202.8 KB · Views: 805
z4pilot said:
Jeez that was quick! PM me your details and I'll post it :thumbsup:

Haha have been subscribed to this forum waiting for this ad for a couple weeks. Seeing every notification is a bit of a pain in the butt though 😂
 
Tommo61 said:
I've got that problem! The ratchet stopped working. Did you investigate fixing it?
No... I've had the replacement for a while so lockdown was the excuse for eventually swopping it over. The broken bit can be seen in the above photo. Looks to me like it was a case of plastic fatigue - clean break across the arm. Probably they all go that way in the end - needs a better designed part really I think.
 
Tommo61 said:
I've got that problem! The ratchet stopped working. Did you investigate fixing it?

Hi Tommo, there are a few members here, myself included, who would happily 3D print you the part required to fix your cup holder.
Shoot me a PM if you would like me to send one to you.

It is a fairly fiddly job but easy enough as long as you have the correct tools.
Tools required would be a 2mm drill bit and drill, a set of screwdrivers, a set of needle files (to trim the 3d printed part to fit perfectly) and a pair of small pliers.
 
Jfgoldfish said:
Tommo61 said:
I've got that problem! The ratchet stopped working. Did you investigate fixing it?

Hi Tommo, there are a few members here, myself included, who would happily 3D print you the part required to fix your cup holder.
Shoot me a PM if you would like me to send one to you.

It is a fairly fiddly job but easy enough as long as you have the correct tools.
Tools required would be a 2mm drill bit and drill, a set of screwdrivers, a set of needle files (to trim the 3d printed part to fit perfectly) and a pair of small pliers.

Sounds like a good offer! - I haven't had chance to remove it yet to see if there's anything thatcan be rescued, but will have a look over the weekend. :thumbsup:
 
There is a chap here who made a set which 'slot' in and don't require any drilling. This is assuming it's just the arm that's broken. I actually picked up a replacement from him last week. Take a look at his thread here. Might be worth going down this route as it doesn't seem as fiddly, I certainly will be, when I get time. No I'm not lazy, just happen to be lucky enough to continue working :)
 
Hi Tommo, there are a few members here, myself included, who would happily 3D print you the part required
[/quote]

Hi Jason,
The additional parts I need are:

B2E09501-3B1D-4D35-A278-2CDC26F1B3B5.png

#19 x2

1294DFB1-F918-4E3A-9121-1DD028E550EB.png

And

9E1F292D-808F-455B-8FF1-CB5CD6708CE7.png

#8 x2

EEF4E17E-8F83-4AD9-BD28-EB5FA092743D.png


Thank you very much,

Bruce
 
Both 19 and 8 are the same part numbers.

Someone was selling some recently, here https://z4-forum.com/forum/viewtopic.php?f=7&t=119766&p=1713914#p1713914
 
Jfgoldfish said:
kis said:
Both 19 and 8 are the same part numbers.

Thanks kis, I didn't even notice!

Bruce, I will print off a few more of that same part tomorrow and get them in the mail. :thumbsup:

No probs! They're expensive little buggers from BMW.
 
They should be. I thought the only difference was the colour.

I’ve heard some members move the “8” Ones forward to where they are missing “19” as the “8” ones are harder to see from the cabin.
 
Back
Top Bottom