Not to complain or anything, but thus far this great forum has provided me with all the answers I need to deal with any issues with my Z, with loads of advice etc, many of the threads and post being quite old and consequently I’ve not thought it worth adding to. So thanks to all you contributors. However, I been feeling a bit guilty in that I have not been able to contribute any thing worth while, as typically some one has already covered it.
So heres my opportunity.
It’s all about that annoying air bag warning light on the instrument panel. Yeah one of those that will fail the MOT.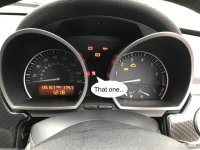
I had previously paid for it to be cleared for an MOT. And that was all they did. Cleared it. It passed, but they couldn’t give me a fault code or any indication as to what it was, but were happy sting me for £25 of course. They did offer to bodge it by soldering in a resistor to fool the on board system into thinking it was ok, but I’d rather the air bags worked.
The red light did return a few months later, by which time I had bought my own OBD II scanner. It revealed that there is an open circuit on the pretensioner on the driver’s seat belt. Apologies I forgot to document this before I set about replacing the seat belt buckle/pretensioner assembly.
I decided to order a seat belt pretensioner from a breaker on eBay for £38.99. My thinking was that there is an issue with the firing circuit.
Replacing it involves removing the respective seat. It’s not a bad job, it took me less than an hour.
A couple of things to note before you start:
If you are sourcing a used part, make sure it comes with the yellow harness connector. (That’s not my choice in carpet…)
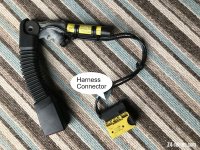
It will be easier to remove the seat with the roof down, so check the weather before you start. Coupe owners may want another helping pair of hands on standby.
For reference, my Z is a 2003 3.0i, with factory fitted electrically adjustable heated seats. These are not the sport seats, so may differ.
Also, do excuse my terminology if not correct, I hope the images help explain what I am referring to.
Removing the seat is fairly straight forward, so I have not covered this, though I will add that making sure it is in the “leaning forward” position before disconnecting the connector (if you have power adjusted seats), as this helps remove and refit and you cant obviously adjust them afterwards.
Once you have the seat out, you will need to remove the main wiring harness connector from the frame. Viewed from under the bracket it’s mounted to, there are 2 clips, squeeze these towards each other and the harness connector will slide off.
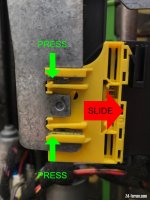
If you have electric adjustable and heated seats you will notice there are 4 sets of wires, while the replacement unit only has 2. Don’t panic, the existing wiring is very easy to add to the new harness connector. At one end, there is a clip on either side, if you push these up, the black retaining clip will slide out of the yellow housing. If you have 3 hands this will be easy. One this is removed, 3 of the sub-connectors will come away easily. (And that carpet doesn’t get any better close up)
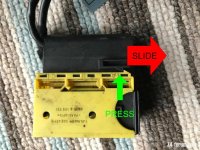
Note the pyrotechnic pretensioner wires do not come out form the yellow housing, and the other pair of wires connect directly in to the seat belt fastener. If you source a 2nd hand pretensioner, make sure you get the main yellow harness connector with it, or you’ll need to cut and rejoin the wires.
There is also a cable clip, squeeze the prongs on the underside of the bracket together to release it, and remove the wires, this can be reused.
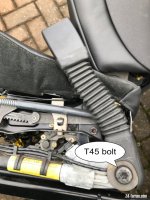
The seat belt tensioner is secured to the seat frame with a single T45 Torx bolt. (Actually T45 may have been a size too small, but it was the biggest I have. The bolt came undone without too much effort).
Fit the replacement belt tensioner, with a spot of thread lock on the bolt.
Reassemble the harness connector, the sub connectors and yellow housing are abled A, B and C, slide the black retaining clip back in, clip the whole harness connector to the bracket, and reuse the cable clip to secure the cables.
The seat is ready to refit. This is a good opportunity to get in there with the vacuum cleaner first though.
In the true spirit or a well know producer of maintenance manuals, reassembly is the reverse of disassembly. Remember to reconnect the harness, it won’t go all the way in until the black retaining clip is pushed in.
It is worth working out which way the twist in the seat belt goes before feeding it back through the guide at the top of the seat, and reattaching it to the seat frame. I did this by putting seat belt clip into the new buckle, and pulling the anchor into position. Once satisfied that there is no unwanted twist, I put the bolt back in and tightened it up.
Once it was all back together I ran an error code scan, (many more to sort out) and cleared it. So far so good, here’s hoping that’s where the fault was. I shall update if the fault reoccurs, thus suggesting the replacement hasn’t solved this issue.
I hope this is of use to anyone with this problem thinking of going down this route to solve it.
Cheers.
So heres my opportunity.
It’s all about that annoying air bag warning light on the instrument panel. Yeah one of those that will fail the MOT.

I had previously paid for it to be cleared for an MOT. And that was all they did. Cleared it. It passed, but they couldn’t give me a fault code or any indication as to what it was, but were happy sting me for £25 of course. They did offer to bodge it by soldering in a resistor to fool the on board system into thinking it was ok, but I’d rather the air bags worked.
The red light did return a few months later, by which time I had bought my own OBD II scanner. It revealed that there is an open circuit on the pretensioner on the driver’s seat belt. Apologies I forgot to document this before I set about replacing the seat belt buckle/pretensioner assembly.
I decided to order a seat belt pretensioner from a breaker on eBay for £38.99. My thinking was that there is an issue with the firing circuit.
Replacing it involves removing the respective seat. It’s not a bad job, it took me less than an hour.
A couple of things to note before you start:
If you are sourcing a used part, make sure it comes with the yellow harness connector. (That’s not my choice in carpet…)

It will be easier to remove the seat with the roof down, so check the weather before you start. Coupe owners may want another helping pair of hands on standby.
For reference, my Z is a 2003 3.0i, with factory fitted electrically adjustable heated seats. These are not the sport seats, so may differ.
Also, do excuse my terminology if not correct, I hope the images help explain what I am referring to.
Removing the seat is fairly straight forward, so I have not covered this, though I will add that making sure it is in the “leaning forward” position before disconnecting the connector (if you have power adjusted seats), as this helps remove and refit and you cant obviously adjust them afterwards.
Once you have the seat out, you will need to remove the main wiring harness connector from the frame. Viewed from under the bracket it’s mounted to, there are 2 clips, squeeze these towards each other and the harness connector will slide off.

If you have electric adjustable and heated seats you will notice there are 4 sets of wires, while the replacement unit only has 2. Don’t panic, the existing wiring is very easy to add to the new harness connector. At one end, there is a clip on either side, if you push these up, the black retaining clip will slide out of the yellow housing. If you have 3 hands this will be easy. One this is removed, 3 of the sub-connectors will come away easily. (And that carpet doesn’t get any better close up)

Note the pyrotechnic pretensioner wires do not come out form the yellow housing, and the other pair of wires connect directly in to the seat belt fastener. If you source a 2nd hand pretensioner, make sure you get the main yellow harness connector with it, or you’ll need to cut and rejoin the wires.
There is also a cable clip, squeeze the prongs on the underside of the bracket together to release it, and remove the wires, this can be reused.
The seat belt tensioner is secured to the seat frame with a single T45 Torx bolt. (Actually T45 may have been a size too small, but it was the biggest I have. The bolt came undone without too much effort).

Fit the replacement belt tensioner, with a spot of thread lock on the bolt.
Reassemble the harness connector, the sub connectors and yellow housing are abled A, B and C, slide the black retaining clip back in, clip the whole harness connector to the bracket, and reuse the cable clip to secure the cables.
The seat is ready to refit. This is a good opportunity to get in there with the vacuum cleaner first though.
In the true spirit or a well know producer of maintenance manuals, reassembly is the reverse of disassembly. Remember to reconnect the harness, it won’t go all the way in until the black retaining clip is pushed in.
It is worth working out which way the twist in the seat belt goes before feeding it back through the guide at the top of the seat, and reattaching it to the seat frame. I did this by putting seat belt clip into the new buckle, and pulling the anchor into position. Once satisfied that there is no unwanted twist, I put the bolt back in and tightened it up.
Once it was all back together I ran an error code scan, (many more to sort out) and cleared it. So far so good, here’s hoping that’s where the fault was. I shall update if the fault reoccurs, thus suggesting the replacement hasn’t solved this issue.
I hope this is of use to anyone with this problem thinking of going down this route to solve it.
Cheers.