You are using an out of date browser. It may not display this or other websites correctly.
You should upgrade or use an alternative browser.
You should upgrade or use an alternative browser.
What have you done to your car today?
- Thread starter Buckz
- Start date
- Featured


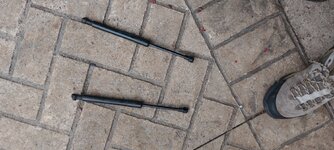
New boot struts fitted £10 off eBay delivered in 3 days
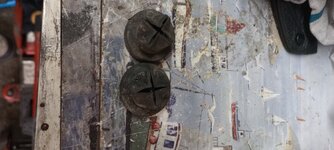
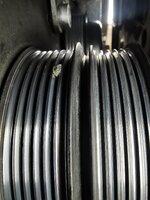
Also cleaned the roof motor drain and the drivers side both slow to drain removed thr rubber drain end caps and flushed from underneath with an airline then rinsed from the top did get debris out both now free flowing. Roof motor got to be Relocated to the boot.
M
Also cleaned the roof motor drain and the drivers side both slow to drain removed thr rubber drain end caps and flushed from underneath with an airline then rinsed from the top did get debris out both now free flowing. Roof motor got to be Relocated to the boot.
M
Attachments
Last edited:


 problem solved.
Got to love a RoyalsHad been planning this for a while but managed to justify it with woman-maths when Royals sent me the quote; got the tattier of the M-Sport steering wheels I own retrimmed in black alcantara (with a grey stitch to match the dashboard and add contrast to the black). Super happy with it.View attachment 282006
This also means I have another M-Sport wheel going spare, if anyone's after a bit-tatty-but-passable bare wheel then let me know.

That's typical!
At least you've got the 3 Series to jump start it - I just hope it doesn't throw up random warning lights like mine did.
I got lucky... I have a 50 metre extension lead, it was dry, I charged the battery for four hours and she fired up first time with no new ;-) warning lights.

Installed a budget cruise control system in my Z4 using the wealth of info available on this forum. The install was fairly involved given that I have a facelift car. Step 1 was to connect into the IVM, used the following guide to identify the correct pin hole;

Then I soldered a long extension wire to take me through the network of pipes, through the bulkhead, then across to the driver's side, where I also removed the cowl under the steering wheel. I then implemented this suggestion to use an E39 steering wheel mounted cruise control module, hence the "budget" aspect. Z4 cruise control stalks are expensive!
I got the part below for £30 from a breaker on eBay;

Of the 4 wires coming out the back, 3 are useful according to this E46 forum;

 www.e46fanatics.com

Wire B was connected to my long extension wire going to the IVM. Then began the scary process of splicing into the bundle of cables behind the headlight switch to obtain Ground (Wire A) and Power (Wire D). I used this YouTube video to help identify which wires to tap into;
I very gingerly sliced the insulation off these 2 wires;

Then started soldering;

Plugged into the module and cable tied everything up for its first test;

This isn't the final appearance; I need to tidy this up, connect it to a stalk etc. It works like a dream; long journeys are now infinitely more pleasant. It was absolutely worth the time, swearing and skinned knuckles.
Guys
Ive scoured this forum and cannot find a definitive answer to this
Which pin number on the DME do i connect the wire for my cruise control retrofit?
I have the n52 engine (3.0si) and everything else has been fitted.
The blue/black wire comming from the main harness is in the DME area and i have cut that to connect on the BLACK 6" cable as per instructions.
However, this is where the confusion comes in - is it pin 39 or 26??? Both sets of instructions say different things...
HELP!
Cheers
Jamie
- jamiez
- Replies: 83
- Forum: E85 / E86 Z4 discussion
Then I soldered a long extension wire to take me through the network of pipes, through the bulkhead, then across to the driver's side, where I also removed the cowl under the steering wheel. I then implemented this suggestion to use an E39 steering wheel mounted cruise control module, hence the "budget" aspect. Z4 cruise control stalks are expensive!
With the price of the cruise control stalk going up a lot in recent years I decided to look into options to make our own cruise control stalks.
I was browsing the internet and found a forum where members with E46's have used the Z4 stalk on their cars when they have changed the steering wheel to a custom one.
So I thought, if the Z4 stalk works on an E46 then it'll work the other way. However the cruise on an E46, E39, X3 etc... looks like this:


A couple of wires need swapping round so I made up an extension lead and connected it up to...
I was browsing the internet and found a forum where members with E46's have used the Z4 stalk on their cars when they have changed the steering wheel to a custom one.
So I thought, if the Z4 stalk works on an E46 then it'll work the other way. However the cruise on an E46, E39, X3 etc... looks like this:
A couple of wires need swapping round so I made up an extension lead and connected it up to...
- Usel
- Replies: 13
- Forum: E85 / E86 Z4 discussion
I got the part below for £30 from a breaker on eBay;
Of the 4 wires coming out the back, 3 are useful according to this E46 forum;
DIY: Dash-mounted cruise control buttons
If you want cruise Control without stuffing around trying to remove airbags or changing steering wheels, it is possible! Ive managed to get the cruise control retrofit modification to work on my 316ti with the cruise controlbuttons mounted on the dash. A little bit of background….. In Australia...
Wire B was connected to my long extension wire going to the IVM. Then began the scary process of splicing into the bundle of cables behind the headlight switch to obtain Ground (Wire A) and Power (Wire D). I used this YouTube video to help identify which wires to tap into;
I very gingerly sliced the insulation off these 2 wires;
Then started soldering;
Plugged into the module and cable tied everything up for its first test;
This isn't the final appearance; I need to tidy this up, connect it to a stalk etc. It works like a dream; long journeys are now infinitely more pleasant. It was absolutely worth the time, swearing and skinned knuckles.
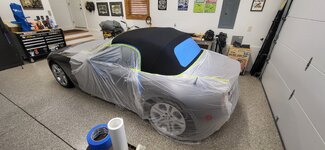
Spent a few hours each day over the last few days trying to get the old paintwork on this 150,000 mile car to look somewhere near decent . Still have loads of stone chips that need filling properly and a botched paint repair on the rear bumper to sort out but they will have to wait for another time as my back has had it 
For some reason the 2nd photo has been turned upside down from original but I cant see a way of rotating it back on forum . Will report to Mods .


For some reason the 2nd photo has been turned upside down from original but I cant see a way of rotating it back on forum . Will report to Mods .
Last edited:
 Rotterdam
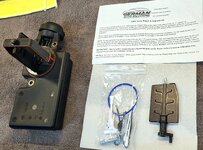
Installed my CarpodGo T3 yesterday. After buying a spare air vent I could drill into, I designed a little adapter for the magnet that fits perfectly in/on the vent. Long screw from inside the vent to the magnet base holds everything in place. Power is supplied via a piggyback fuse which powers the unit on and off when ignition is turned on or off. The cable is routed internally and comes out the vent (drilled a small hole in the side of the vent to allow it to pass through, while still allowing the vents to close fully if needed).
Since I had a nice vent mounted wireless magnetic charger for my phone before I did this, I trimmed down the back of the charger and mounted it on the transmission tunnel on the passenger side. Nice and out the way, and gives me easy access to attach it and ensures my phone still charges.
Overall I’m very happy with the look, everything, including vent controls, is reachable and usable. The unit itself performs flawlessly, as you would expect from a CarPlay device, AND its fully removable should I want to stow it for a bit.
And what’s an install post without pictures!
Last edited:
And what’s an install post without pictures!
(I dont know why they’re upside down
There is a bug in the system at the moment so have been informed to insert image from top tool bar rather than attach files
Thanks, fixed!There is a bug in the system at the moment so have been informed to insert image from top tool bar rather than attach files
I have the MINIX version of this being delivered today (essentially the same device spec-wise).Installed my CarpodGo T3 yesterday. After buying a spare air vent I could drill into, I designed a little adapter for the magnet that fits perfectly in/on the vent. Long screw from inside the vent to the magnet base holds everything in place. Power is supplied via a piggyback fuse which powers the unit on and off when ignition is turned on or off. The cable is routed internally and comes out the vent (drilled a small hole in the side of the vent to allow it to pass through, while still allowing the vents to close fully if needed).
Since I had a nice vent mounted wireless magnetic charger for my phone before I did this, I trimmed down the back of the charger and mounted it on the transmission tunnel on the passenger side. Nice and out the way, and gives me easy access to attach it and ensures my phone still charges.
Overall I’m very happy with the look, everything, including vent controls, is reachable and usable. The unit itself performs flawlessly, as you would expect from a CarPlay device, AND its fully removable should I want to stow it for a bit.
And what’s an install post without pictures!
I will want to do something similar with the power, can you tell me what you hooked it up to please?
@Hyperion.uk
Used a piggyback fuse from a dashcam kit which also included the 12v to 5v3a converter plus a handy USB-C plug and all necessary wiring ends and odds. I can look up which kit I used if you want. I used fuse 6 or 7 (I forgot which one, but doesn’t matter much). Reason for those is that they’re switched, whereas 5 for instance is always ‘hot’.
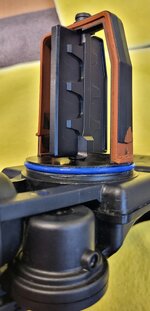
Everything is routed internally from the fusebox behind the radio to the side of the air vent. The only thing sticking out from necessity is the plug with a bit of wire, like below. Also shows the unit removed and what’s left when it is.


Bonus side view:

Used a piggyback fuse from a dashcam kit which also included the 12v to 5v3a converter plus a handy USB-C plug and all necessary wiring ends and odds. I can look up which kit I used if you want. I used fuse 6 or 7 (I forgot which one, but doesn’t matter much). Reason for those is that they’re switched, whereas 5 for instance is always ‘hot’.
Everything is routed internally from the fusebox behind the radio to the side of the air vent. The only thing sticking out from necessity is the plug with a bit of wire, like below. Also shows the unit removed and what’s left when it is.
Bonus side view:
Last edited:
3002 tii
Active member
@Hyperion.uk
Used a piggyback fuse from a dashcam kit which also included the 12v to 5v3a converter plus a handy USB-C plug and all necessary wiring ends and odds. I can look up which kit I used if you want. I used fuse 6 or 7 (I forgot which one, but doesn’t matter much). Reason for those is that they’re switched, whereas 5 for instance is always ‘hot’.
Everything is routed internally from the fusebox behind the radio to the side of the air vent. The only thing sticking out from necessity is the plug with a bit of wire, like below. Also shows the unit removed and what’s left when it is.
Do you recall which fuse you tapped into? I recall tapping into an 'ignition on' only fuse (and I can clearly see the device power off) when the car is off. But I'm still dealing with some parasitic loss from my dashcam.
Yes, fuse 6 or 7. Both would work. I think I went for 7 as that’s a 5A one, which is enough for my purposes.Do you recall which fuse you tapped into? I recall tapping into an 'ignition on' only fuse (and I can clearly see the device power off) when the car is off. But I'm still dealing with some parasitic loss from my dashcam.
Attached a fuse chart I found here once, might come in handy!