Making the MOT man happy

Matty_Z4

Member
Having had a couple of years of trouble free motoring with the only trips to the specialist for a service MOT and a general look over the time has come to get my hands dirty. The MOT this year was a little less and satisfactory lets say.

Monitor and repair if necessary (advisories):
  • Nearside Front light lens cracked (DONE)
  • Rear Coil spring corroded o/s and n/s (5.3.1 (b) (i)) (DONE)
  • Nearside Rear Lower Suspension arm pin or bush worn but not resulting in excessive movement outer bush (5.3.4 (a) (i))
  • Offside Rear Lower Suspension arm pin or bush worn but not resulting in excessive movement outer bush (5.3.4 (a) (i))
  • Front Brake disc worn, pitted or scored, but not seriously weakened o/s and n/s scored (1.1.14 (a) (ii)) (DONE)
  • Nearside Front Tyre slightly damaged/cracking or perishing cracking outer and treads (5.2.3 (d) (ii)) (DONE)
  • Offside Front Tyre slightly damaged/cracking or perishing cracking outer and treads (5.2.3 (d) (ii)) (DONE)
  • Nearside Front Brake hose slightly deteriorated (1.1.12 (b) (ii)) (DONE)
  • Offside Front Brake hose slightly deteriorated (1.1.12 (b) (ii)) (DONE)
  • Offside Front Brake pipe corroded, covered in grease or other material corroding (1.1.11 (c)) (DONE)
  • Nearside Rear Shock absorbers has light misting of oil (5.3.2 (b)) (DONE)

I had my specialist do the rear shocks and springs and that started my saga as no one would touch the alignment for (rear toe) for rear of snapping the RTAB bolts so I decided it was finally time to get my hands dirty and go for a crawl under the car and see how bad things really are.

After a bit of a late night shopping spree I decided it would probably be a good idea to start with something easy and hard to mess up like the rear ARB bushes so off to that I go, What a pain in the ass those 13mm bolts are for the brackets.
Old ARB Bushes and Brackets with a splash of rust converter to make them shiny again.
IMG_4778.jpeg
IMG_4779.jpeg

Next lets take a look at those pesky RTABs and see if the wheel alignment guy was being over dramatic about snapping bolts(Will gives you a clue he was They were crusty but not anything to write home about IMO)

Old nasty RTAB and crusty trailing arm you can see the "nasty" bolts on the floor the shafts are still very clean the heads were just a bit flakey but nothing a bit of lube and a tickle with a breaker bar didn't sort out.
IMG_4780.jpeg

After a light wire wheel and a cup of tea and bang the bushes are in but not without injury, somehow I had my drill on reverse and managed to wire wheel my hand :( Anyway shines new Powerflexy things.
IMG_4784.jpeg
IMG_4783.jpeg

Finally a nice close up of the old worn bushes carriers and bolts, I replaced the lot so not to give the alignment place any chance to say no. I ended up taking it to BMW for an alignment in the end and they came back with their own hit list of things to look at. Check out all of the rust flakes on the floor.

IMG_4790.jpeg
IMG_4787.jpeg

BMW came back with the following list.

  • Slight weep from Oil sump
  • Missing front engine splash plate
  • Missing gearbox splash shield
  • slight leak from washer pump ( I thought I was using screen wash very quickly even in the winter with all the salt)
  • Front brake pads have 5mm left (minimum is 3mm)

So that's not too bad of a hit list but the more I poke around the more I find and the never ending repairs start.

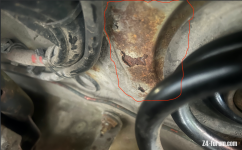
Final picture for this post how scary is this rust scab? Is it something I can paint with rust converter or do I need to speak to someone.
IMG_4786.jpeg
 
The next adventure under the car was to fit some more shiny purple things up front

Old vs New, the old ones didn't look too bad but I have shiny purple things so lets do it.
IMG_4829.jpeg

Brackets cleaned up.
IMG_4830.jpeg
IMG_4831.jpeg
IMG_4832.jpeg

And the new Bushes fitted with a liberal helping of lube.
IMG_4835.jpeg
IMG_4836.jpeg
IMG_4833.jpeg
 
What do you think of my crusty bits?

While crawling under the front doing the ARB I had a look and confirmed there is a "slight misting of oil" around the sump and also appears to be a small leak around the transmission cooler so I am going to clean both of those off when I fit the new engine undertray I have purchased and monitor to see if they come back.

Engine underside (What do you think). Anything to look at while im in here?
IMG_4837.jpeg

Missing gearbox splash shield and crusty exhaust. Again anything to be alarmed about? Does anyone have a picture of the cover I am missing here and maybe a part number? Real OEM doesn't show a part number.
IMG_4838.jpeg

Nasty brake pipes (Both front look like this) I think the rears have been done if you look at one of the pictures in the first post you can see a shiny bit of copper but I need to inspect those.
IMG_4842.jpeg
IMG_4843.jpeg

Finally the attack of the mice, :( Any options for something to spare on the firewall to keep them from stealing it to make a nest.

IMG_4844.jpeg
IMG_4845.jpeg
IMG_4846.jpeg
 
Next on the list is the brakes, so I have popped into BMW to see if I could order some pre bent brake lines for the front. The guy at the parts basically said don't bother they are steel and come in a roll the only benefit is they come pre flared and with a black coating your better off doing it in copper. He then happily sold me 1 litre of brake fluid and the retaining clips that look rusty AF in the my last post.

I then remembered there was all this talk of Cunifer on this forum and if you stand in the mirror and say Cunifer 3 times after midnight he will come and repair your brakes. Unfortunately I tried that and Cunifer didn't come to fix my car. So it is time to ask the Amazon fairy to delivery me some shiny bits. So in typical Matt fashion buy now and ask if it is the right stuff later hopefully you guys will give me the thumbs up and not haze me too bad :P

Cunifer Pipe 3/16" by 25ft (Do we not use metric these days)
https://www.amazon.co.uk/gp/product/B00CRGGTX2/ref=ppx_yo_dt_b_asin_title_o00_s00?ie=UTF8&psc=1

Bendy thing, Straighty Thing and Cutty Thing
https://www.amazon.co.uk/gp/product/B00392X7X8/ref=ppx_yo_dt_b_asin_title_o01_s00?ie=UTF8&th=1
https://www.amazon.co.uk/gp/product/B09NC8M52C/ref=ppx_yo_dt_b_asin_title_o01_s02?ie=UTF8&psc=1
https://www.amazon.co.uk/gp/product/B000LFVCKQ/ref=ppx_yo_dt_b_asin_title_o01_s02?ie=UTF8&psc=1

Flaring tool SAE and DIN (Got both as I have seen conflicting advice I think I want the DIN side)
https://www.amazon.co.uk/gp/product/B0B6GJM1CW/ref=ppx_yo_dt_b_asin_title_o02_s00?ie=UTF8&psc=1

M10 and M12 male brake unions, I got both as it seems the DSC pump side is a M10 and the brake hose size is a M12
https://www.amazon.co.uk/gp/product/B07NPVBLJD/ref=ppx_yo_dt_b_asin_title_o02_s00?ie=UTF8&psc=1
https://www.amazon.co.uk/gp/product/B07NPRSY2R/ref=ppx_yo_dt_b_asin_title_o02_s00?ie=UTF8&psc=1

Stainless Brake hoses (Yep I ordered them before I see everyone on here raving about HEL lines)
https://balancemotorsport.co.uk/6-line-stainless-goodridge-braided-brake-hose-kit-bmw-z4-3-0-se-2003-2005-sbw0970-6c-1646.html

Brake Paint for Callipers
https://www.amazon.co.uk/dp/B07NZ5LBCG?psc=1&ref=ppx_yo2ov_dt_b_product_details

I got a pressure bleeder and a K Dcan cable so I can bleed the ABS pump with ISTA and make sure I dont have any air. Will 1 litre of brake fluid be enough to do this job?
https://www.amazon.co.uk/dp/B081HD3CNB?psc=1&ref=ppx_yo2ov_dt_b_product_details
https://www.amazon.co.uk/dp/B09DD4F84Q?psc=1&ref=ppx_yo2ov_dt_b_product_details

Im not going to do discs and pads yet as the above little lot should take me long enough and the front pads and discs have at least another couple of 1000 miles left in them so will keep monitoring them before swapping them out.

Have I missed anything on my shopping list or anything that you have seen in the pictures above that is worth me looking at next.


Also I have a Map Thermostat error code stored in the fault memory but no lights on the dash and the temperature gauge stays in the middle. How urgent/critical is it that I get that sorted and how much of a PITA is it to change, Do I do the water pump at the same time The Rad and Expansion tank have already been done. Im thinking of sorting the thermostat after the brakes as I quite enjoy being able to stop my car.
 
Interesting information, keep it coming, I have these jobs coming down the pipe next year, so helpful info. Thanks :thumbsup:
 
From experience with MX5s, grind the rusty bits with a wire brush attachment, and wear garden gloves! Clean, then place rust converter. Allow it to dry before you coat it with good-quality paint. Never place underseal, the MOT man will make a note of it. Then once a year check for any further rusting and treat it accordingly.
 
Thanks guys, should I bother videoing any of my repairs for you or just keep it to a photo blog?

raymond.harper said:
From experience with MX5s, grind the rusty bits with a wire brush attachment, and wear garden gloves! Clean, then place rust converter. Allow it to dry before you coat it with good-quality paint. Never place underseal, the MOT man will make a note of it. Then once a year check for any further rusting and treat it accordingly.

How far would you go in peeling back the OEM underseal that is flaking would you just do what is inside of the red circle or would you poke around further? I have been watching too much Readish Motorsport and one thing that keeps coming up is that the rust can be much further than you think under the OEM underseal once it has been breached like this.
Also how would you seal any of the OEAM underseal that will be disturbed by the wire wheeling and paint again from Readish Motorsport the underseal has a bit of capillary action and can draw the moisture in like it appears to have done near the main scab. Most of what is in the picture looks like stained underseal with the main scab being in the centre but i dread to see what is underneath the stained underseal.

Also I assume as I would need to take the spring off to access the bit near the spring pad would I need to do a wheel alignment again I assume so.

When you say dont underseal as the MOT man will make a note do you mean dont hide the corrosion with black shmoo (Dinitrol, Waxiol) treat it with a converter and paint.
 

Attachments

  • Screenshot 2023-04-23 at 12.02.35.png
    Screenshot 2023-04-23 at 12.02.35.png
    1.1 MB · Views: 1,600
When I cleaned up all my brake lines I sprayed them with white grease, which doesnt wash of easily. I get an MOT advisory that brake lines are covered with oil or similar and cannot be properly inspected. MOT inspector said it was a good idea to spray every few years and live with the advisory.
 
Just waiting for the stainless brake hoses and a good few days where I can tackle this job. But in the mean time all of the other parts are here so I have had a bit of practice with the flare tool before I have to do it for real. I have found that with the tool I bought you really have to make sure everything is aligned and square or it doesn't flare right. You also need to make sure there is plenty of grease on the tool and threads to make sure its nice and easy. Less grease means a bad flare or so it seems.

Any further tips on ensuring I get a good and consistent flare would be awesome thanks in advance.

One slight annoyance is the Brake unions are just Steel, not sure if they are coated as they are extra shiny, but I was expecting them in that gold zinc passivate finish. Hopefully a nice serving of grease after assembly will stop them from rusting in the future.

The Reject pile
IMG_4886.jpeg
IMG_4887.jpeg

Nice looking flare, Does this look ok to you guys?

IMG_4888.jpeg
IMG_4889.jpeg

When it comes time to assemble what grease would you put on the pipe underneath the fitting (not on the flare) but between the union and the pipe to stop the union corroding swelling and then binding onto the pipe. Is the White Lithium grease that Mike mentioned the best for this?

IMG_4891.jpeg
 
Still not started the brakes yet, its more of a bigger job than I expected as it looks like I may need to do the rear ones also. But I ddi manage to get to work on the car today. I have recently had a MAP Thermostat Control 00279C error code flash up recently as the thermostat has not been replaced in my ownership and I decided to just give it a go and swap out the thermostat and do a partial coolant change.

No pics of the thermostat fitting its pretty uneventful, remove the top radiator cover, remove the fan, Open the bottom radiator drain, Remove radiator cap and bleed screw, slacken off the engine lifting eye, remove the coolant hoses, undo the 4 bolts, remove, clean engine face with green scotchbrite, then refit everything as you found it while loosing your 10mm down inside the front bumper (If you do this you can find it inside of the foglight hole if your lucky you can reach it from the bulb changing flap. )
Oh and dont forget to refill and bleed the coolant.

I should have recorded my bleeding the system as Im not sure I did things quite to the letter, I used one of those magic funnels that you screw onto where the radiator cap goes and has a little valve in the funnel neck so you can control the flow into the radiator. So I screwed that on and removed the bleeder screw. 3L of BMW coolant then water till the bleed screw was running with no air, started her up and left her idling until the temperature got to the middle (Watching the ODB temperature also to make sure things dont get too hot.) Once the engine "felt" warm enough "Guage in the middle" and ODB reading around 80c. I then increased the revs to between 1500 - 2000rpm to bring up the temperature more, I saw the stat open and left it idle a little longer and some bubbles started burping out of the funnel (winner) So I leave it idle some more while I have a good old cuppa, Bring the revs up and watch the coolant temp and when it gets to 100c I put it back down to idle and this is where I think I did bad the coolant boiled and the funnel filled up. I opened the bleeder and it burped out loads of air closed the bleeder when it ran clean again, idled longer and did the rev thing once more it boiled again but i was ready for it had the funnel valve had shut so it didn't go everywhere but could still burp out air. Vented he bleed screw again. Left it idle more until I saw no more air bubbles venting in the funnel. cleaned up my mess and put the coolant back on.


Good news is, old coolant looks pretty clean :) so another win. Just need to figure out where to get rid of the coolant responsibly as the internet just says sod it and flush it down the loo which does not seem very responsible. Im hoping Halfords will take in used coolant and dispose of it or at lest tell me where I can take it to be recycled.
 

Attachments

  • IMG_4938.jpeg
    IMG_4938.jpeg
    61.1 KB · Views: 1,368
Your local plant will be processing a bajillion litres of stuff a week so, in the grand scheme of things, a gallon of coolant in the waste water system is neither here nor there.

Good looking pipe flares. Tricky to get good ones with the cheapy DIY tools (I found many years ago) but good enough to work and get thru the MOT!
 
smorris_12 said:
Your local plant will be processing a bajillion litres of stuff a week so, in the grand scheme of things, a gallon of coolant in the waste water system is neither here nor there.

Good looking pipe flares. Tricky to get good ones with the cheapy DIY tools (I found many years ago) but good enough to work and get thru the MOT!

I ended up taking the coolant to Halfords (with Autocentre next door) and they were happy to dispose of it safely. Also I rate Halfords Advanced tools they repacked my broken Torx bit no questions asked so that is pretty awesome.

I opted to buy a more expensive flare tool as I had read that about the inconstant flares. I have had trouble getting them consistent also as the tool come with no instructions and works a little different to the ones that everyone on youtube seems to be using. I will have to just do a couple of "Warm up" flares when I eventually get to it.
 
Replaced the cracked headlight with a nice shiny one, not quite sure I have the alignment quite correct as there is more of a gap at the bottom of the light but its in and it works :) Also attempted to replace the broken bumper clips but need to find a day when I have more patience.

IMG_4944.jpeg
IMG_4945.jpeg
IMG_4946.jpeg

Does anyone know if my old headlight unit is worth anything to anyone? Is it worth putting up on the for sale section here or sticking it on ebay? It is a fully complete unit including bulbs, back door seals and everything. Only problem is the massive bullseye in the middle of the indicator Previous owner filled it with Silicone but that has failed over the last 5 years until I have finally had to do something about it.

IMG_4959.jpeg
IMG_4960.jpeg
IMG_4961.jpeg
 
I've been practicing for my Xenons with headlight lens removal. So effectively just needs a new lens. It's definitely worth some money even if only a few quid. Best bet is stick it on auction on ebay after getting a postage cost and seeing what it goes for. You'll get at least £20 for it I recon.
 
kis said:
I've been practicing for my Xenons with headlight lens removal. So effectively just needs a new lens. It's definitely worth some money even if only a few quid. Best bet is stick it on auction on ebay after getting a postage cost and seeing what it goes for. You'll get at least £20 for it I recon.

Was hoping someone would say somewhere closer to £100 would be nice to cover off the import tax on the new unit. I may try my luck on ebay for £50 good shout on checking postage before listing.
 
So I have done a bit more fettling today, managed to replace those annoying bumper clips. the new ones from BMW seem to have an extra reinforcement rib in them so had to modify the bumper with a file for them to fit properly.

Bit of a gappy bumper and a wavy clip.
IMG_4964.jpeg
IMG_4967.jpeg

The new clip with the new reinforcement ribs (had fitted it before but couldn't get it to fit right so just left it hence the rust residue on the new clip.

IMG_4975.jpeg

Bumper before modification to fit the new clip.
IMG_4976.jpeg

After a quick blast with a file.
IMG_4977.jpeg

Bumper now fits pretty well and no longer droops wooo!!!!11
IMG_4981.jpeg
IMG_4982.jpeg

Green shmoo is Nutrarust as the wing was getting a little crusty around the holes where the bumper clip attached.
IMG_4972.jpeg
 
I made a start on the brakes and oh my what a pain, things didn't go quite to plan.

So a couple of before pics.
IMG_4989.jpeg
IMG_4994.jpeg

Removed for De-Rusting and painting ( I decided to do a test paint on one calliper first)
IMG_4998.jpeg
IMG_5005.jpeg

Don't bother with Evaporust you need lots of solution to kill heavy rust so works out expensive, Bilt Hamber Deox C seems to be much better. I had the callipers soaking in Evaporust Monday/Tuesday then Wednesday overnight in Deox C as the Evaporust got used up pretty damn quick.
IMG_5008.jpeg

So I managed to break my bloody nipple :( So Drilled it out and tapped it good so far :)
IMG_5009.jpeg

Painted up looking Sexy AF!!
IMG_5013.jpeg

Now this is where things go wrong(I needed the car for the weekend so had to push on even though the paint was soft), after waiting until the next day for the paint to dry it was still a little soft (apparently it takes up to 24 hours to go hard then up to 7 days to fully cure? ) anyway ignoring all that as I needed the car I figured I would just be careful and try not to wreck the paint and if I did I can just touch it up.

Next up someone used too many ugga duggahs on the disc retaining bolt so needed to drill that out :(
IMG_5017.jpeg

And the final result
IMG_5018.jpeg
IMG_5021.jpeg

You think GG looking good!! well the eagle eyed of you may notice a hose clamp in the background of that last picture. Yep my drilled and tapped bleed screw stripped the threads in the calliper :( and leaked brake fluid everywhere when I tried to bleed the brake. So I have had to invoke plan B purchase a replacement calliper from ECP and put it in there and make things work so I can use the car. Then worry about painting them at a later date.
 
So now to finish what I started.

First up was to make a new brake line for the drivers side (start off easy and its the one that the MOT was complaining about.) After all of my practice flaring I have determined that the success of the flare is down to how well you deburr the end and using the correct amount of grease on your tool. TBH after wiping off the flakey paint and scrubbing the old line down with some wire wool it didn't seem too bad but im here now so may was well carry on.
IMG_5026.jpeg

Degrease and throw some rust converter around to pick up any scabby bits around the brackets.
IMG_5027.jpeg

Mated up to the DSC pump just nice :)
IMG_5028.jpeg

New rubber hoses (Didn't do stainless steel in the end but may do in the future)
IMG_5033.jpeg
IMG_5043.jpeg

"New Refurbished" calliper from Euro Car Parts looks pretty pitted compared to the one it replaced (bloody bleeder nipple) you have to be careful with your nipples man!!.
IMG_5031.jpeg

All mounted up nice woo! yay no leaks!!
IMG_5042.jpeg

Mouldy stuff in the brake fluid (Was last changed when I bought the car and then had a small refresh about 3 years ago) was desperately in need of a fluid change (2020/2021 messed up my maintenance routine :() Sucked all the black scum out and bled through using ISTA all happy.
IMG_5032.jpeg

Worn Disc and brake pads looks like I got my moneys worth out of those :)
IMG_5045.jpeg
IMG_5034.jpeg


So I couldn't bleed my rear drivers side brake calliper as the bleed nipple is pretty well rusted up, a 9mm socket is too big but an 8mm is too small the 9mm is just rounding and making things worse.
Having learned my lesson from the first bleeder I broke I have decided to get a set of calipers from ebay, paint them up then fit them to my car. Then the ones that are currently on there I will de-Rust and prime then put them up on ebay as the last thing I need at the moment is to snap that rear bleeder and mess up another calliper without a backup plan.
 
Back
Top Bottom