'06 Coupe ICE Install *Picture Heavy*
Posted: Mon Feb 07, 2011 5:45 pm
So I’ve finally finished my ICE install into m ’06 Coupe; be warned this is rather Image intensive so you can see what I went through and perhaps do yours better the next time round. There are quite a few images missing from this write up however they will be added later today, once I get back home. I’m also going to gloss over the trim removal parts since there’s plenty of guide about that will fill in those blanks, so I will make many assumptions that you know what you’re doing.
Ruby (The car) originally had the business Professional with 6 speaker setup which we all know is lacking in every way, coming from a car with Harman Kardon it was pretty clear that things needed to change, so I purchased the following items from Various places for this upgrade, I’ve added links to each item so you can see details of what they are.
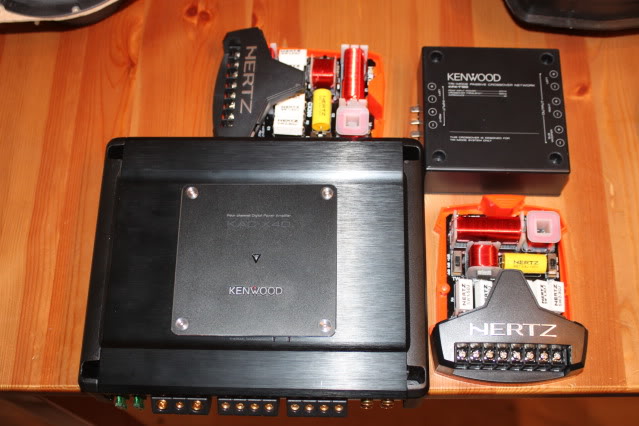
1 x Kenwood KAC-X4D Amplifier (1200W, 4 Channel, Class D) - £275 – Link /[url] 1 x Kenwood KPX-T120 Tri Mode Crossove ... .html]Link
1 x Hertz: ESK163L.3 - 3 way 16.5cm components - £219 – Link /[url] 1 x Hertz: ECX100.3 - 2 way 10cm speak ... .html]Link
2 x Connection by Audison: FT2-550 - 5.5m RCA - £15 each – Link
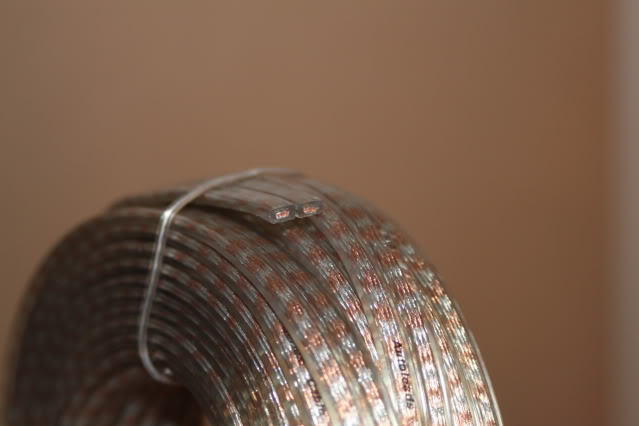
2 x Autoleads: G9-S215-10 - 10m x 1.5mm Flat Speaker Cable - £10 each – Link
2 x Orion Speaker to RCA Converter with Variable Gain – £10 Each – Link Missing
Loads of spade Connectors and Splicers
Here’s some pictures of the stuff:
Components


Amp & Crossovers
Wiring
The aim was to have an install that is completely hidden and fits in the existing confines of the car; I also wanted to get maximum SQ without having thumping bass to chav the car up. Ruby is only little and there’s no need to drown out the rest of the sound with a fat sub, but I also wanted the low frequencies to be pronounced do deliver rich bass into the cabin.
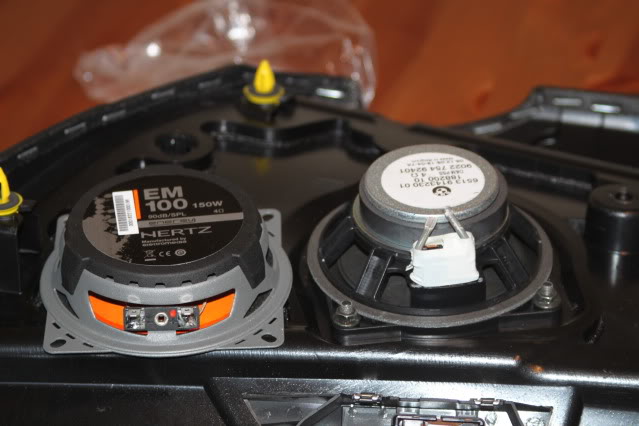
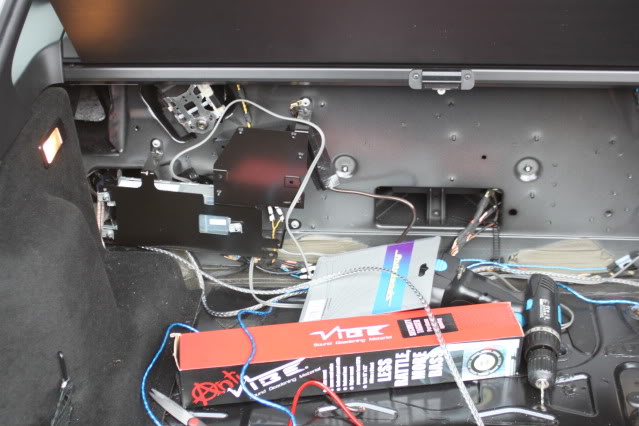
The Amp was selected for its size and value for money and performance; that thing is tiny and has active cooling; and fits into the existing Amp hole as shown below:


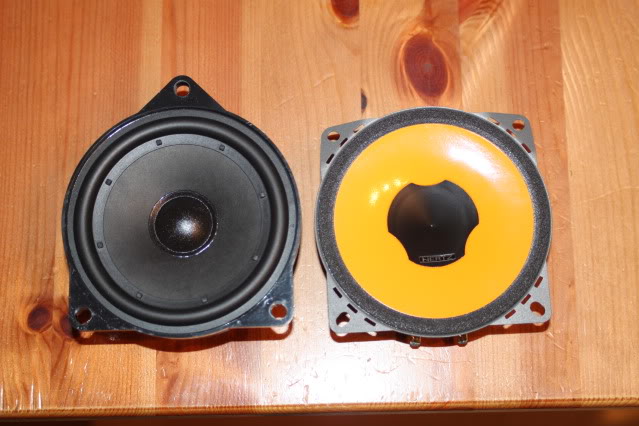
The Hertz components and the 2 way were selected for their size and range of frequency, these are the most important parts so they had to be good; the ECX100’s are basically the 2 way version of the components. I selected to two way to spread the audio range throughout the car; below are size comparisons:
Footwell Woofers


This Image shows the difference in the mounting holds, I’ll come to that in a moment

Door Mids
Tweats
Missing Images
Rear Mids
Missing Images
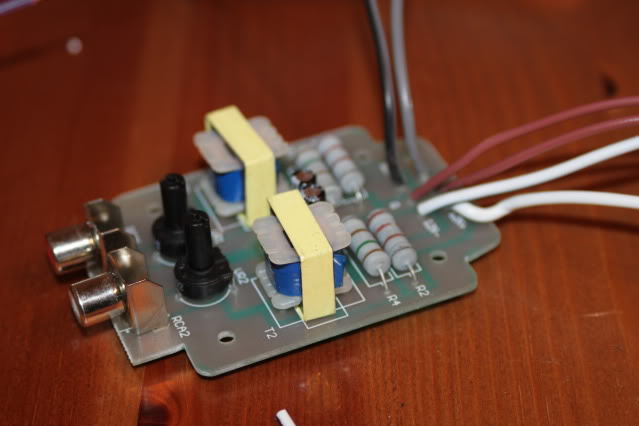
This crossover was selected to drive the JL subs at low frequencies because they can bridge the sub output but deliver full range to the rear; very clever and very rare, there’s maybe 2 on Ebay at the moment; get them while you can.


Ok so now for the fun part.
The new Woofers may be the same size as the stock Woofers, however they cannot be mounted without a little innovation;

They are also different on each side, meaning the driver side has an additional mount, both the woofer are identical, however this mount adds additional depth to allow for a slightly wider speaker cover on the driver’s side to make room for the bonnet release and other stuff.

So I decided to get creative and mimic the stock mounting solution using 3mm MDF.
Firstly I destroyed one of the stock speakers (with much glee and delight I might add)

Used the shape from the above picture to create a plate for the new woofer (I used a Dremel to cut the shape out for added precision); which lined up like a dream, I placed the new plate in driver side mount bracket to make sure it was the right size.


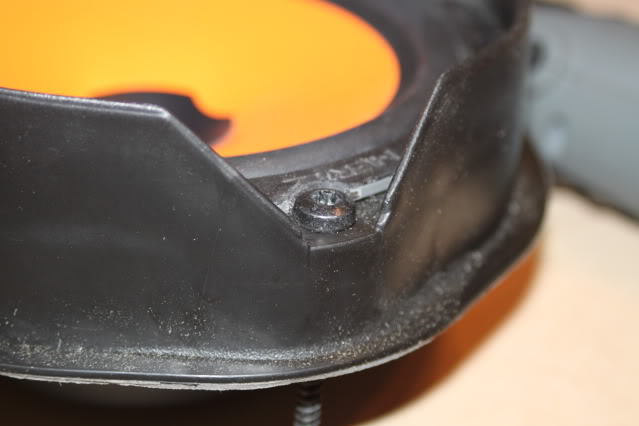
For the Drivers side I simply mounted the Woofer into the pod that houses the stock Woofer, and bolted it in place, since it’s made out of ABS plastic, drill some hole and use short screws with pinchers to keep it in place. But then I hit a snag, the speaker edges was fouling the stock mounting holes.


So I trimmed back the speakers in 4 places so they no longer foul the holes; I had to use a Dremel with a grinding stone for this since the speaker is rubber and metal; I strongly suggest you mark where you’re gonna trim first since the holes are not equally spaced around the speaker.

Test fitted the screw just to be sure I got it right
This was the same for the passenger side so both speakers required modification; once complete, I bonded the speakers to their respective mounts using high impact multipurpose glue (choses specifically coz I was bonding wood to metal or metal to plastic), here are the finished articles drying ready for fitting.

Mids were a piece of cake with the hertz kit, here’s where they would be sitting:

As you can see BMW have bolts in place to fit the mids to which thankfully align beautifully to the standard mounting holes of the hertz, so all I needed to do was modify the top mounts to they match the curvature of the plastic surround and use self-tapping 10mm screws to button them down; be very careful to not go over 10mm since they will go through the door card and pierce your lovely leather on the other side!!!


Tweets needed a little more fiddling; so much so I neglected to take any photo’s due to my excessive swearing and sore fingers; I’ll add some later; basically they are bonded with epoxy in place however the bonds can be removed using your Dremel with a small head (NOT A KNIFE, OR YOU’LL LOSE FINGERS). Then they were bonded back in place. I won’t go into this too much since without images you won’t get to see what I’m referring to.
The JL Subs were not photographed either, however I’ll take them apart again so you can see the work there too. But here’s a really bad picture taken on my phone so you get an impression on their size:

Essentially, I mounted them onto the stock metal plate, since they are very heavy and like the woofers don’t fit the same mounting holes I simply drilled some new ones and used nuts and bolts to secure them onto the plate.

I also sound dampened the enclosures using vibe sound dampening to completely seal the box off and close any vents, the wiring was run through the rear hole and then under the vibe matting.
I then used universal spray glue (stuff used for gluing down the sub carpet) and sprayed every inch of the enclosure with a thick coat for 2 reasons, 1st to close up any small holes and 2nd to attach some acoustic filler to the inside of the box. The theory behind this is:
The matting reduces the resonance of the metal box reducing flex and feedback increasing SPL and the acoustic matting does some counter scientific wizardry by fooling the amp into thinking it’s in a larger box by refracting the sound waves in different direction preventing it bouncing back against the back of the sub thus allowing for lower frequency sounds.
Since I was not smart enough to buy the matting, I distracted the missus with a bottle of WKD and stole a pillow from the soda and rubbed the filler against the half dry glue creating a thick layer.
God this bit really needs pictures…
Then I used my Dremel and reduced the plastic sticky out bit on the back of the grill to prevent the sub from hitting it as it’s wobbling away. Then I fitted the plates and subs into the enclosure and bolted them up.
Now comes all the complicated wiring:
So I chose the flat wiring because it’s 8 gauge and can be run without bulging and has very durable rubber so can also be pulled quite hard through tight spaces. I used a CD marker on the cabling to mark the + and – on both ends, that just removed the thinking aspect later on when you’re getting tired and it also allows you to keep track of what wire is for what component and where it goes.
To connect the components I used Halfords spade terminals which I had to remove the coloured plastic so they would fit on the end of the wiring; since the wires themselves were marked this made caused no identification issues.
Firstly I laid out all the wires and trimmed them to size, this picture shows where I’ve run the RCA from the front down the left trunking to the boot; along the back wall and into the battery trunk space down the right rear carpet, that’s a bit of a way, but there’s vastly more room to stuff cables that the left side and there’s a sticky out bit allowing cables to be run into the amp space (see the last picture).
This picture shows the left trunking; the sill cover pops of with a little effort (pulling in an upwards motion 3 inches from the left edge

To feed the front components you need to run the wires through the rubber grommet at the edge of the woofer hole; I had to increase the hole in the grommet to fit all the cables in however they fit well enough and the grommet went back in nicely.
For the tweets I used the existing wiring, since they are less than 10w full gauge cable would have been a pain to run twice so the standard cable is good enough, so I trimmed the cable off and lengthened it so it reached the crossover which was hidden (too hidden for the camera unfortunately) above the footwell woofers.
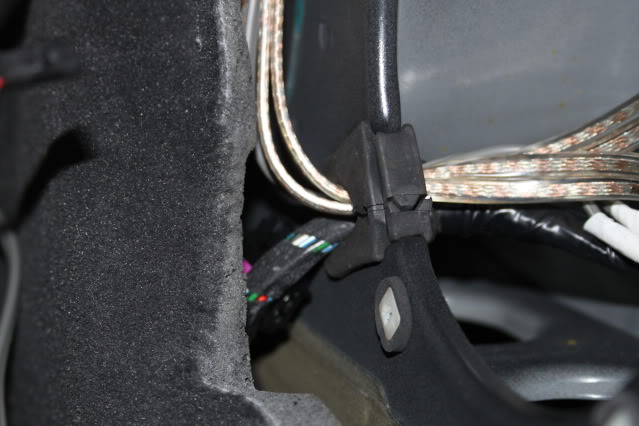
The following images show how I ran the mid cable through the existing channelling as you would do when adding a door handle LED.

Since the wires are flat there is a small space beneath the connector where the wire can run though, fits very nicely but is a bit of a faff to get it through the rubber channel; both ends of that channel come away from the door and the chassis, make sure to run the cable in reverse, so that’s door to chassis since it’s just easier that way

Once run all cables go through the grommet mentioned above and into the crossover. Then you can fit all the speakers in and stick your door cards back on and tweeters so you can perform audio tests.
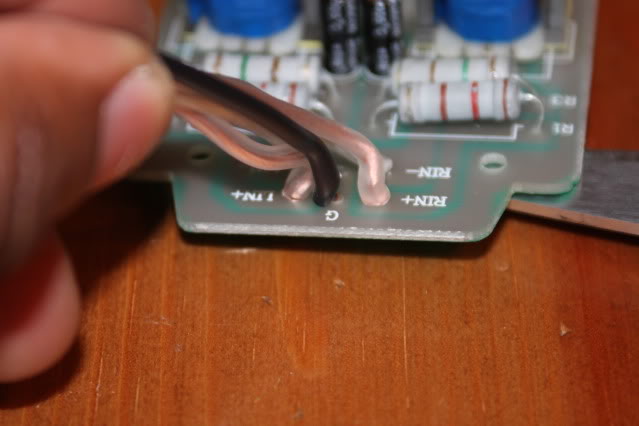
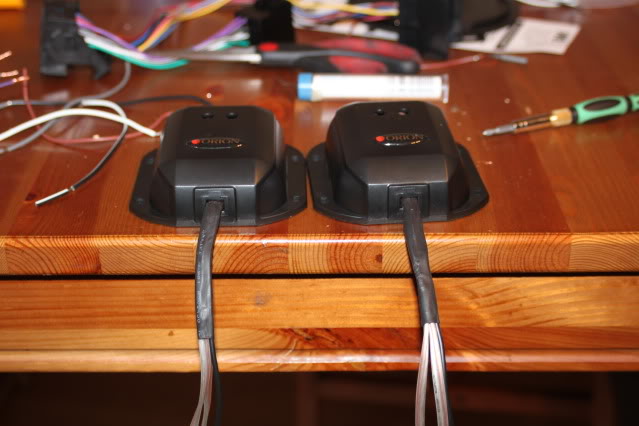
Next was to tap into the Head Unit output, since there is limited flex in the wiring you have to be rather wily in getting all the connections in place. So I spliced into all the speaker wires and connected the 2 Origin Speaker to RCA Connectors. I also spliced in my DICE link Plus to the, Live, Earth and I-Bus, this looks like a mess, but I can know what everything is
[Image to follow]
Now that the front is wired ready to go, I then had to tackle the rear, however the sun decided to go to bed and left me at a loss as to how to remove the plastic from the back wall to get to the rear speakers so I decided to give them a miss for now and tackle them next weekend.
However I still ran all the wiring in prep for next weekend and connected the stock mids to where the hertz should be just to make sure it all worked. This is where the Kenwood KPX-T120 comes into play. So I fed it with the rear left and right outputs from the sub; joined up the subs on to the sub output terminals and the mids onto the left right component outputs.

Then I hid it behind the existing mounting using double sided tape

The last thing to do was wire up the amp, I double check every single connection to make sure they were secure, undamaged and not bridging then wired up the amp which was very quick.
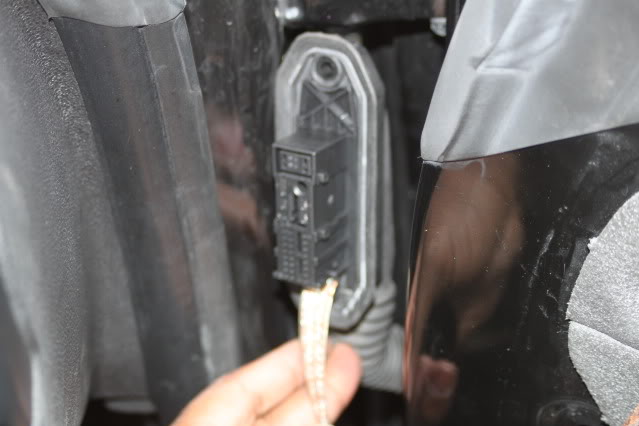
The Preamp (amp signal) I sourced from the amplified areal running from the back of the head unit. You can also pick this up (like I did) at the back of the car just to the left of the metal mounting bracket shown two pictures up; it’s the white cable running midway up the wall; splice into it and feed your remote connector on your amp; it will switch on once the radio comes on.


I’ve used the wires to wedge the sub in place with an extra spongy thing on the other side to dampen any knocks; the RCA connectors I used have 90 degree angles on the sub end which allowed for the shallow mount meaning it fit the sub space nicely with enough space for the active cooling to work, and since that space is practically outside it’ll stay cool anyway.
Since every amp is different I’ll skip the SQ bit but I basically ran lower frequencies to the rear at a slightly increased volume (+3 since the low frequencies are harder to hear) and full range to the front at a +2 ratio to the head unit. (meaning I increased the input volume on the front)
First impressions are staggering; the sound is so much richer, clearer, less distorted, fuller in range, superb bass and not one rattle; the headunit settings are configured to bass and treble in the middle. Fading a little forward, but that will be tweaked over time as the speakers bed in. All in all I can’t quite get over how much better it sounds; it’s awesome!!!
The only things left to do is change the rear mids which will just set it off beautifully and change the metal plate the JL subs are mounted to since I’m not happy with the sound they’re producing. I’ve already shaped and cut some 10mm MDF replacements with a 5” vent, just gonna wait till the weekend to swap it out.
Things I learnt:
Never use a knife to replace a screw driver
Dremels run hot
BMW don’t know sh*t about SQ
Don’t scrimp on the budget on your install, one cheap component will mess up the entire install
Don’t use the metal plate for the rear subs, use 10mm MDF
Always test before you screw everything back in.
Buy a torch with a rubber handle so you can use your mouth to hold it (just watch the dribble) or get a torch hat.
Get yourself a cordless power drill to save the forearms
Left overs:
1 x JBL: GTO-3501e - Mono Bass Amplifier - £109 – Link
2 x Stock Mids (soon to be 4)
1 x Stock Woofer (other was destroyed )
)
Ruby (The car) originally had the business Professional with 6 speaker setup which we all know is lacking in every way, coming from a car with Harman Kardon it was pretty clear that things needed to change, so I purchased the following items from Various places for this upgrade, I’ve added links to each item so you can see details of what they are.
1 x Kenwood KAC-X4D Amplifier (1200W, 4 Channel, Class D) - £275 – Link /[url] 1 x Kenwood KPX-T120 Tri Mode Crossove ... .html]Link
1 x Hertz: ESK163L.3 - 3 way 16.5cm components - £219 – Link /[url] 1 x Hertz: ECX100.3 - 2 way 10cm speak ... .html]Link
2 x Connection by Audison: FT2-550 - 5.5m RCA - £15 each – Link
2 x Autoleads: G9-S215-10 - 10m x 1.5mm Flat Speaker Cable - £10 each – Link
2 x Orion Speaker to RCA Converter with Variable Gain – £10 Each – Link Missing
Loads of spade Connectors and Splicers
Here’s some pictures of the stuff:
Components
Amp & Crossovers
Wiring
The aim was to have an install that is completely hidden and fits in the existing confines of the car; I also wanted to get maximum SQ without having thumping bass to chav the car up. Ruby is only little and there’s no need to drown out the rest of the sound with a fat sub, but I also wanted the low frequencies to be pronounced do deliver rich bass into the cabin.
The Amp was selected for its size and value for money and performance; that thing is tiny and has active cooling; and fits into the existing Amp hole as shown below:
The Hertz components and the 2 way were selected for their size and range of frequency, these are the most important parts so they had to be good; the ECX100’s are basically the 2 way version of the components. I selected to two way to spread the audio range throughout the car; below are size comparisons:
Footwell Woofers
This Image shows the difference in the mounting holds, I’ll come to that in a moment
Door Mids
Tweats
Missing Images
Rear Mids
Missing Images
This crossover was selected to drive the JL subs at low frequencies because they can bridge the sub output but deliver full range to the rear; very clever and very rare, there’s maybe 2 on Ebay at the moment; get them while you can.
Ok so now for the fun part.
The new Woofers may be the same size as the stock Woofers, however they cannot be mounted without a little innovation;
They are also different on each side, meaning the driver side has an additional mount, both the woofer are identical, however this mount adds additional depth to allow for a slightly wider speaker cover on the driver’s side to make room for the bonnet release and other stuff.
So I decided to get creative and mimic the stock mounting solution using 3mm MDF.
Firstly I destroyed one of the stock speakers (with much glee and delight I might add)
Used the shape from the above picture to create a plate for the new woofer (I used a Dremel to cut the shape out for added precision); which lined up like a dream, I placed the new plate in driver side mount bracket to make sure it was the right size.
For the Drivers side I simply mounted the Woofer into the pod that houses the stock Woofer, and bolted it in place, since it’s made out of ABS plastic, drill some hole and use short screws with pinchers to keep it in place. But then I hit a snag, the speaker edges was fouling the stock mounting holes.
So I trimmed back the speakers in 4 places so they no longer foul the holes; I had to use a Dremel with a grinding stone for this since the speaker is rubber and metal; I strongly suggest you mark where you’re gonna trim first since the holes are not equally spaced around the speaker.
Test fitted the screw just to be sure I got it right
This was the same for the passenger side so both speakers required modification; once complete, I bonded the speakers to their respective mounts using high impact multipurpose glue (choses specifically coz I was bonding wood to metal or metal to plastic), here are the finished articles drying ready for fitting.
Mids were a piece of cake with the hertz kit, here’s where they would be sitting:
As you can see BMW have bolts in place to fit the mids to which thankfully align beautifully to the standard mounting holes of the hertz, so all I needed to do was modify the top mounts to they match the curvature of the plastic surround and use self-tapping 10mm screws to button them down; be very careful to not go over 10mm since they will go through the door card and pierce your lovely leather on the other side!!!
Tweets needed a little more fiddling; so much so I neglected to take any photo’s due to my excessive swearing and sore fingers; I’ll add some later; basically they are bonded with epoxy in place however the bonds can be removed using your Dremel with a small head (NOT A KNIFE, OR YOU’LL LOSE FINGERS). Then they were bonded back in place. I won’t go into this too much since without images you won’t get to see what I’m referring to.
The JL Subs were not photographed either, however I’ll take them apart again so you can see the work there too. But here’s a really bad picture taken on my phone so you get an impression on their size:
Essentially, I mounted them onto the stock metal plate, since they are very heavy and like the woofers don’t fit the same mounting holes I simply drilled some new ones and used nuts and bolts to secure them onto the plate.
I also sound dampened the enclosures using vibe sound dampening to completely seal the box off and close any vents, the wiring was run through the rear hole and then under the vibe matting.
I then used universal spray glue (stuff used for gluing down the sub carpet) and sprayed every inch of the enclosure with a thick coat for 2 reasons, 1st to close up any small holes and 2nd to attach some acoustic filler to the inside of the box. The theory behind this is:
The matting reduces the resonance of the metal box reducing flex and feedback increasing SPL and the acoustic matting does some counter scientific wizardry by fooling the amp into thinking it’s in a larger box by refracting the sound waves in different direction preventing it bouncing back against the back of the sub thus allowing for lower frequency sounds.
Since I was not smart enough to buy the matting, I distracted the missus with a bottle of WKD and stole a pillow from the soda and rubbed the filler against the half dry glue creating a thick layer.
God this bit really needs pictures…
Then I used my Dremel and reduced the plastic sticky out bit on the back of the grill to prevent the sub from hitting it as it’s wobbling away. Then I fitted the plates and subs into the enclosure and bolted them up.
Now comes all the complicated wiring:
So I chose the flat wiring because it’s 8 gauge and can be run without bulging and has very durable rubber so can also be pulled quite hard through tight spaces. I used a CD marker on the cabling to mark the + and – on both ends, that just removed the thinking aspect later on when you’re getting tired and it also allows you to keep track of what wire is for what component and where it goes.
To connect the components I used Halfords spade terminals which I had to remove the coloured plastic so they would fit on the end of the wiring; since the wires themselves were marked this made caused no identification issues.
Firstly I laid out all the wires and trimmed them to size, this picture shows where I’ve run the RCA from the front down the left trunking to the boot; along the back wall and into the battery trunk space down the right rear carpet, that’s a bit of a way, but there’s vastly more room to stuff cables that the left side and there’s a sticky out bit allowing cables to be run into the amp space (see the last picture).
This picture shows the left trunking; the sill cover pops of with a little effort (pulling in an upwards motion 3 inches from the left edge
To feed the front components you need to run the wires through the rubber grommet at the edge of the woofer hole; I had to increase the hole in the grommet to fit all the cables in however they fit well enough and the grommet went back in nicely.
For the tweets I used the existing wiring, since they are less than 10w full gauge cable would have been a pain to run twice so the standard cable is good enough, so I trimmed the cable off and lengthened it so it reached the crossover which was hidden (too hidden for the camera unfortunately) above the footwell woofers.
The following images show how I ran the mid cable through the existing channelling as you would do when adding a door handle LED.
Since the wires are flat there is a small space beneath the connector where the wire can run though, fits very nicely but is a bit of a faff to get it through the rubber channel; both ends of that channel come away from the door and the chassis, make sure to run the cable in reverse, so that’s door to chassis since it’s just easier that way
Once run all cables go through the grommet mentioned above and into the crossover. Then you can fit all the speakers in and stick your door cards back on and tweeters so you can perform audio tests.
Next was to tap into the Head Unit output, since there is limited flex in the wiring you have to be rather wily in getting all the connections in place. So I spliced into all the speaker wires and connected the 2 Origin Speaker to RCA Connectors. I also spliced in my DICE link Plus to the, Live, Earth and I-Bus, this looks like a mess, but I can know what everything is
[Image to follow]
Now that the front is wired ready to go, I then had to tackle the rear, however the sun decided to go to bed and left me at a loss as to how to remove the plastic from the back wall to get to the rear speakers so I decided to give them a miss for now and tackle them next weekend.
However I still ran all the wiring in prep for next weekend and connected the stock mids to where the hertz should be just to make sure it all worked. This is where the Kenwood KPX-T120 comes into play. So I fed it with the rear left and right outputs from the sub; joined up the subs on to the sub output terminals and the mids onto the left right component outputs.
Then I hid it behind the existing mounting using double sided tape
The last thing to do was wire up the amp, I double check every single connection to make sure they were secure, undamaged and not bridging then wired up the amp which was very quick.
The Preamp (amp signal) I sourced from the amplified areal running from the back of the head unit. You can also pick this up (like I did) at the back of the car just to the left of the metal mounting bracket shown two pictures up; it’s the white cable running midway up the wall; splice into it and feed your remote connector on your amp; it will switch on once the radio comes on.
I’ve used the wires to wedge the sub in place with an extra spongy thing on the other side to dampen any knocks; the RCA connectors I used have 90 degree angles on the sub end which allowed for the shallow mount meaning it fit the sub space nicely with enough space for the active cooling to work, and since that space is practically outside it’ll stay cool anyway.
Since every amp is different I’ll skip the SQ bit but I basically ran lower frequencies to the rear at a slightly increased volume (+3 since the low frequencies are harder to hear) and full range to the front at a +2 ratio to the head unit. (meaning I increased the input volume on the front)
First impressions are staggering; the sound is so much richer, clearer, less distorted, fuller in range, superb bass and not one rattle; the headunit settings are configured to bass and treble in the middle. Fading a little forward, but that will be tweaked over time as the speakers bed in. All in all I can’t quite get over how much better it sounds; it’s awesome!!!
The only things left to do is change the rear mids which will just set it off beautifully and change the metal plate the JL subs are mounted to since I’m not happy with the sound they’re producing. I’ve already shaped and cut some 10mm MDF replacements with a 5” vent, just gonna wait till the weekend to swap it out.
Things I learnt:
Never use a knife to replace a screw driver
Dremels run hot
BMW don’t know sh*t about SQ
Don’t scrimp on the budget on your install, one cheap component will mess up the entire install
Don’t use the metal plate for the rear subs, use 10mm MDF
Always test before you screw everything back in.
Buy a torch with a rubber handle so you can use your mouth to hold it (just watch the dribble) or get a torch hat.
Get yourself a cordless power drill to save the forearms
Left overs:
1 x JBL: GTO-3501e - Mono Bass Amplifier - £109 – Link
2 x Stock Mids (soon to be 4)
1 x Stock Woofer (other was destroyed