
Not joined yet? Register for free and enjoy features such as alerts, private messaging and viewing latest posts and topics.
2005 Z4 E85
-
Mr Ward

- Newbie

- Posts: 49
- Joined: Mon May 10, 2021 9:47 pm
- Location: Rugeley, Staffordshire.
2005 Z4 E85
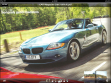
Here's one for you. How many of you noticed the plastic divider on the rear lights were removed? I think it gives it a much rounder appearance than the split light look it had.
Never be afraid to do anything, put your mind to it and work at it.
Pre facelift 2.0i heavily modified with a stubby.
Pre facelift 2.0i heavily modified with a stubby.
-
Mr Ward
- Newbie
- Posts: 49
- Joined: Mon May 10, 2021 9:47 pm
- Location: Rugeley, Staffordshire.
2005 Z4 E85
It took a lot of time and effort that I can tell you. The z was painted under a 3mtr x 3mtr marquee without any sides on it. Each panel was removed from the car and sanded fully down to the metal or bare plastic. 2 coats of primer applied with sanding between each coat. Then 6 coats of paint sanded down after every 2nd coat until the final 7th coat was on and left to harden. Then it was hit with wet n dry from 400 grit right up to 3000 grit. After that I used several electric polishers with various grade cutting compounds and various polishing compounds until I had the shine I required. Each panel took roughly around 4 days each to fully paint and sand down then a day to polish it. That was around 2 months of painting, sanding and polishing for the whole Z.
Now here's the kicker.
I've never painted a car in my life. It was only by spending many hours on YouTube watching hundreds of videos on how to spray and correct spraying errors plus, finishing stages that I was able to spray the Z.
Last edited by Mr Ward on Wed Sep 21, 2022 12:24 pm, edited 1 time in total.
Never be afraid to do anything, put your mind to it and work at it.
Pre facelift 2.0i heavily modified with a stubby.
Pre facelift 2.0i heavily modified with a stubby.
-
MikeyH

- Lifer

- Posts: 4840
- Joined: Sat Oct 02, 2021 10:57 pm
- Location: Devon
2005 Z4 E85
Welcome to the forum Mr Ward, your creativity certainly stands out, good for you.
Now, Sterling grey Z4 2.2 with cup holders, stubby aerial and sport seats. Roadsters ‘cause they’re great with the roof down.
Ford Anglia, Red Sprite, a few MG midgets, MGB Roadster and yellow Ford Capri, all gone many years now.
Ford Anglia, Red Sprite, a few MG midgets, MGB Roadster and yellow Ford Capri, all gone many years now.
-
Mr Ward
- Newbie
- Posts: 49
- Joined: Mon May 10, 2021 9:47 pm
- Location: Rugeley, Staffordshire.
2005 Z4 E85
Just a few photos of some of the work carried out in various stages, including the welding and test fitting of the stainless-steel air pipe that sits just behind the Bumper. I cut the entire middle out of the front bumper and rebuilt it with fibreglass and filler until it was as I liked it.
- Attachments
-
- z4 front 1.jpg (94.65 KiB) Viewed 640 times
-
- front1.jpg (138.36 KiB) Viewed 640 times
-
- bumper3.jpg (163.31 KiB) Viewed 640 times
-
- bumper2.jpg (117.94 KiB) Viewed 640 times
-
- bumper1.jpg (97.54 KiB) Viewed 640 times
-
- bonnet2.jpg (114.41 KiB) Viewed 640 times
-
- bonnet1.jpg (108.49 KiB) Viewed 640 times
Never be afraid to do anything, put your mind to it and work at it.
Pre facelift 2.0i heavily modified with a stubby.
Pre facelift 2.0i heavily modified with a stubby.
-
Mr Ward
- Newbie
- Posts: 49
- Joined: Mon May 10, 2021 9:47 pm
- Location: Rugeley, Staffordshire.
2005 Z4 E85
I did not think they went well with the look I was going for. They are held in with a double-sided sticky pad and I think it was 2 plastic lugs also.
Never be afraid to do anything, put your mind to it and work at it.
Pre facelift 2.0i heavily modified with a stubby.
Pre facelift 2.0i heavily modified with a stubby.
-
Rldee007
- Member

- Posts: 239
- Joined: Tue Dec 29, 2020 11:26 am
- Location: Warwickshire
2005 Z4 E85
Looks like muscle car with the mods.
Once again, great work!
Once again, great work!
-
Dave 2 dogs
- Senior Member

- Posts: 1384
- Joined: Tue Apr 03, 2018 7:29 pm
2005 Z4 E85
Thanks
Mr ward
I put some vents in my e89 recently…
Just interested to see a closer picture to see how your ones turn out. Have you left it open underneath? I put trays and drains in .
Mr ward
I put some vents in my e89 recently…
Just interested to see a closer picture to see how your ones turn out. Have you left it open underneath? I put trays and drains in .
-
Mr Ward
- Newbie
- Posts: 49
- Joined: Mon May 10, 2021 9:47 pm
- Location: Rugeley, Staffordshire.
2005 Z4 E85
The underside of the bonnet is still a work in progress. At the moment all construction work on the underside is yet to start. So, everything I have done to get the vents and bonnet locks into it is still highly visible with all the raw cuts and parts taken away from the structure glaring at you once the bonnet is opened. I will get onto it eventually to tidy it up and make it look pretty. The vents I positioned in such a way that one side above the engine were closed and solid so no water could drop onto the engine through them. The front and one side are open, the position of the open vents lets water drip down just past the sides of the engine and any electrical components. Took a lot of measuring and plenty of cardboard mock-ups to get the positioning correct. I plan to put something like a door seal or some form of rubber strip around all the exposed parts of metal that were cut away to get the bonnet catches into the bonnet. The bonnet catch under the bonnet that locks the bonnet in place snapped off when I tried to remove it, so I will have to cut a hole into the bottom of the bonnet to remove the snapped part inside. 85% of the bonnet structure on the underside middle section has been removed to get the bonnet vents and bonnet catches into the bonnet.Dave 2 dogs wrote: ↑Wed Sep 21, 2022 12:48 pm Just interested to see a closer picture to see how your ones turn out.
Never be afraid to do anything, put your mind to it and work at it.
Pre facelift 2.0i heavily modified with a stubby.
Pre facelift 2.0i heavily modified with a stubby.
-
Mr Ward
- Newbie
- Posts: 49
- Joined: Mon May 10, 2021 9:47 pm
- Location: Rugeley, Staffordshire.
2005 Z4 E85
As requested.Dave 2 dogs wrote: ↑Tue Sep 20, 2022 7:48 pm Now …. Can you post some more pictures of the bonnet please
- Attachments
-
- bonnet11.jpg (111 KiB) Viewed 542 times
-
- bonnet10.jpg (171.59 KiB) Viewed 542 times
-
- bonnet9.jpg (72.77 KiB) Viewed 542 times
-
- bonnet8.jpg (125.87 KiB) Viewed 542 times
-
- bonnet7.jpg (166.45 KiB) Viewed 542 times
-
- bonnet6.jpg (121.15 KiB) Viewed 542 times
-
- bonnet5.jpg (134.7 KiB) Viewed 542 times
-
- bonnet4.jpg (181.21 KiB) Viewed 542 times
Never be afraid to do anything, put your mind to it and work at it.
Pre facelift 2.0i heavily modified with a stubby.
Pre facelift 2.0i heavily modified with a stubby.
-
Jembo
- Lifer
- Posts: 6030
- Joined: Sat Jun 25, 2011 11:59 pm
- Location: 1066 Country
2005 Z4 E85
Saved a Z, that’s worth everything
Black & yellow is exceptionally brave - but suggest there is too much black - a solution could be to add a rakish yellow on the front to balance?
Otherwise deffo with you on the de-French fry look, did that on my previous 3.0
Good effort fella, now just enjoy
Black & yellow is exceptionally brave - but suggest there is too much black - a solution could be to add a rakish yellow on the front to balance?
Otherwise deffo with you on the de-French fry look, did that on my previous 3.0

Good effort fella, now just enjoy
- Attachments
-
- 4F53AEE8-22AD-4C37-BF80-FDE097AE1F62.jpeg (58.83 KiB) Viewed 529 times
Joined the dark side with a ///M Hell Bronze Sepang Coupe 
Ex Aug 2005 Maldives Blue 3 litre cruizer, lots of toyz,
Lifer 54
Ex Aug 2005 Maldives Blue 3 litre cruizer, lots of toyz,
Lifer 54
-
Dave 2 dogs
- Senior Member
- Posts: 1384
- Joined: Tue Apr 03, 2018 7:29 pm
2005 Z4 E85
Like what you did there MR WARD
I went for a different approach
I went for a different approach
- 10B3732F-DE66-4643-90E4-FC9F591F8B53.jpeg (106.1 KiB) Viewed 511 times
-
Mr Ward
- Newbie
- Posts: 49
- Joined: Mon May 10, 2021 9:47 pm
- Location: Rugeley, Staffordshire.
2005 Z4 E85
I agree with you on the black amount, I have been toying with a few ideas to possibly break it up.
1) Yellow Alloy Rim protectors.
2) Yellow mirrors and yellow mirror mounts on the doors.
3) Inside the original alloys there are some flat ridges in-between the spokes. I have been thinking of spraying the ridges yellow, so it continues to break up the black. Plus, when revolving it would create a continuous yellow line inside the wheels.
4) Spray the wheels a metallic sliver so there is less black.
5) I have a plan for the centre of the bonnet to break up the black. I am looking for an airbrush artist to spray a picture of my recently deceased border collie in the middle of the bonnet. I have the image I want in the middle of the bonnet just need a dam good artist to spray it on for me. I will drop a few images of what I am thinking of doing after I have finished editing them in photoshop.
Last edited by Mr Ward on Wed Sep 21, 2022 10:21 pm, edited 1 time in total.
Never be afraid to do anything, put your mind to it and work at it.
Pre facelift 2.0i heavily modified with a stubby.
Pre facelift 2.0i heavily modified with a stubby.
-
Mr Ward
- Newbie
- Posts: 49
- Joined: Mon May 10, 2021 9:47 pm
- Location: Rugeley, Staffordshire.
2005 Z4 E85
The image of the Border collie i am looking at having her sprayed on the middle of the bonnet in-between the air vents. The original image of my border collie is a lot clearer with a lot more detail in it.
- Attachments
-
- wheel idea.jpg (149.46 KiB) Viewed 488 times
-
- Bow Somerset Caravan 1.jpg (58.51 KiB) Viewed 488 times
Never be afraid to do anything, put your mind to it and work at it.
Pre facelift 2.0i heavily modified with a stubby.
Pre facelift 2.0i heavily modified with a stubby.
-
Mr Ward
- Newbie
- Posts: 49
- Joined: Mon May 10, 2021 9:47 pm
- Location: Rugeley, Staffordshire.
2005 Z4 E85
That does look nice and not a bad job. I did think of going down the route of buying some premade vents but then my artistic side kicked in and that was the end of that thought.
Never be afraid to do anything, put your mind to it and work at it.
Pre facelift 2.0i heavily modified with a stubby.
Pre facelift 2.0i heavily modified with a stubby.
-
Zedebee
- Lifer
- Posts: 3355
- Joined: Tue Sep 29, 2020 10:37 pm
- Location: North Hampshire
2005 Z4 E85
I’m sad for you, BCs are the best. We lost ours at the beginning of the year and realised we couldn’t do without one, so . . .
- 34CDA4C9-D878-410E-96E1-EBAF6E38F910.jpeg (244.23 KiB) Viewed 439 times
Last edited by Zedebee on Sun Oct 23, 2022 1:28 pm, edited 1 time in total.
2003 Maldives Blue 3.0i auto
Previously: Maldives Blue 2.5i manual (its back!) and another, and a Monaco Blue 3.0Si coupe
Previously: Maldives Blue 2.5i manual (its back!) and another, and a Monaco Blue 3.0Si coupe