Page 11 of 18
My Second Zed Thread (2010 E89 sDrive30i)
Posted: Wed May 06, 2020 5:17 pm
by Argyll Andy
Timmyboybunter wrote: ↑Wed May 06, 2020 11:52 am
Also managed to pick up a set of roof buttons in decent condition from Ebay, as mine are in a bit of a state (common problem with the paint flaking off).
I've actually managed to buy 2 this week after a few months of half heartedly searching around - the first one is in a worse state to mine but was fairly cheap, so I was going to investigate the 'refurb' option, either DIY/after market vinyl stickers, or using a company in Spain called 'Serprint' which was recommended on Facebook. No need for the refurb option now thankfully.
Roof_buttons.jpg
Can you not just put the spare set in the Zed you bought this week, the windows are tinted darkly enough no one will notice

My Second Zed Thread (2010 E89 sDrive30i)
Posted: Wed May 06, 2020 5:34 pm
by Timmyboybunter
I'm not convinced the tints in the mini-Zed are strictly legal

My Second Zed Thread (2010 E89 sDrive30i)
Posted: Wed May 06, 2020 9:48 pm
by Argyll Andy
Timmyboybunter wrote: ↑Wed May 06, 2020 5:34 pm
I'm not convinced the tints in the mini-Zed are strictly legal
But it’s just a show car, not for road use

My Second Zed Thread (2010 E89 sDrive30i)
Posted: Mon May 11, 2020 11:07 pm
by Timmyboybunter
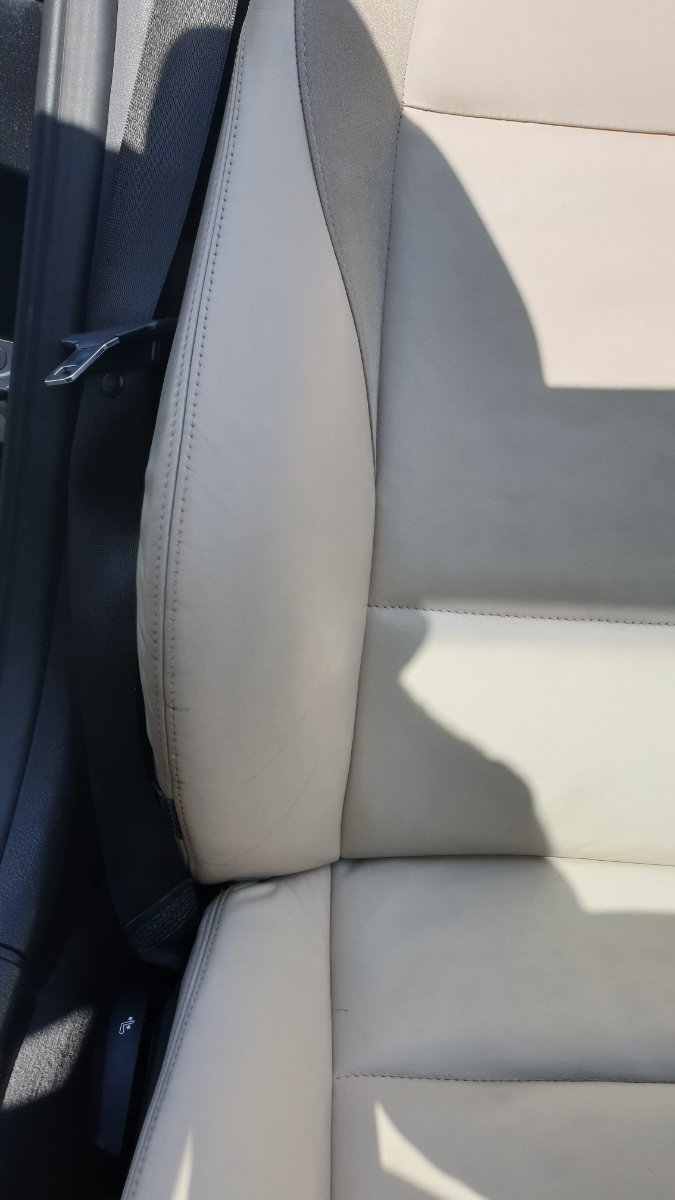
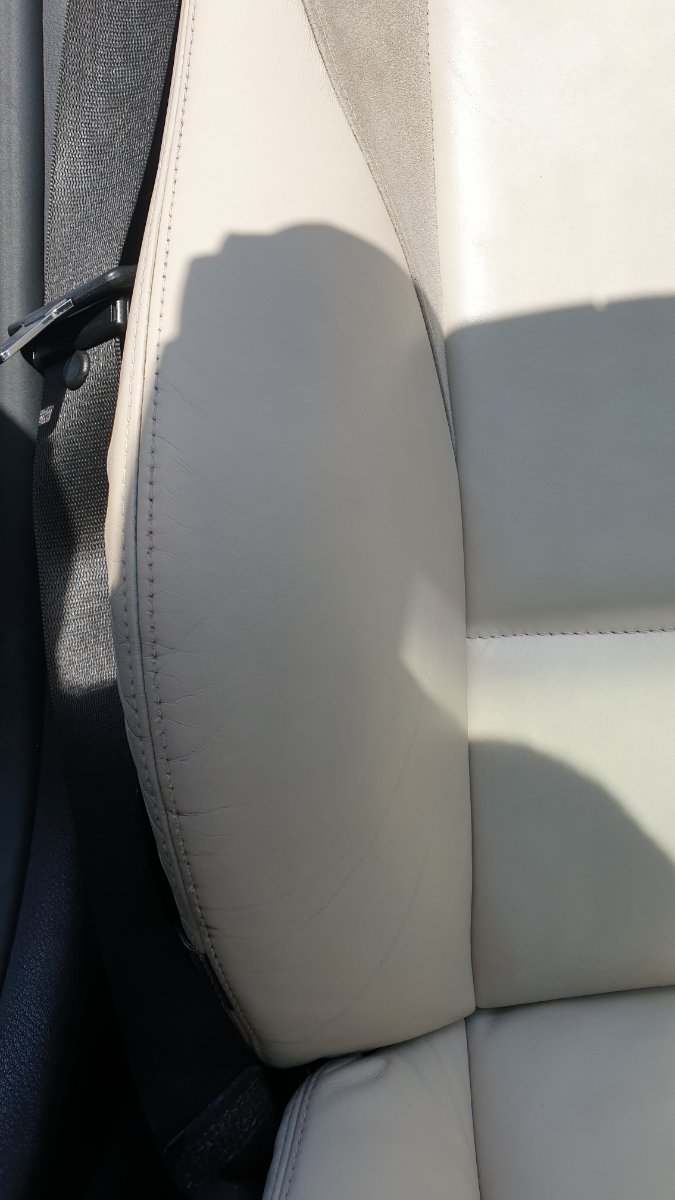
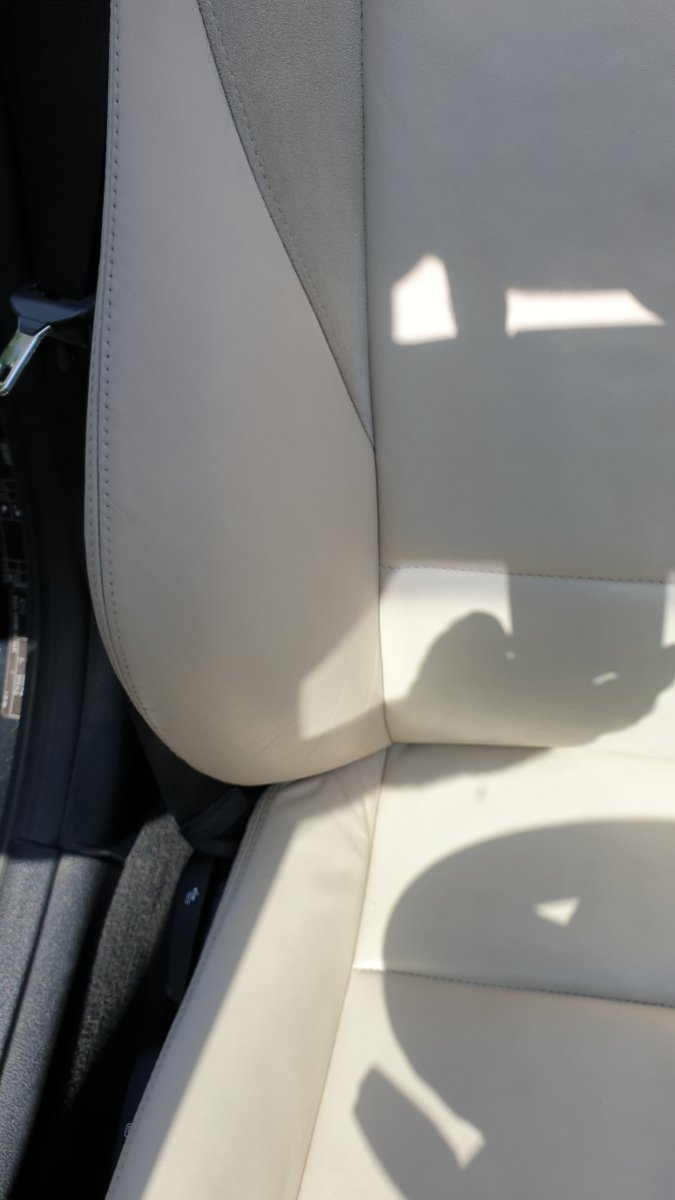
Had a go at making the leather seats more presentable at the weekend.
This is using the Gliptone / Scuffmaster Liquid Leather touch up kit, which for the option I selected gives you 4 products:
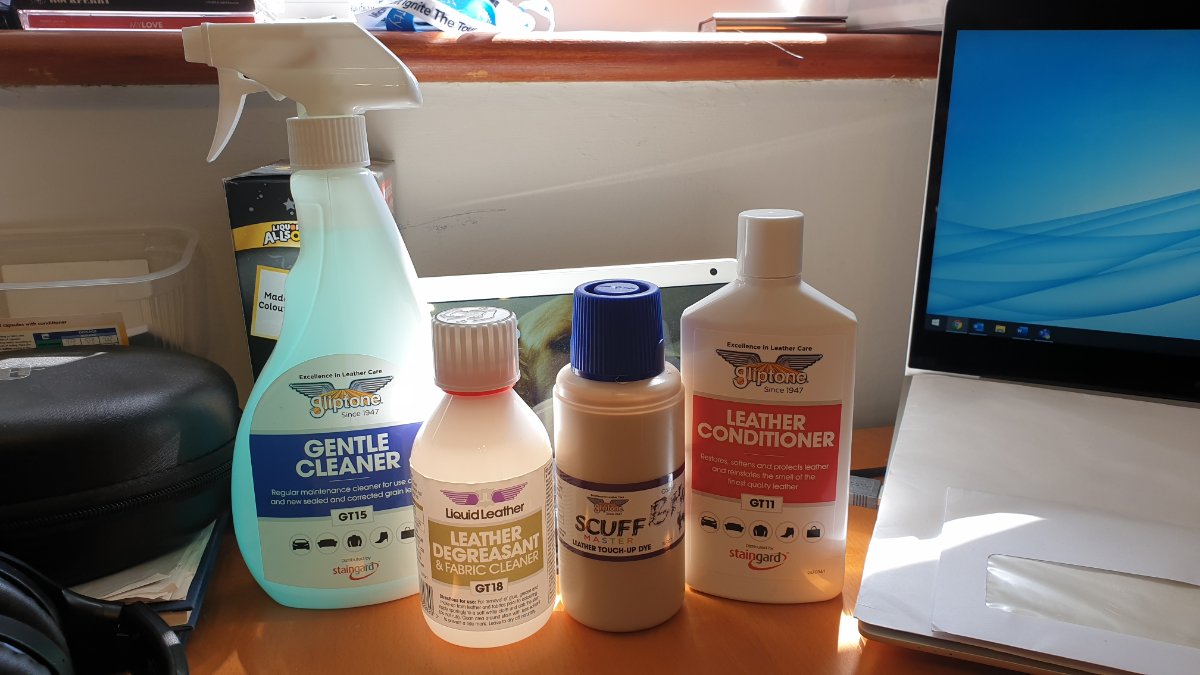
- 20200507_134346.jpg (191.5 KiB) Viewed 1282 times
Used the cleaner first which did remove a fair amount of grime (even though I've cleaned the seats previously using baby wipes), then went over them again using the degreasnt - which didn't seem to do much, but I didn't really have any marks/stains to come off, as is the intended use.
Then applied the dye by squeezing onto a lint free cloth and dabbing onto the most obvious areas which needed attention. Initial impression is: hmm, that was a wasted of money, it doesn't actually cover anything. The weekend was very warm so the coats dried quickly, so as I worked my way around the driver seat first, I kept going back to the really obvious marks and adding another layer every couple of minutes. By the time I'd finished a general dab over the seat (takes a good long time), multiple layers had been added to the bad scuffs and marks - and they have actually come up very well indeed. The single most obvious mark on the bolster has basically disappeared.
Before:
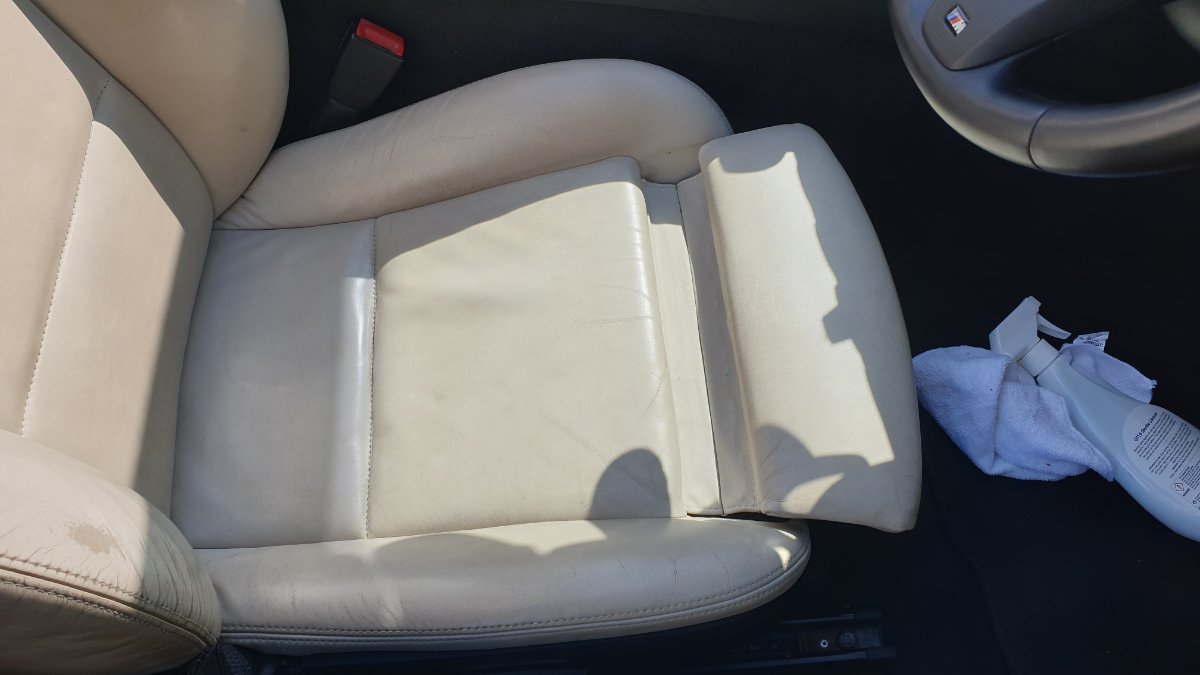
- Base before.jpg (154.35 KiB) Viewed 1353 times
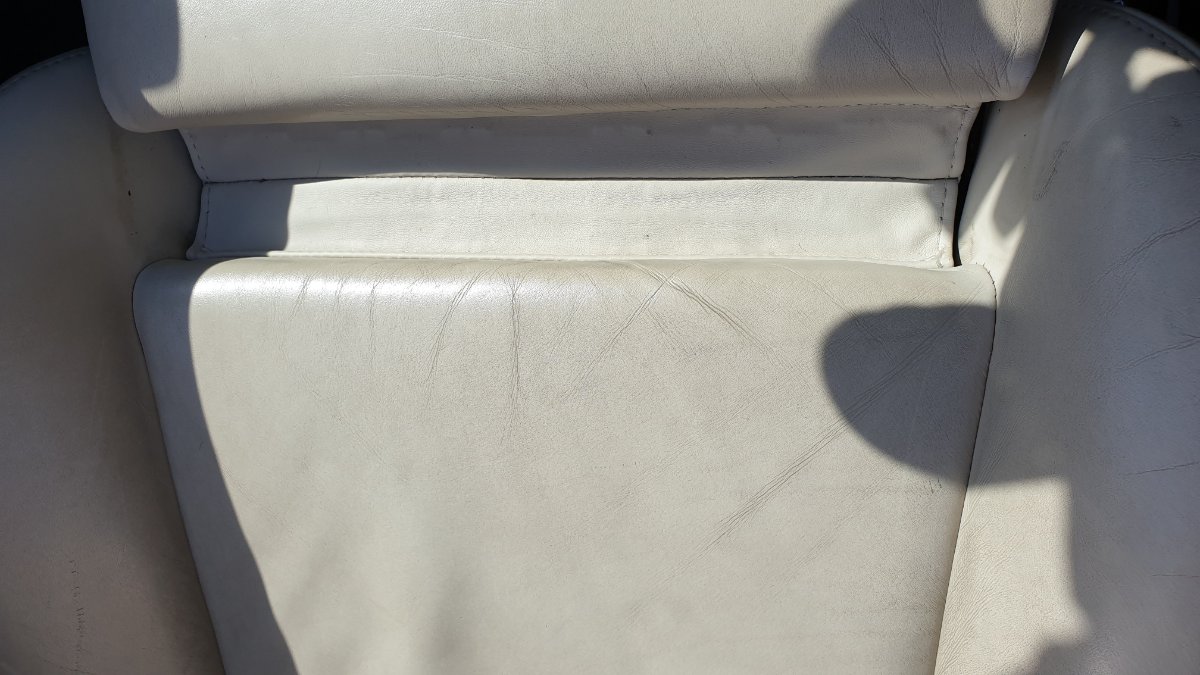
- Base 2 before.jpg (193.83 KiB) Viewed 1353 times
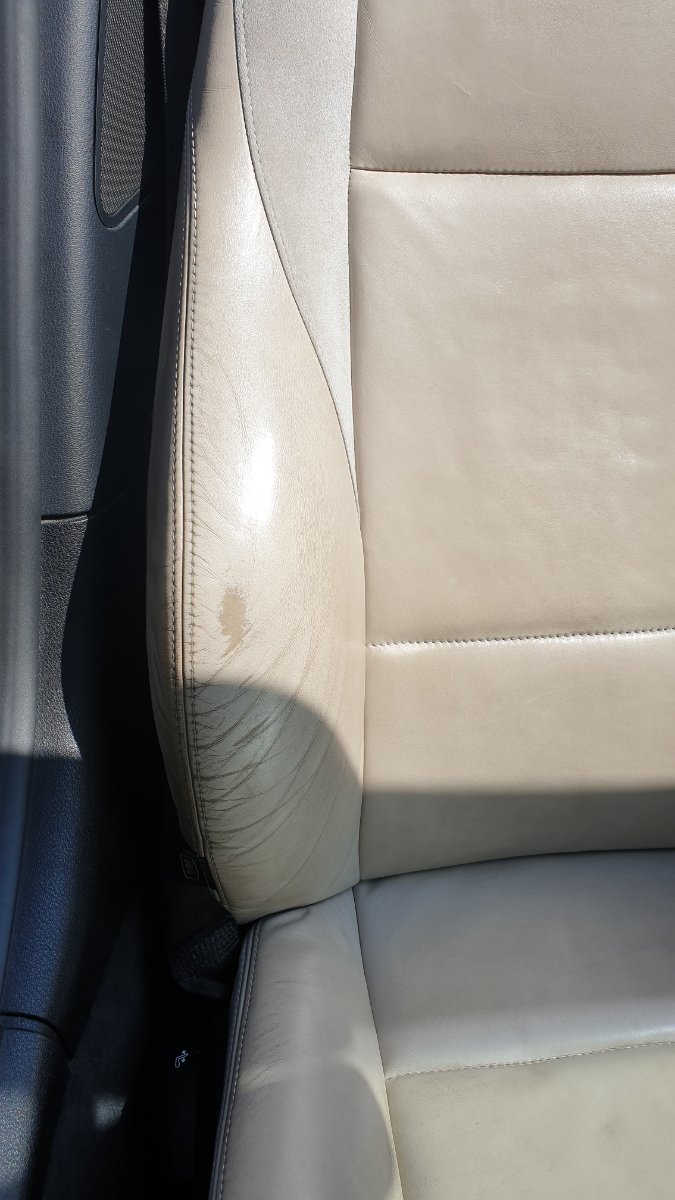
- Bolster 1 before.jpg (195.98 KiB) Viewed 1353 times
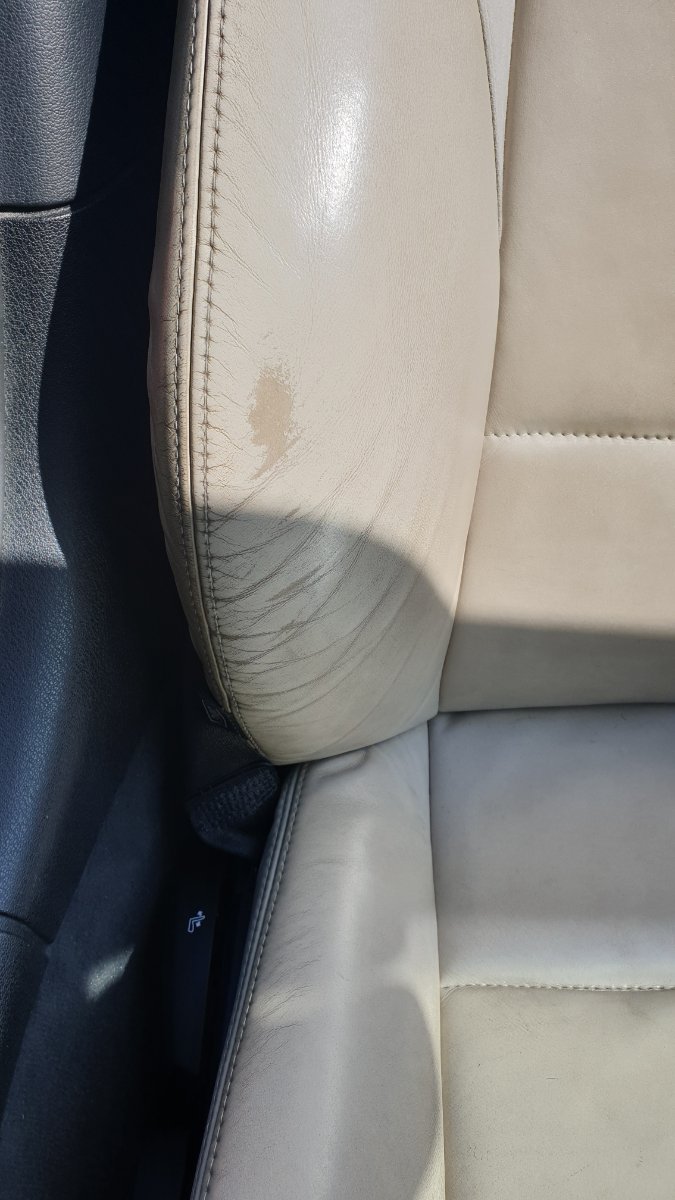
- Bolster 2 before.jpg (190.4 KiB) Viewed 1353 times
After:
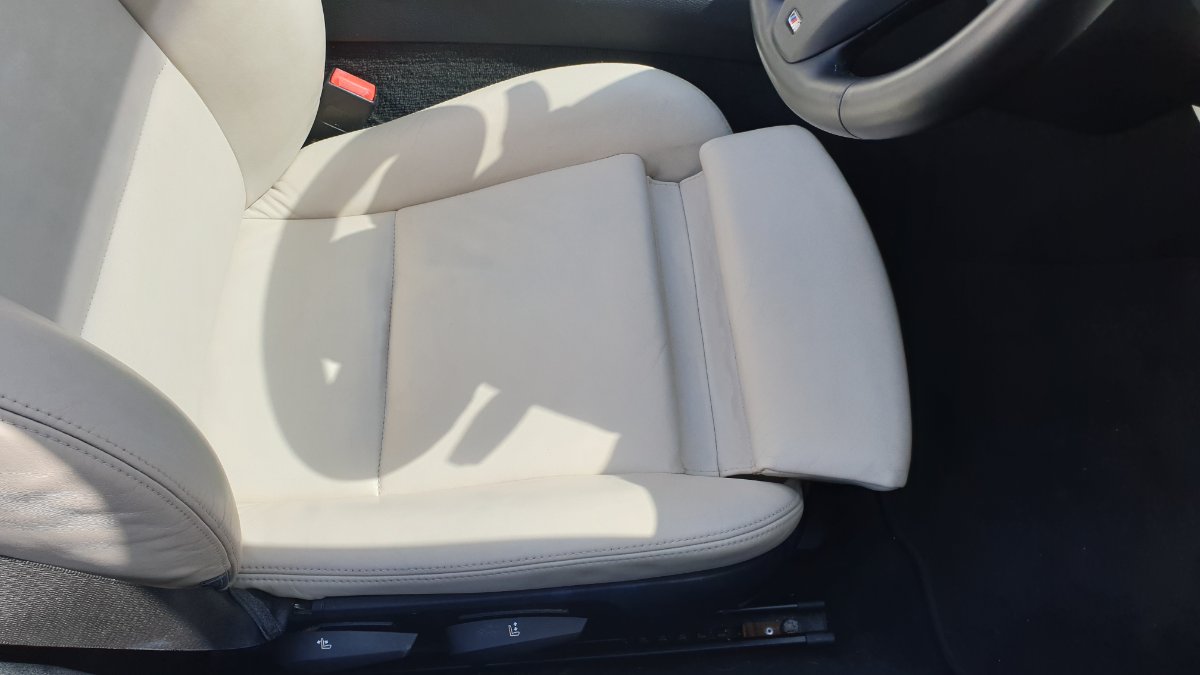
- Base after.jpg (141.4 KiB) Viewed 1353 times
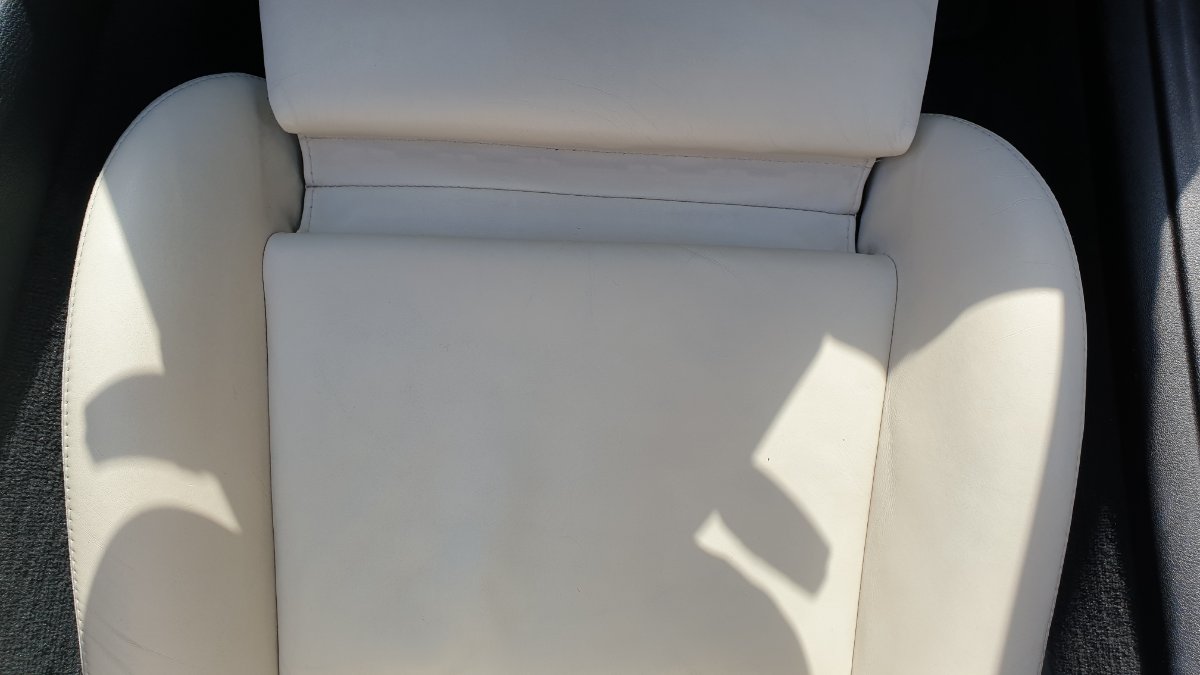
- Base 2 after.jpg (145.46 KiB) Viewed 1353 times
- Bolster 1 after.jpg (149.37 KiB) Viewed 1353 times
- Bolster 2 after.jpg (160.68 KiB) Viewed 1353 times
- Bolster 3 after.jpg (134.26 KiB) Viewed 1353 times
I let that dry for 24 hours, then used the final conditioner product - nice smell (have used this one before) and once that had dried (took a day again before that was truly dry), the job is finished.
I used less dye on the 2nd seat, partially because it was in better condition, partially becuase I'd had enough of doing it

but now I know how well it works and how simple it is to use, I'll probably have another more methodical go in the futuer (and use it as an ongoing maintenance task to keep the seats looking decent).
I note on the website that the dye bottle is now 250 ml, whereas before (and as is printed on the label!) it only used to be 60ml. I've probably used 2/3 to 3/4 of the bottle and have only completed the seats - not really 100% coverage - and the arm rest; the rest of the interior (I have the extended leather option) remains to be done if I'm truly being picky, so will probably pick up another bottle of the dye on its own.
At this point in time then, I would heartily recommend this product.
My Second Zed Thread (2010 E89 sDrive30i)
Posted: Mon May 11, 2020 11:13 pm
by Timmyboybunter
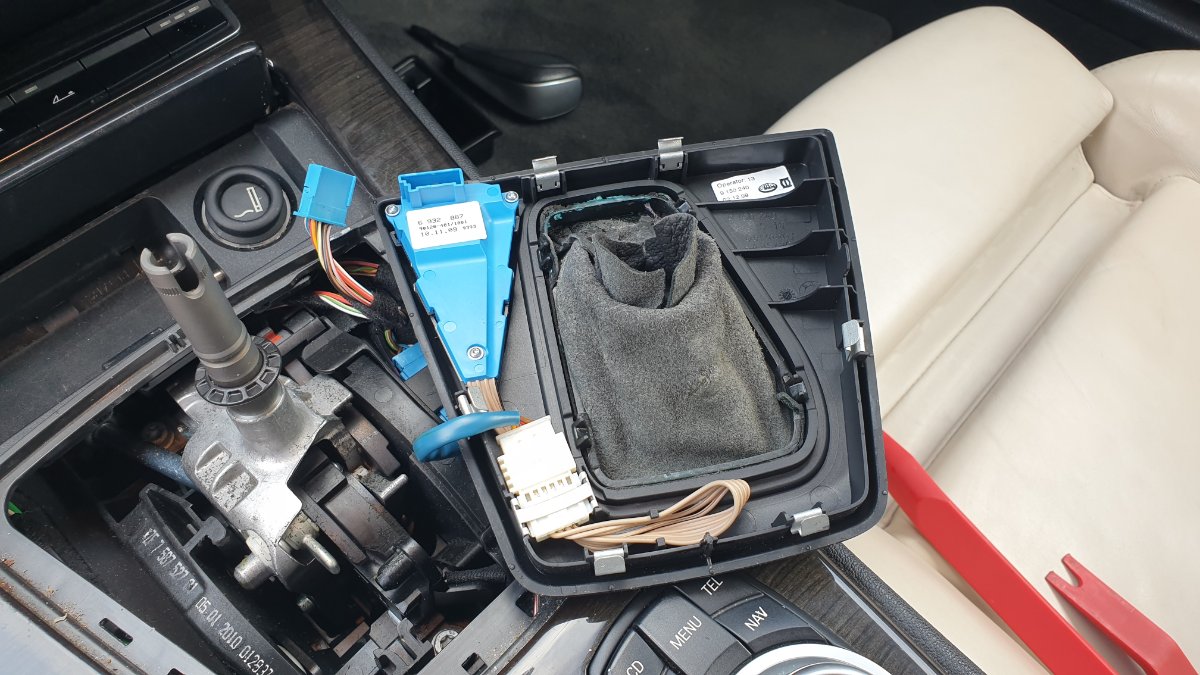
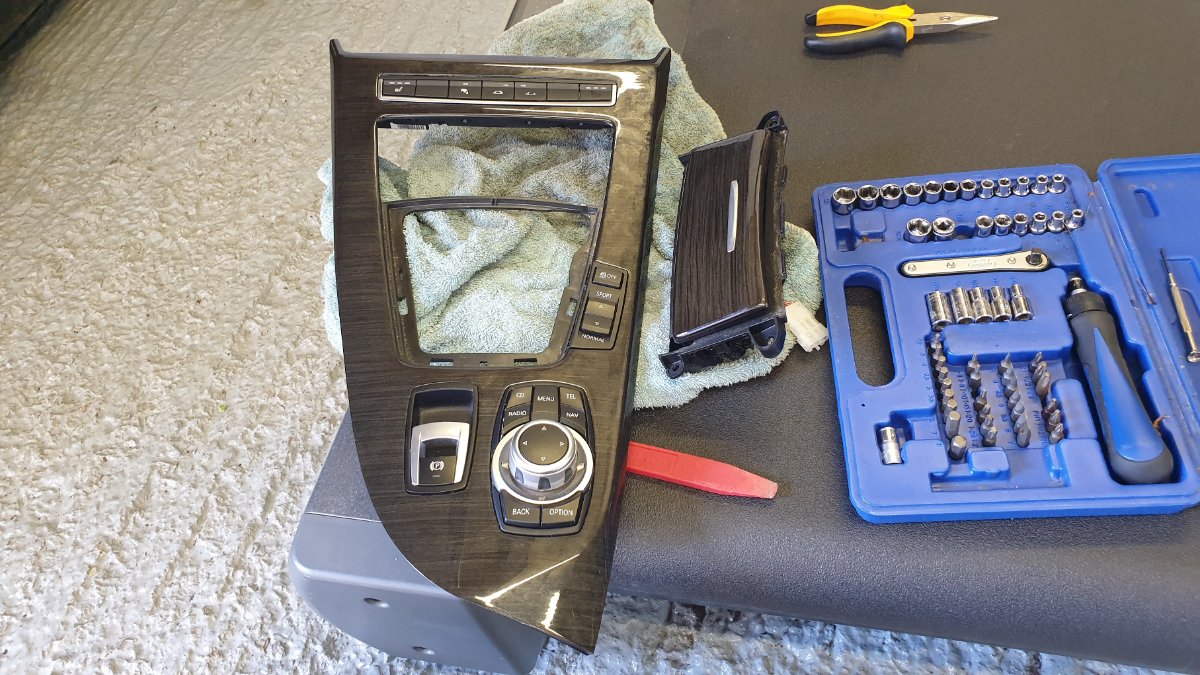
Replaced my worn roof buttons with the new set I picked up on Ebay. Nice easy job.
Before:
- Before.jpg (219.84 KiB) Viewed 1352 times
Gear lever plastic surround just pulls upward, as does the lever itself. 2 electrical connectors to pop off:
- 1.jpg (245.06 KiB) Viewed 1352 times
Then remove further connectors for ash tray, iDrive, hand brake and mode selectors - the ash tray also needs to be removed to get enough access to be able to remove the roof buttons, this is held on with 4 torx screws:
- 2.jpg (244.83 KiB) Viewed 1352 times
Replacement buttons fitted (they're perfect
), ash tray added back on:
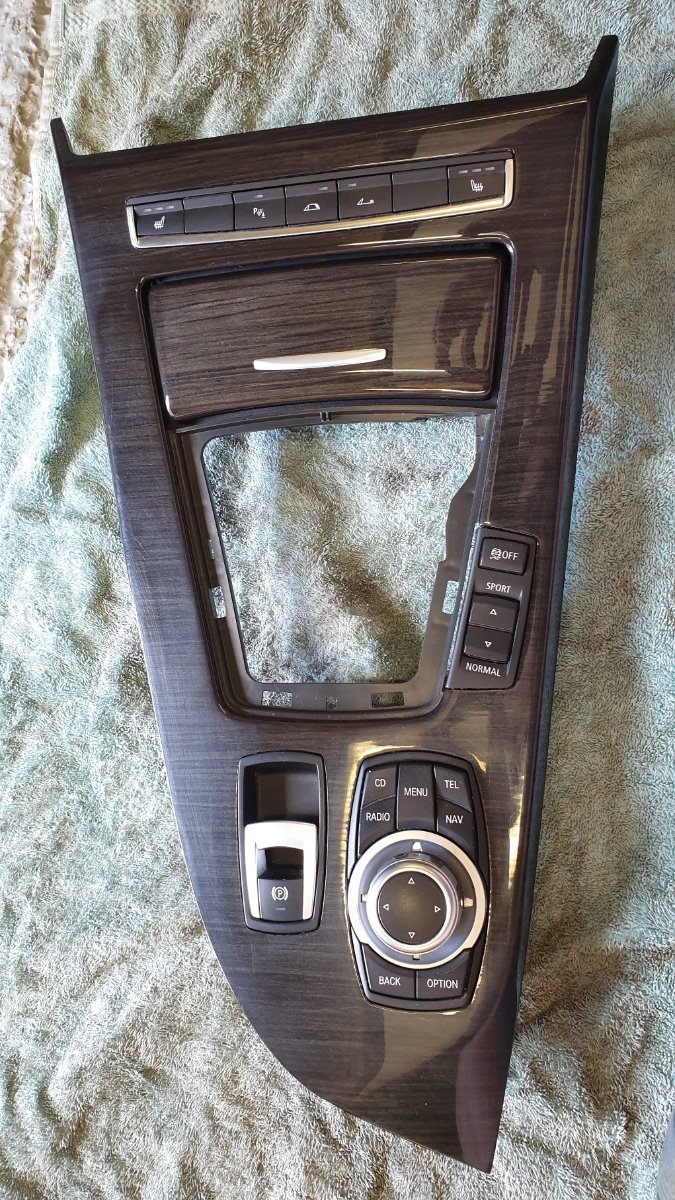
- 3.jpg (314.1 KiB) Viewed 1352 times
And back in the car.

- 4.jpg (223.21 KiB) Viewed 1352 times
My Second Zed Thread (2010 E89 sDrive30i)
Posted: Mon May 11, 2020 11:23 pm
by Timmyboybunter
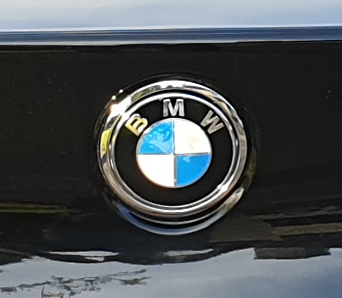
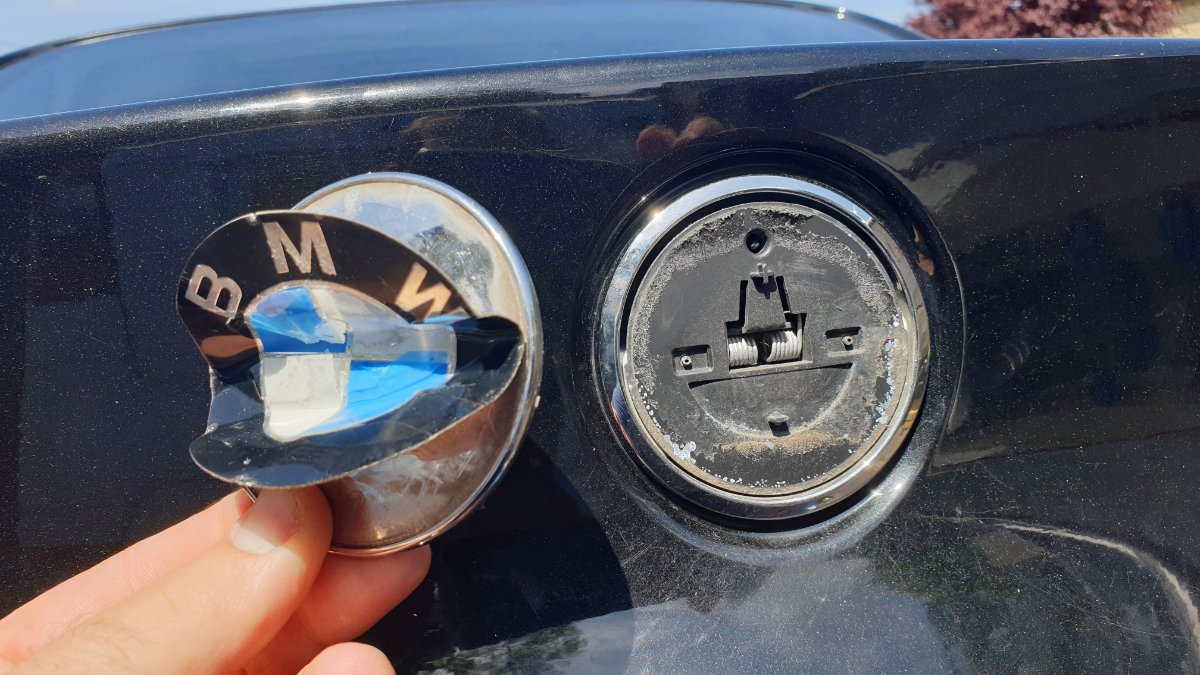
My rear BMW roundel was in a bit of a state, so I've bought a nice new one. Another easy job, though I made it harder than it should be
I forgot to take a 'before' prior to butchering the badge, but here's a grab from another photo:
- Before.png (127.56 KiB) Viewed 1350 times
I very, very carefully prised the badge away from the silver surround - it was only when congratulating myself that I managed to do it without marking the surround, that I realised the surround I was protecting is actually part of the badge, so will be replaced anyway. Doh.
This pic shows the badge I initialy removed, now folded - to show the silver surround bit behind which also just pulls off (it is held on just with a sticky pad, plus 2 plastic bits that just rest agains the car to guide it home accurately)
- 20200509_132357.jpg (263.03 KiB) Viewed 1350 times
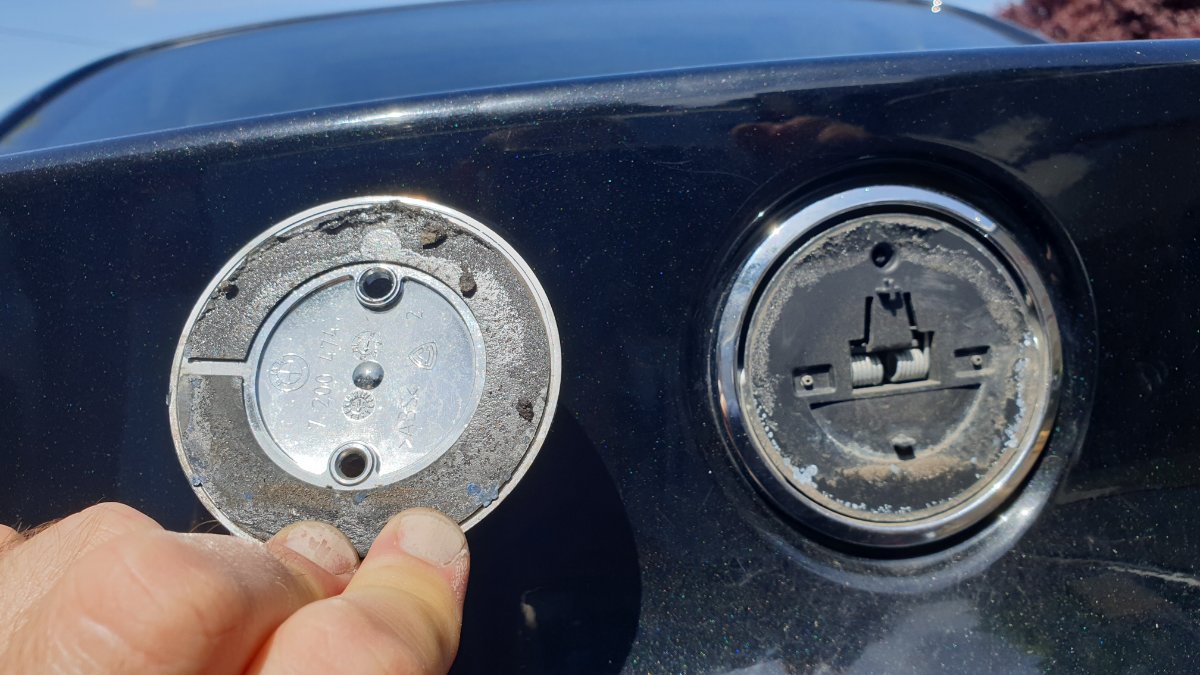
- 20200509_132408.jpg (224.08 KiB) Viewed 1350 times
Tidied up with some Goo Gone, bit of 3 in one on the spring mechanism: (those marks on the outer section is actually corrosion)
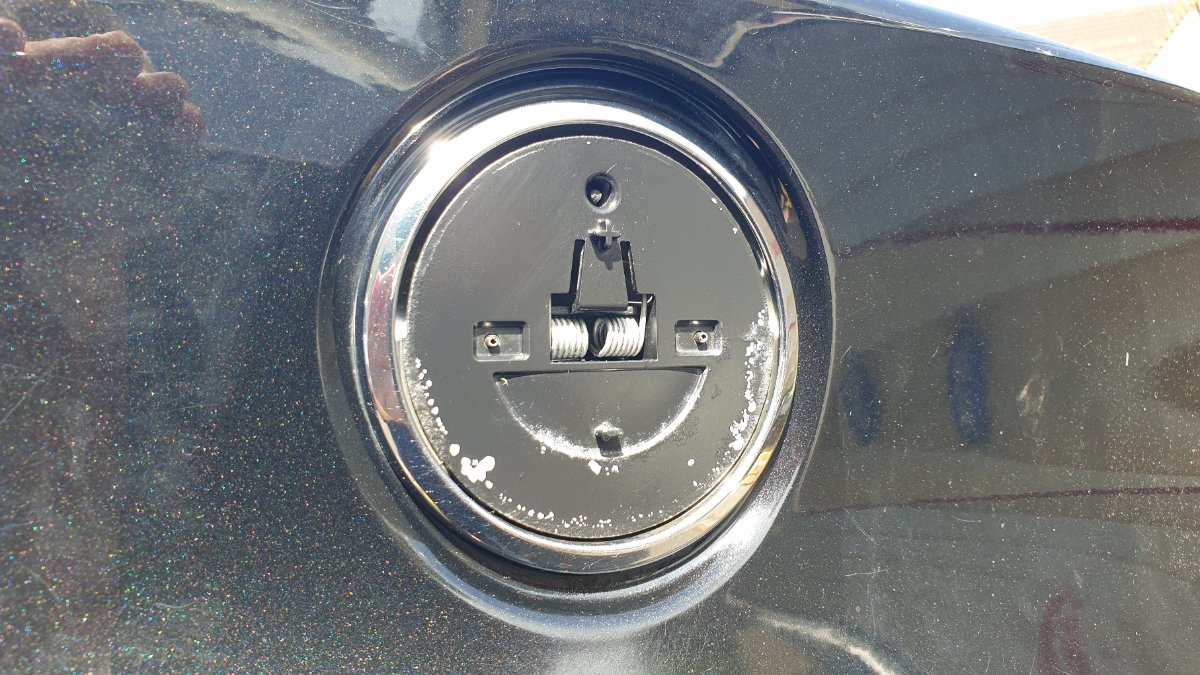
- 20200509_133357.jpg (240.12 KiB) Viewed 1350 times
And ready for the new badge - after pic to follow when it arrives from Latvia

Edit: 1st June, the badge shows up...
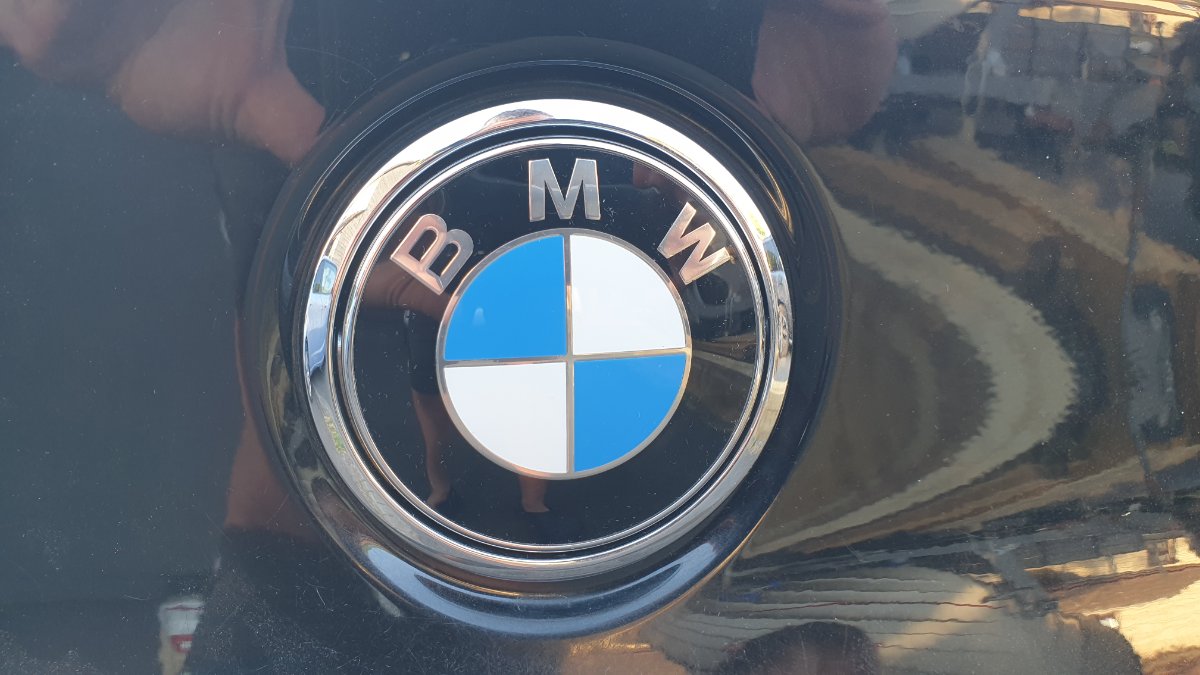
- 20200601_192415.jpg (197.77 KiB) Viewed 1091 times
My Second Zed Thread (2010 E89 sDrive30i)
Posted: Mon May 11, 2020 11:44 pm
by Silverstar
Timmyboybunter wrote: ↑Mon May 11, 2020 11:07 pm
Had a go at making the leather seats more presentable at the weekend.
This is using the Gliptone / Scuffmaster Liquid Leather touch up kit, which for the option I selected gives you 4 products:
20200507_134346.jpg
Used the cleaner first which did remove a fair amount of grime (even though I've cleaned the seats previously using baby wipes), then went over them again using the degreasnt - which didn't seem to do much, but I didn't really have any marks/stains to come off, as is the intended use.
Then applied the dye by squeezing onto a lint free cloth and dabbing onto the most obvious areas which needed attention. Initial impression is: hmm, that was a wasted of money, it doesn't actually cover anything. The weekend was very warm so the coats dried quickly, so as I worked my way around the driver seat first, I kept going back to the really obvious marks and adding another layer every couple of minutes. By the time I'd finished a general dab over the seat (takes a good long time), multiple layers had been added to the bad scuffs and marks - and they have actually come up very well indeed. The single most obvious mark on the bolster has basically disappeared.
Before:
Base before.jpg
Base 2 before.jpg
Bolster 1 before.jpg
Bolster 2 before.jpg
Base 2 before.jpg
After:
Base after.jpg
Base 2 after.jpg
Bolster 1 after.jpg
Bolster 2 after.jpg
Bolster 3 after.jpg
I let that dry for 24 hours, then used the final conditioner product - nice smell (have used this one before) and once that had dried (took a day again before that was truly dry), the job is finished.
I used less dye on the 2nd seat, partially because it was in better condition, partially becuase I'd had enough of doing it
but now I know how well it works and how simple it is to use, I'll probably have another more methodical go in the futuer (and use it as an ongoing maintenance task to keep the seats looking decent).
I note on the website that the dye bottle is now 250 ml, whereas before (and as is printed on the label!) it only used to be 60ml. I've probably used 2/3 to 3/4 of the bottle and have only completed the seats - not really 100% coverage - and the arm rest; the rest of the interior (I have the extended leather option) remains to be done if I'm truly being picky, so will probably pick up another bottle of the dye on its own.
At this point in time then, I would heartily recommend this product.
Those seats are looking real good, definitely worth the effort!
How's the colour match of the dye? I recently tried the dye from Furniture Clinic for my coral red seats and their dye is just a bit lighter, definitely not a 100% match.
My Second Zed Thread (2010 E89 sDrive30i)
Posted: Mon May 11, 2020 11:52 pm
by Timmyboybunter
Thanks
Yes the match is 100% perfect to my eye - I sent my interior code with the order ("Nappa/elfenbein-weiss" - LZEW) and they sent out the products without any further contact. I think coats is the key factor here really, as even after applying 5 or 6 the largest of the scuff marks on the bolster was still visible underneath, but eventually it got fainter and just blended away. May be worth sticking some more red coats on your bolster and seeing if the slight light shade darkens down a bit further?
If you can get delivery to Spain for a reasonable rate, it's not a huge amount of money to have a toy around with as an altnerative product is another way of looking at it.
My Second Zed Thread (2010 E89 sDrive30i)
Posted: Tue May 12, 2020 1:02 am
by Timmyboybunter
One other thing I forgot to mention, I was messing around with Carly a couple of weeks ago, trying - unsuccessfully - to change the warning bongs to make the Rolls Royce sound rather than BMW (only supported on later models - boo) and noticed the option to reset adaptations on the auto box so it will 'relearn' my driving style and habits.
Happy to report it has cured the previously jerky gear change in sport mode, no noticeable difference in normal mode though have only travelled a few miles so far - changing the transmission fluid still on the to-do list however.
My Second Zed Thread (2010 E89 sDrive30i)
Posted: Tue May 12, 2020 11:07 am
by Silverstar
Yes I noticed that too, you have to apply multiple coats to get good coverage, I think I must have applied about 8 to 10 coats on the worst areas but it seems the colour difference was getting more noticeable the more coats I put on! I think for what it's worth I might get a bottle of the dye you used and try on top hopefully it will work and be a much better match.
Interesting what you mentioned about the auto gearbox adaptations, I wonder if Carista has that setting too. I too find the response / changes in sport mode a bit jerky and or not really very smooth.
My Second Zed Thread (2010 E89 sDrive30i)
Posted: Fri May 15, 2020 9:38 am
by Timmyboybunter
Silverstar wrote: ↑Tue May 12, 2020 11:07 am
Interesting what you mentioned about the auto gearbox adaptations, I wonder if Carista has that setting too. I too find the response / changes in sport mode a bit jerky and or not really very smooth.
Managed my first proper drive out yesterday in about 6 weeks - the kind of drive just to burn petrol and no other reason, very good for the soul.
Massive improvement on the gearchange - I had it in sport mode probably 90% of the 1 hour blast, and didn't get a single lurchy gear change. Before, gear changes on full throttle were nice and snappy (possibly seem 'slower' now if that is at all possible?) but changes on partial throttle really did come with a pronounced lurch - now completely gone.
Bit of googling suggests this may just be temporary, but I'd love to understand the process behind it all - and yes, if Carista doesn't support it I'd definitely recommend seeking out an alternative (or a friendly Spanish Carly ower perhaps).
You could pop over to the UK, I'll reset the adaptations while you do my instrument cluster LED mod
My Second Zed Thread (2010 E89 sDrive30i)
Posted: Fri May 15, 2020 10:50 pm
by Silverstar
Timmyboybunter wrote: ↑Fri May 15, 2020 9:38 am
You could pop over to the UK, I'll reset the adaptations while you do my instrument cluster LED mod
You will have to come here first to get your rear bumper sprayed!

Somewhere down the long list of mods I have planned, is the XHP Flash tool. From what I have heard it does wonders for both the older ZF6HP gearbox and the newer ZF8HP. Makes gear changes quicker and makes Sport mode way better and more useable without any of those lurches etc.
https://www.xhpflashtool.com
My Second Zed Thread (2010 E89 sDrive30i)
Posted: Sat May 16, 2020 9:51 am
by Pbondar
Silverstar wrote: ↑Fri May 15, 2020 10:50 pm
Timmyboybunter wrote: ↑Fri May 15, 2020 9:38 am
You could pop over to the UK, I'll reset the adaptations while you do my instrument cluster LED mod
You will have to come here first to get your rear bumper sprayed!
Somewhere down the long list of mods I have planned, is the XHP Flash tool. From what I have heard it does wonders for both the older ZF6HP gearbox and the newer ZF8HP. Makes gear changes quicker and makes Sport mode way better and more useable without any of those lurches etc.
https://www.xhpflashtool.com
It doesn’t appear to support the E89 ZF8HP box at the moment?
My Second Zed Thread (2010 E89 sDrive30i)
Posted: Sat May 16, 2020 1:27 pm
by Silverstar
Pbondar wrote: ↑Sat May 16, 2020 9:51 am
Silverstar wrote: ↑Fri May 15, 2020 10:50 pm
Timmyboybunter wrote: ↑Fri May 15, 2020 9:38 am
You could pop over to the UK, I'll reset the adaptations while you do my instrument cluster LED mod
You will have to come here first to get your rear bumper sprayed!
Somewhere down the long list of mods I have planned, is the XHP Flash tool. From what I have heard it does wonders for both the older ZF6HP gearbox and the newer ZF8HP. Makes gear changes quicker and makes Sport mode way better and more useable without any of those lurches etc.
https://www.xhpflashtool.com
It doesn’t appear to support the E89 ZF8HP box at the moment?
Yes you are right, I just checked it. Seems only to support the 30i ZF6HP in E89s right now. However I did read somewhere in their documentation that if your car isn't supported to contact their support and they will try to add it.
My Second Zed Thread (2010 E89 sDrive30i)
Posted: Sat May 16, 2020 1:37 pm
by Pbondar
Silverstar wrote: ↑Sat May 16, 2020 1:27 pm
Pbondar wrote: ↑Sat May 16, 2020 9:51 am
Silverstar wrote: ↑Fri May 15, 2020 10:50 pm
You will have to come here first to get your rear bumper sprayed!
Somewhere down the long list of mods I have planned, is the XHP Flash tool. From what I have heard it does wonders for both the older ZF6HP gearbox and the newer ZF8HP. Makes gear changes quicker and makes Sport mode way better and more useable without any of those lurches etc.
https://www.xhpflashtool.com
It doesn’t appear to support the E89 ZF8HP box at the moment?
Yes you are right, I just checked it. Seems only to support the 30i ZF6HP in E89s right now. However I did read somewhere in their documentation that if your car isn't supported to contact their support and they will try to add it.
There seems to be an issue with the E89 ZF8HP box re-maps..I see Celtic offers a similar re-map of many ZF boxes but the E89 is conspicuous by its omission?