This is were I went wrong, didn't apply a final lacquer coat. Will need to redo them as the plastikote is showing signs of wear.
Not joined yet? Register for free and enjoy features such as alerts, private messaging and viewing latest posts and topics.
How To - Steering Wheel Spoke Refurbishment
-
Marlon

- Lifer

- Posts: 10899
- Joined: Mon Jan 05, 2015 11:13 am
- Location: Lancs.
- Contact:
How To - Steering Wheel Spoke Refurbishment
Gone: 3.0si 2008 E85
911 997 Carrera S
-
MrPT

- Lifer
- Posts: 4747
- Joined: Sun Oct 21, 2012 7:44 pm
- Location: Bucks/Oxon
How To - Steering Wheel Spoke Refurbishment
Where did you get the lacquer? I used plastic primer and satin black bumper paint, which seems to be very durable and looks the part but still doesn’t replicate the original texture.
Agreed removing the stuff is horrendous! I found wet and dry plus lots of water did the trick, but it took chuffing ages.
- imag4961.jpg (213.09 KiB) Viewed 7067 times
2008 Z4MC: heavy wheels | crap suspension | skittish rear end | wobbly engine | not enough induction noise | underwhelming turn in | inconsistent braking | lardy battery | chubby steering wheel
2006 Z4 2.5si: gone
2006 Z4 2.5si: gone
-
Bing

- Legend

- Posts: 26514
- Joined: Sun Oct 02, 2011 7:19 pm
- Location: Exiled Scot in Maidstone
How To - Steering Wheel Spoke Refurbishment
I need to speak to you about how you did all that as the ones I got have a white line along the edges where the paint hasn’t taken or has worn... my OCD won’t let me fit them like that
Current... Silver Grey ///M Roadster, non-flimper spec, Imola Red nappa, permanent ear-to-ear grin 
Previous... 3.0Si Sport Roadster, Black Sapphire, Dream Red leather with lots of toys and lots of mods...
Previous... 3.0Si Sport Roadster, Black Sapphire, Dream Red leather with lots of toys and lots of mods...
-
ph001

- Lifer
- Posts: 3870
- Joined: Mon Oct 31, 2016 5:53 pm
- Location: N. Yorkshire.
How To - Steering Wheel Spoke Refurbishment
I wonder if something like acetone would bring the old rubberised paint off easily? I don't think it would harm the plastic if it is a hard plastic.
2007 E85 Z4 3.0Si manual 
19" CSL's | Eibach Springs | Aeroskirts | Z4M front bumper | Clear brake light | ZHP | RCH+| Stubby
2004 E46 M3 coupe manual - gone but not forgotten.

19" CSL's | Eibach Springs | Aeroskirts | Z4M front bumper | Clear brake light | ZHP | RCH+| Stubby
2004 E46 M3 coupe manual - gone but not forgotten.
-
craigbeal

- Member

- Posts: 123
- Joined: Thu Sep 20, 2018 7:39 am
How To - Steering Wheel Spoke Refurbishment
going to have to give this a go. Looks great!!
-
Polarbert
- Newbie

- Posts: 20
- Joined: Tue Feb 23, 2016 7:47 am
How To - Steering Wheel Spoke Refurbishment
I used something called Plastikoat when I redid mine. Still holding up well after 9 months of daily driving.
-
dgmx5
- Member

- Posts: 89
- Joined: Mon Mar 03, 2014 2:14 pm
How To - Steering Wheel Spoke Refurbishment
Very useful information throughout here.
The water pump recently went on my 3.0si so whilst it was laid up in the garage awaiting delivery of parts I thought this would give me a great chance to get in and finally refurbish my spokes which were looking tired. I had thought I would only do this once I got the wheel covered in Alcantara by Royals but having had the chance to give it a damned good clean whilst the spokes were off, I will probably leave as is as the wife, whose car it is, doesn't really like any mods.
I did front and rear spokes so that the feel/texture will be the same even if you can't see the rears.
Having removed the remainder of the rubberised coating using IPA, and keying the sound paint below or removing it entirely in parts, I went with grey plastic primer, matt black and matt lacquer (all Halfords' rattle cans). I did not sand down between coats which means there is a slightly rough finish but I actually think it suits.
Time will tell as to whether or not the lacquer helps prolong the finish although the car only does ca. 2-3,000 miles a year.
Reinstallation was a bit of a problem for the centre spoke.
As most here have experienced, the clips had all broken and the lugs of the front spoke into which the screws go had previously been sheared off leaving the front spoke only held in by the airbag. A mix of superglue and 2-part chemical weld had given a pretty strong base but I managed to shear them again when installing as I could not get the rear spoke inside the "shroud" of the wheel which left a gap which as I tightened the screws caused the lugs to shear again
There was also an unsightly gap along the sides that necessitated removing the wheel entirely to take off the plastic shroud (3 torx screws, same size as the other torx screws on the spokes). This allowed me to properly seat the rear centre spoke first before reattaching the shroud. As a result, even though I only have the two torx screws to attached the front centre spoke to the rear centre spoke, it lines up pretty well. The rear side spokes could be moved into place with the shroud still fitted.
Really pleased with the outcome.
The red arrow marks where I could not get the rear centre spoke to fit inside the rear shroud without removing the wheel and taking the shroud off. Note the pretty good 'shut line' between the rear and front spokes despite only having the two torx screws to hold this section together. And if the lugs do break again, it will be a lot easier to just remove the front piece and repair.
The water pump recently went on my 3.0si so whilst it was laid up in the garage awaiting delivery of parts I thought this would give me a great chance to get in and finally refurbish my spokes which were looking tired. I had thought I would only do this once I got the wheel covered in Alcantara by Royals but having had the chance to give it a damned good clean whilst the spokes were off, I will probably leave as is as the wife, whose car it is, doesn't really like any mods.
I did front and rear spokes so that the feel/texture will be the same even if you can't see the rears.
Having removed the remainder of the rubberised coating using IPA, and keying the sound paint below or removing it entirely in parts, I went with grey plastic primer, matt black and matt lacquer (all Halfords' rattle cans). I did not sand down between coats which means there is a slightly rough finish but I actually think it suits.
Time will tell as to whether or not the lacquer helps prolong the finish although the car only does ca. 2-3,000 miles a year.
Reinstallation was a bit of a problem for the centre spoke.
As most here have experienced, the clips had all broken and the lugs of the front spoke into which the screws go had previously been sheared off leaving the front spoke only held in by the airbag. A mix of superglue and 2-part chemical weld had given a pretty strong base but I managed to shear them again when installing as I could not get the rear spoke inside the "shroud" of the wheel which left a gap which as I tightened the screws caused the lugs to shear again
There was also an unsightly gap along the sides that necessitated removing the wheel entirely to take off the plastic shroud (3 torx screws, same size as the other torx screws on the spokes). This allowed me to properly seat the rear centre spoke first before reattaching the shroud. As a result, even though I only have the two torx screws to attached the front centre spoke to the rear centre spoke, it lines up pretty well. The rear side spokes could be moved into place with the shroud still fitted.
Really pleased with the outcome.
- 20201121_092748 (1).jpg (166.21 KiB) Viewed 2709 times
- 20201121_092834.jpg (135.64 KiB) Viewed 2709 times
- 20201121_092904.jpg (167.5 KiB) Viewed 2709 times
- 20201121_092918.jpg (138.74 KiB) Viewed 2709 times
- 20201121_093002 (1).jpg (84.78 KiB) Viewed 2709 times
-
flimper
- Lifer
- Posts: 4607
- Joined: Wed Jan 21, 2009 11:47 pm
- Location: Hampshire
How To - Steering Wheel Spoke Refurbishment
My spokes are a bit sticky/scratched now and interesting reading this thread. But being lazy and seeing how much hassle this is I may just spend £220 on new spokes and work a couple of my days off!
Piano black & black extended leather. Power mirrors, tinted glass, PDC, Prof hi-fi, CD, retro-fit cruise
-
Ben_Z4

- Newbie
- Posts: 9
- Joined: Tue Jan 09, 2024 3:30 pm
How To - Steering Wheel Spoke Refurbishment
My steering wheel can also use a touch up. I am going to readup this topic 

- IMG_20240302_154930_.jpg (49.39 KiB) Viewed 741 times
mm, seems I would need three parts for this, the covers 32348035326 and the two buttons (with covers). Seeing the prices for that, it would be more like 650 euro. Then some homework becomes more likely
-
flimper
- Lifer
- Posts: 4607
- Joined: Wed Jan 21, 2009 11:47 pm
- Location: Hampshire
How To - Steering Wheel Spoke Refurbishment
At 650 euros they can keep their shiny new bits 
Piano black & black extended leather. Power mirrors, tinted glass, PDC, Prof hi-fi, CD, retro-fit cruise
-
pvr

- Legend
- Posts: 26405
- Joined: Fri Jun 15, 2007 12:27 pm
- Location: South East UK
How To - Steering Wheel Spoke Refurbishment
I used the method to get all the rubber material off with alcohol, works very well - except that your fingers hurt like mad 
Current:
911-50 Black - unique spec
X5M - 575 hp of fun in a V8
Abarth 595 Comp.
Golf Clipper - collectors item
Z4 3.0si Black Sapphire
VW ID.3
Previous:
Z4M Silver Grey - non flimper spec (gone to Bing)
Z4 3.0 Toledo
911-50 Black - unique spec
X5M - 575 hp of fun in a V8
Abarth 595 Comp.
Golf Clipper - collectors item
Z4 3.0si Black Sapphire
VW ID.3
Previous:
Z4M Silver Grey - non flimper spec (gone to Bing)
Z4 3.0 Toledo
-
Z4Mariner
- Member
- Posts: 184
- Joined: Tue Jan 11, 2022 6:40 pm
How To - Steering Wheel Spoke Refurbishment
Lots of good advice here, but I'll add a quick description of my experience in re-finishing my 'pop-up' CID (computer information display) unit for the Sat Nav in my Coupe. The paint advice may or may not be brand-specific (I'm in the US).
I removed the ‘soft touch’ vinyl finish on the exposed surfaces with isopropyl alcohol (IPA) like most have described. It swells the original finish for removal, but it doesn’t dissolve it. The vinyl can be rubbed or scraped from the base plastic – and it’s a messy process! Then followed more IPA and lots of rubbing with clean IPA-soaked paper towels. This leaves a plasticizer residue. As a chemist, I'm familiar with this property of vinyl materials. I removed the plasticizer with low-odor mineral spirits. Because the plastic is an ABS/PC blend, I worried ketones or ethyl acetate would cause damage, so I tested on a hidden spot, and mineral spirits worked. I did a final IPA wipe to remove the mineral spirit residue (oily) before painting the parts.
To paint the display module parts I used Rustoleum® flat black primer, allowed it to dry for over 48 hours, and finished it with two coats of the same brand of matte clear. I asked the Rustoleum® help desk for the most durable surface out of three possible products they sell (satin bumper paint, flat auto accent paint, and their '2X-coverage' standard paints). They said that matte clear (not flat, not satin) was likely to be the best for a surface that might receive some wear and light cleaning but still look okay. This advice on matte finish versus flat or satin may or may not extend to other paint manufacturers. I'm happy with the result, now we'll see how well it wears.
Z4Mariner
Minnesota, USA
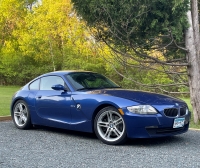
2006 Z4 Coupe 3.0Si, Montego Blue, MT
Minnesota, USA
2006 Z4 Coupe 3.0Si, Montego Blue, MT