
About the only replaceable thing that sometimes wears out on these TBs is the plastic pull rod or #11 on the diagram. The delicate stuff, Stainless Steel shims, Butterfly valves, Butterfly shafts, Butterfly brass screws, return springs, you can't get any of it so you have to take care of what you have.
I refer to it as overhauling but what you are really doing is a through cleaning but I don't just mean for aesthetic reasons, the real reason these TBs need to be dismantled are the 15 roller or needle bearings.
12 supporting the Throttle or Butterfly valve shaft and 3 supporting the TBs and linkage.
Every set I've taken apart regardless how much mileage is on the car shows all of the needle bearings are seized with hard packed grease and dirt, to the point where the needles are no longer turning.
The throttle shaft is made of brass with a thin layer of chrome over it, the needle bearings are hardened steel so the shaft takes the wear and that's not good.
A set of S38 TBs I took apart were so worn into the brass that they were starting to leak unmetered air through the bearings.
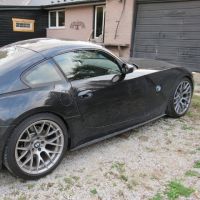
The set of TBs in these photos have 91,000mi on them and I think I got to them just in time.
- Screenshot 2022-10-16 at 17-12-36 RealOEM.com - Online BMW Parts Catalog.png (382.43 KiB) Viewed 1143 times
- oct16 1.JPG (185.94 KiB) Viewed 1143 times
Once it is into the brass it starts to wear quickly.
- oct16 6.JPG (236.03 KiB) Viewed 1143 times
- oct16 3.JPG (136.3 KiB) Viewed 1143 times
- oct16 4.JPG (223.74 KiB) Viewed 1143 times
- oct16 5.JPG (200.78 KiB) Viewed 1143 times
I wish I had taken a photo of the hardened grease, these next 2 photos are of the cleaned needle bearings, brake cleaner, a dental pic and compressed air will get them moving again.
- oct16 7.JPG (113.06 KiB) Viewed 1143 times
- oct16 8.JPG (127.96 KiB) Viewed 1143 times
- oct1615.JPG (123.62 KiB) Viewed 1143 times
You'll need a T10 star socket to remove the brass screws, the back end of those screws have been mushroomed out to make a thread lock but the brass is very soft and backing the screws out is not difficult, put them safely in the bag. Rotate the throttle shaft 90 degrees and pull the Butterfly out.
- oct16 12.JPG (135.91 KiB) Viewed 1143 times