Brake Cooling - Cheap DIY method

The OEM brake cooling ducts are just decorative as far as I can see! I've had exactly that from EBC Bluestuff pads on OEM discs. I'm going to try the brake cooling ducts before I spend a couple of thousand on brakes (although I am prepared to spend the money if I can't achieve the results I'm after).
Do you switch off the DSC on the track? I always turn it off, but on the rare occasion I've forgotten, the brakes have become extremely hot very quickly.
 
BMWZ4MC said:
The OEM brake cooling ducts are just decorative as far as I can see! I've had exactly that from EBC Bluestuff pads on OEM discs. I'm going to try the brake cooling ducts before I spend a couple of thousand on brakes (although I am prepared to spend the money if I can't achieve the results I'm after).
Do you switch off the DSC on the track? I always turn it off, but on the rare occasion I've forgotten, the brakes have become extremely hot very quickly.
Use a hand-held Infra-Red thermometer to check your brake disc/pad temps after being on track, with both OEM and cooling ducts to check if there's any difference. The hottest I've see immediately on stopping with cooling ducts is around 320 degsC.
 
Hi John! I have one so I shall :thumbsup: I think the easiest way will be to fit the cooling ducts then to make test runs with and without bath plugs in the sink waste pipes :lol:
Of course, it'll be February before I'm back, so there will be added environmental cooling taking place too...
 
BMWZ4MC said:
Hi John! I have one so I shall :thumbsup: I think the easiest way will be to fit the cooling ducts then to make test runs with and without bath plugs in the sink waste pipes :lol:
:rofl: They were designed with testing in mind! :wink: 8)
 
exdos said:
BMWZ4MC said:
Hi John! I have one so I shall :thumbsup: I think the easiest way will be to fit the cooling ducts then to make test runs with and without bath plugs in the sink waste pipes :lol:
:rofl: They were designed with testing in mind! :wink: 8)
Clearly carefully considered, like all of your engineering projects :thumbsup:
 
I'm considering this mod, but I've been wondering: how do the plastic straps hold up after 2 years? It all looks a bit fragile but I can be mistaking... :-)
 
It's all still in place and working perfectly. I recently did a 1500 mile round trip to The Ring where I did nearly 500 miles around The Ring itself. It's not so fragile as it might look: just a case of using the right size of straps. :thumbsup:
 
I'm thinking the full-size(!) protection plate inside the disc's may be my first priority, they're missing (fully or partly) on most other performance cars I've seen.
 
Brilliant job and thanks for explaining it so well. I am going to be doing this mod this weekend and just gathering in materials. Would u say 1m of ducting either side was enough? Was gonna order 3metres just to be safe? Don't wanna be short once i am under the car on a Sunday with no where to go and get some more? But if u ended up cutting the lengths a little shorter than a metre then i could get away with ordering just 2 metres. Cheers again can't wait to get this done.
 
It's more than 7 years ago since I did this so I can't remember the exact length of tubing required but 3 metres in total for both sides will be plenty. :thumbsup:
 
Mod all done last Sunday 😎
Track day yesterday, car performed way above expectations, all the work before hand more than paid off. Cooling mod soo cheap and soo good, brakes were amazing. Decided to come right out the front grill (they are now painted black and blend right in)
 

Attachments

  • WP_20191124_11_33_16_Pro.jpg
    WP_20191124_11_33_16_Pro.jpg
    207.2 KB · Views: 12,732
  • WP_20191124_12_37_30_Pro.jpg
    WP_20191124_12_37_30_Pro.jpg
    198.2 KB · Views: 12,732
  • WP_20191124_11_33_24_Pro.jpg
    WP_20191124_11_33_24_Pro.jpg
    185.6 KB · Views: 12,732
  • WP_20191124_14_18_26_Pro.jpg
    WP_20191124_14_18_26_Pro.jpg
    194.5 KB · Views: 12,732
Hi Paul,

Can i ask where you got the bits and bobs from and if you recall a 1m length would be enough. Merlin motor sport only sell in 1m lengths it seems.

Can’t tell from the thread if that would def be enough.

Thanks.
Chris
 
Actually looks like demon tweaks will sell me 3m. They also sell special hose clamps for this hose and also 300mm of aluminimum pipe with bevelled ends. Ill give that a go with the sink holes and see how i get on. I also have metal zip ties which ill probably use.
 
z4mcc said:
Actually looks like demon tweaks will sell me 3m. They also sell special hose clamps for this hose and also 300mm of aluminimum pipe with bevelled ends. Ill give that a go with the sink holes and see how i get on. I also have metal zip ties which ill probably use.
DT will also sell you inlet trumpets so you don’t need to use plumbing accessories:

DD8F66C8-D50C-4178-A9B1-BB591EEA13E5.jpeg
 
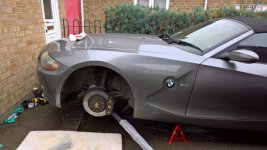
I’ve just added brake cooling to by E86 after turning the sidewall of my front left PS4 into bubble wrap on a track day (pic below). Tyre burped air under high speed cornering then 4km trundle to the pits killed the sidewall. Cooling may help slightly but I did this mod more for the fun of it.

1FCCAAB8-1831-492E-8231-F44702C4E45F.jpeg

Both this guide for the facelift and the other on here for the pre-facelift have been very useful but I have done things slightly differently and learnt a few lessons to share.

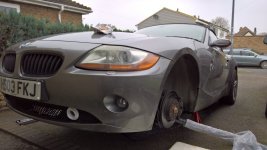
I opted for inlets in the bumper to benefit from ram air pressure as well as air velocity. I used Revotec 51mm (2”) aluminium inlets as these were the largest I could fit with minimal butchery to the bumper. These inlets came with double sided sticky foam to attach them. Even though i removed the crosshatching with a dremel to smooth the surface, they did not stick for long so I used 3-off 3.5mm bolts and washers instead.

483F24E3-723E-4961-B192-2052871640C3.jpeg

When cutting the bumper, be aware that you’ll have to remove some of the fog light mounting bracket. It’s pretty chunky so I doubt this will have an effect. Be careful with the bolt placement.

E64E6048-AAA8-4974-AC82-5E7633E503F4.jpeg

I used double skin silicone air ducting. 1.02meters per side. I’d ordered a 2m length. Luckily it was slightly longer as I needed those extra cm’s. I’d recommend ordering 2.2metres.

The hose has to pass through a plastic wall. This was easy to cut with a 64mm hole saw. To prevent the sharp edge to the plastic wearing and eventually cutting the hose. I bought some large rubber cable grommets. Yes, you can see in the picture with the horn that I bought the wrong size of grommet and had to cut it to open it up. Silly me.

The horns block the hose routing so I had to move them upwards by shortening their brackets by about an inch. Easy job.

8EBCD800-6C92-4A88-A71D-A16EABF780C9.jpeg

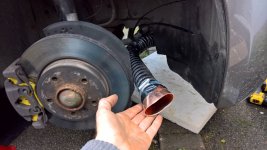
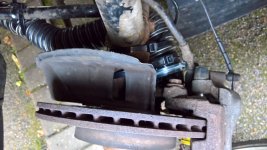
The stock dust shields already have a hole to let air into the inside of the brake discs. There are lots of folds in the dust shield but Revotec 51mm outlets fitted perfectly between these. I opened up the existing slot and attached with 3 bolts.

8704BA2C-FCAA-4940-B772-A5C8543424CE.jpeg

The hose attaches to the inlets and outlets using jubilee clips.

8031F232-73EC-4129-8813-9A866AB8E9C8.jpeg

All in, this cost me around £85. Very happy with the result. I’m still toying with fitting black mesh over the inlets to make it more inconspicuous but this would heavily affect airflow. So far, I’m happy with them as they are.
 
Back
Top Bottom