Post 04 cruise control retrofit N52
Posted: Tue Jun 01, 2010 3:57 pm
Hi all
I’ve now managed to do a post 04 cruise control retrofit on a 3.0 N52 using the loom and switch. I took some photos so people can see what I did and the mistakes I made so you hopefully can avoid them.
Equipment required
Loom and bits
Switch
BMW Instructions. (To be used in conjunction with this guide)
Multimetre
Electrical Tape
Pliers
Screwdriver Philips and flat nose
Wire stripper and cutter
Socket set including star socket screwdriver
Step 1
Disconnect Battery.
Step 2
First remove the screw under the Cowel (I) there is only one. Then give it a tug downwards on one side then repeat on the other. You may need to pull down the wheel adjustment height handle to remove the cowel. Remove Cowel and cut out the marked area if you haven’t bought one pre-cut.
Step 3

Remove Light switch Surround by using a credit card or something similar that you don’t mind breaking. It does take some force so be patient using two cards is best one either end. Then remove the two screws under the plate.

Remove cable on the top of the switch block, by pulling the white switch handle towards you. That will release the cable, then pull it through you may need to unravel some of the cable tape.

Step 4
Separate wires VI/GE cable this should go into pin 27 and also BR/SW which goes into pin 31. Be especially careful with this one. We found that there were two of these and cut the wrong one at first. Cut the cables then test these then by using a multimetre so that you are 100% sure you have the right cables. (this applies to N52 check BMW instructions for other models). Then crimp socket contact E/D on the wires as shown on BMW Diagram. Then Connect F to E and then G to D again shown in on BMW Diagram. Then connect Loom(A) using the same colours wires from the light switch cable to the loom. Then cable tie (J) it up.


Step 5
Right now the tricky bit, you now need to feed the blue cable on the Loom (I) behind the stereo down into the passenger foot well and into the engine bay. This took us ages as the BMW Instruction were very poor at this point. To do this you may need to remove the glove box unscrewing 4 screws and then another 2 under the the glove box which releases a plastic cover where the wire will feed into the engine bay.

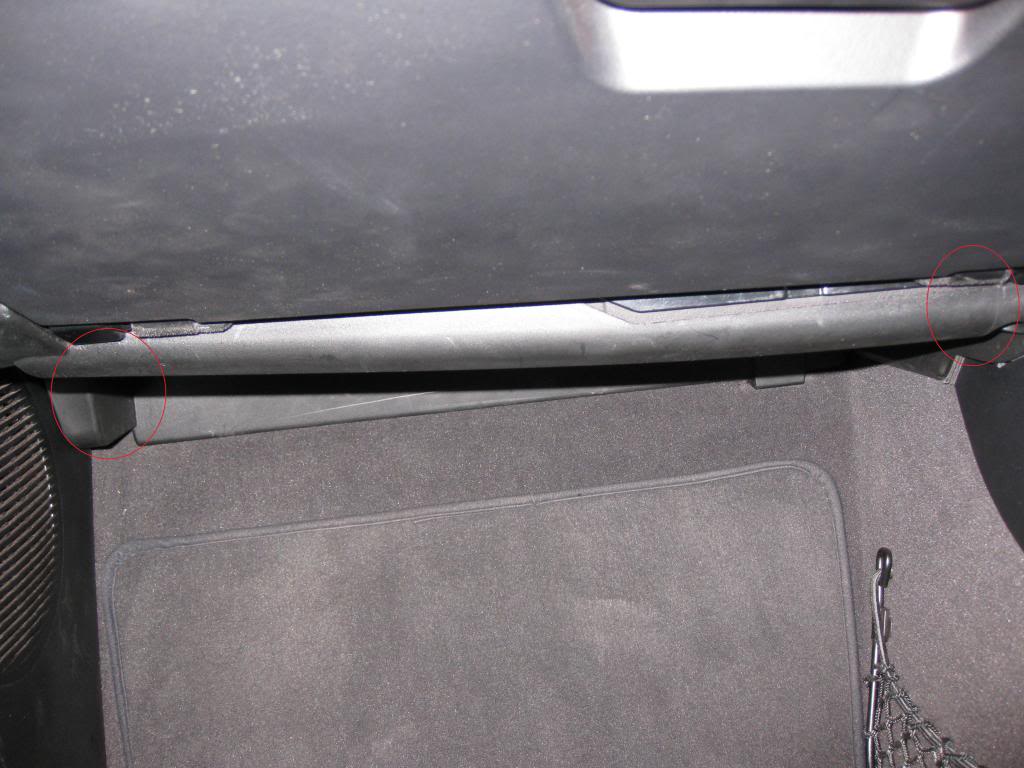
Once these screws have been removed this is what you should see. The blue cable then feeds through this hole into the electronic box in the engine bay.

Step 6
Remove plastic cover using screwdriver with star head. This is what you should see.

You then need to get the cable up. The best way to do this is to use a cable tie and dangle it down in the electronic box, connect the wire to it form inside the car and then pull it up. The wire needs to then feed into the IVM. We did this by shoving some tubing up the waterproof tubing as you see (red circle) once through, feed the cable through, and then remove tubing.
Step 7
Open up IVM box by pressing the two switches down on its top.

Then pull up the IVM. You should then see this.
Then follow BMW instructions for which ever engine you have ( N52 in this case) Connect B to blue cable loom (I), then use shrink tubing (K) to seal it. Mine didn’t work so used electrical tape as a temporary measure.
Step 8
Then remove 42 pin block. There are two 42 pin blocks in IVM. Make sure you pull out the correct one. Mine was grey and in the top left corner the wrong one is black, in the bottom right hand corner. Then slide out the half of the block and check that the pin is free. (39 in this case) then slide it in, and plug it back in.
Step 9
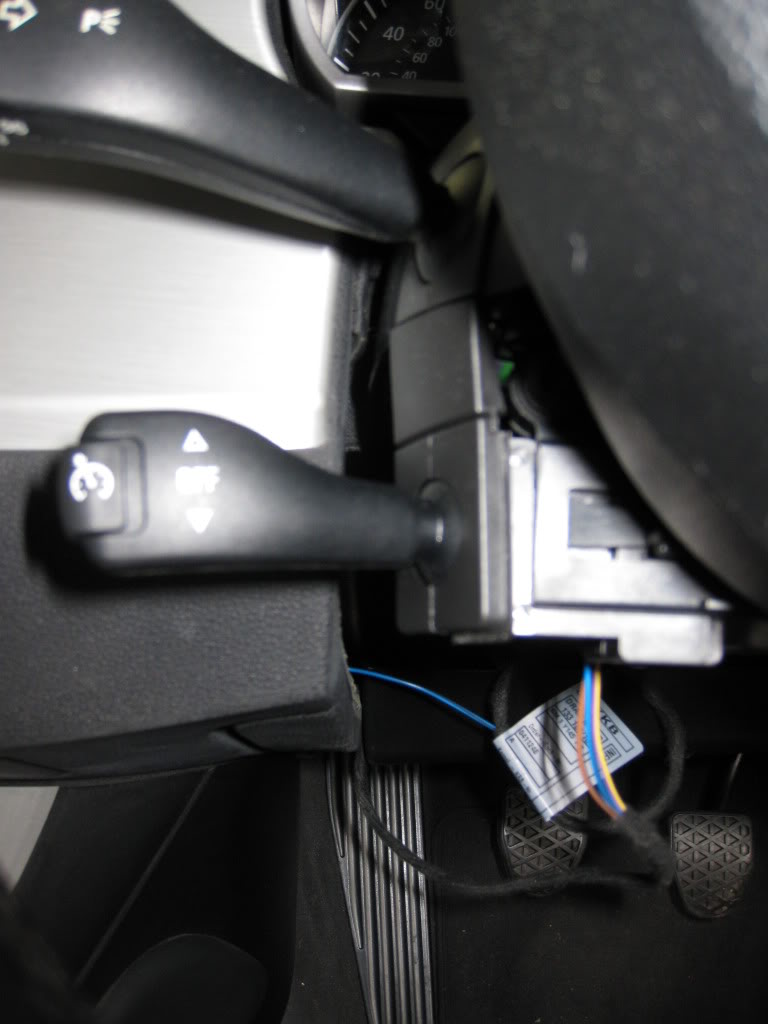
Connect Loom (A) to Switch (H) and then slide the switch into steering column.
Step 10
Reassemble everything. I started in the engine putting all the covers back on. Then into the car. Reassemble Glove box and cover 6 Screws in total. Then Light switch block and plug and 2 screws. Very fiddly if you have large hands. Put on Cowel and then one remaining screw. Then connect battery. Reset Clock and windows. Then test drive preferably on dual carriage way. No need for recoding.
Job done.
Things to remember
Never rush. We tried doing it in an evening and ran out of light. 70 Mins BMW suggest. If this is the first one you have done allow at least 3 Hrs. We made some silly mistakes due to trying to rush it.
Keep all bits in one place screws etc. We ended up mislaying things everywhere.
Always read the instructions and try and have someone with you so you can run things by them. Two heads are better than one and simple mistakes were avoided due to this.
Make sure you’ve got everything you need as you won’t be able to drive down B&Q or Hanford’s if your car is in bits.
This is a guide to how I did it. Other cars may vary on wiring etc so this is at your own risk, and if you’re not confident it may be best not to attempt it.
My thanks to all the various info on the site, and to my mate Phil who did a lot of the fiddly bits.
Now onto next project SatNav.
I’ve now managed to do a post 04 cruise control retrofit on a 3.0 N52 using the loom and switch. I took some photos so people can see what I did and the mistakes I made so you hopefully can avoid them.
Equipment required
Loom and bits
Switch
BMW Instructions. (To be used in conjunction with this guide)
Multimetre
Electrical Tape
Pliers
Screwdriver Philips and flat nose
Wire stripper and cutter
Socket set including star socket screwdriver
Step 1
Disconnect Battery.
Step 2
First remove the screw under the Cowel (I) there is only one. Then give it a tug downwards on one side then repeat on the other. You may need to pull down the wheel adjustment height handle to remove the cowel. Remove Cowel and cut out the marked area if you haven’t bought one pre-cut.
Step 3
Remove Light switch Surround by using a credit card or something similar that you don’t mind breaking. It does take some force so be patient using two cards is best one either end. Then remove the two screws under the plate.
Remove cable on the top of the switch block, by pulling the white switch handle towards you. That will release the cable, then pull it through you may need to unravel some of the cable tape.
Step 4
Separate wires VI/GE cable this should go into pin 27 and also BR/SW which goes into pin 31. Be especially careful with this one. We found that there were two of these and cut the wrong one at first. Cut the cables then test these then by using a multimetre so that you are 100% sure you have the right cables. (this applies to N52 check BMW instructions for other models). Then crimp socket contact E/D on the wires as shown on BMW Diagram. Then Connect F to E and then G to D again shown in on BMW Diagram. Then connect Loom(A) using the same colours wires from the light switch cable to the loom. Then cable tie (J) it up.
Step 5
Right now the tricky bit, you now need to feed the blue cable on the Loom (I) behind the stereo down into the passenger foot well and into the engine bay. This took us ages as the BMW Instruction were very poor at this point. To do this you may need to remove the glove box unscrewing 4 screws and then another 2 under the the glove box which releases a plastic cover where the wire will feed into the engine bay.
Once these screws have been removed this is what you should see. The blue cable then feeds through this hole into the electronic box in the engine bay.
Step 6
Remove plastic cover using screwdriver with star head. This is what you should see.
You then need to get the cable up. The best way to do this is to use a cable tie and dangle it down in the electronic box, connect the wire to it form inside the car and then pull it up. The wire needs to then feed into the IVM. We did this by shoving some tubing up the waterproof tubing as you see (red circle) once through, feed the cable through, and then remove tubing.
Step 7
Open up IVM box by pressing the two switches down on its top.
Then pull up the IVM. You should then see this.
Then follow BMW instructions for which ever engine you have ( N52 in this case) Connect B to blue cable loom (I), then use shrink tubing (K) to seal it. Mine didn’t work so used electrical tape as a temporary measure.
Step 8
Then remove 42 pin block. There are two 42 pin blocks in IVM. Make sure you pull out the correct one. Mine was grey and in the top left corner the wrong one is black, in the bottom right hand corner. Then slide out the half of the block and check that the pin is free. (39 in this case) then slide it in, and plug it back in.
Step 9
Connect Loom (A) to Switch (H) and then slide the switch into steering column.
Step 10
Reassemble everything. I started in the engine putting all the covers back on. Then into the car. Reassemble Glove box and cover 6 Screws in total. Then Light switch block and plug and 2 screws. Very fiddly if you have large hands. Put on Cowel and then one remaining screw. Then connect battery. Reset Clock and windows. Then test drive preferably on dual carriage way. No need for recoding.
Job done.
Things to remember
Never rush. We tried doing it in an evening and ran out of light. 70 Mins BMW suggest. If this is the first one you have done allow at least 3 Hrs. We made some silly mistakes due to trying to rush it.
Keep all bits in one place screws etc. We ended up mislaying things everywhere.
Always read the instructions and try and have someone with you so you can run things by them. Two heads are better than one and simple mistakes were avoided due to this.
Make sure you’ve got everything you need as you won’t be able to drive down B&Q or Hanford’s if your car is in bits.
This is a guide to how I did it. Other cars may vary on wiring etc so this is at your own risk, and if you’re not confident it may be best not to attempt it.
My thanks to all the various info on the site, and to my mate Phil who did a lot of the fiddly bits.
Now onto next project SatNav.