108 Refurbishment and Customisation
Posted: Tue Dec 23, 2008 10:09 pm
Those of you who know me well, know that I can’t stop doing little projects, so having got a set of 108’s on the Zed and really liked the look, I wondered if I could do something just a little different to the norm.
As luck would have it I grabbed a second set on Ebay, which were badly corroded, but almost no kerbing. They were displaying the advanced stages of the infamous lacquer failure, so they were the basis of the project.
Local tyre shop got rid of the old RFT’s for me and a 12 point spline set was sourced from http://www.toolmix.com
Pretty easy job to break them down using a rachet to ‘crack’ the bolts and then a power driver in low gear to spin them out. (with 80 bolts I didn’t fancy RSI) .
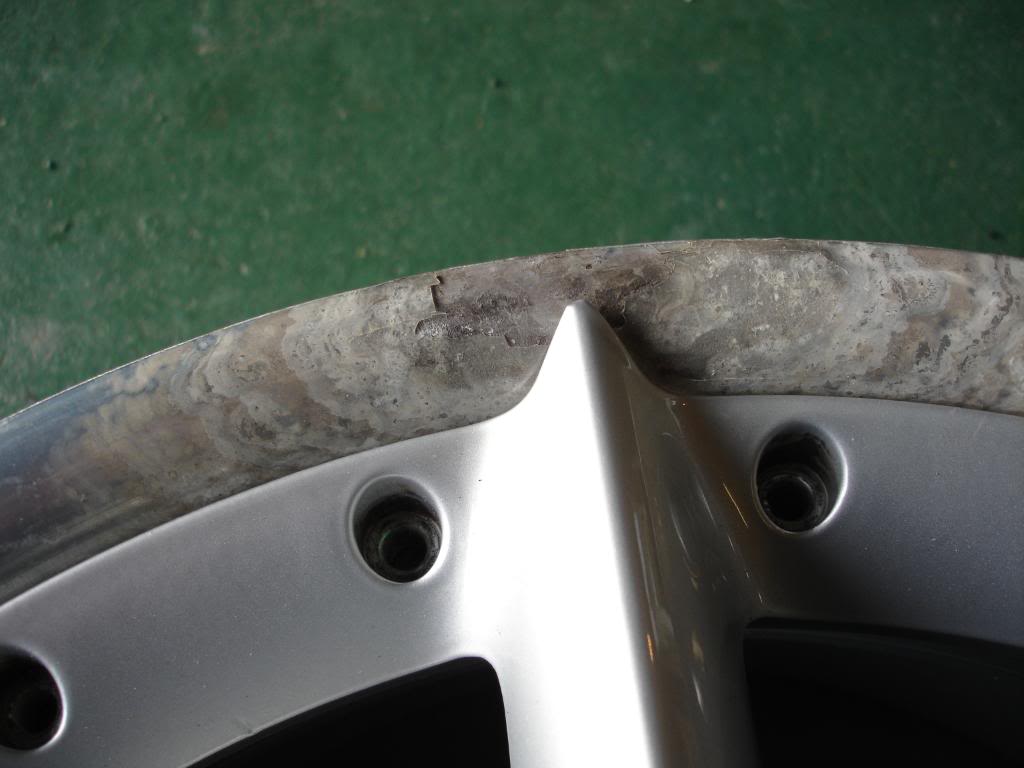
Well, just so you don’t think I started with a perfect set here’s the state of the rims..

First step was lacquer off and I chose some good old Nitromors as it’s a thick gel and potent. It blistered the old lacquer off in minutes with a bit of agitation.
OMG – what was under that lacquer??


The next step was to brighten up the rims with 400, 800 and then 1200 grade paper. These quickly removed tarnish creating a smooth, void of any minor grazes, but a dull surface.
To get a mirror shine I opted to buy a specialist buffing kit from the very helpful people at Merlin Abrasives They assembled me a whole series of polishing pads, polish, arbor and Vienna Lime (don’t ask me but it removes excess polish).

As always I hate work, so I opted for a flexible drive off a bench stand drill, to create a powerful flexible buffer with the supplied 4” mop as the base tool
10 minutes per side of buffing and they turned to a mirror finish.
Advise from Merlin was to not lacquer, as for sure they would go again, as quite simply you can’t stop water getting under the lacquer from kerbing, even tyre fitting or a stone chip. On mine one major fault on one rim was a dented star point that had touched the rim. 3 coats of Poorboys now seal the rims so all they ever need is a once a month wipe around.
The inner faces were in good condition and just a few minor dings, but since these are ‘inside’ a couple of coats of steel wheel silver and then lacquer, had them pristine.
The stars I wanted different, so after Herminator did me a few photoshops which helped crystalise what I had in mind - a colour that was in harmony with Sterling grey, but not a flat paint finish. I tracked a local guy down who for £140, stripped back to bare, fixed minor imperfections, powder coated black and baked. That was followed by a transparent chrome wet paint and lacquered to create a wonderful smoked chrome look.
(Strangely he has in the last week purchased a 108 to do up in a similar way as a shop exhibit so I guess he liked the outcome)
So the exciting bit of putting them together. Matching the right casting to rim and bolting together with Locktite and torque up.
The end result I really like, but you’ll have to wait until the New Year when I’m allowed by Mrs CJ to get a set of Falkens and put them on. For now I’m putting them on the shelf and keeping the existing on as a Winter set.
I’ll try to get some better photos and substitute later, but for now you get the idea:

The indoor photo does make them look darker than in reality where they are much more shiny and reflective bringing a depth through and a great shade to work with the Sterling Grey.
As luck would have it I grabbed a second set on Ebay, which were badly corroded, but almost no kerbing. They were displaying the advanced stages of the infamous lacquer failure, so they were the basis of the project.
Local tyre shop got rid of the old RFT’s for me and a 12 point spline set was sourced from http://www.toolmix.com
Pretty easy job to break them down using a rachet to ‘crack’ the bolts and then a power driver in low gear to spin them out. (with 80 bolts I didn’t fancy RSI) .
Well, just so you don’t think I started with a perfect set here’s the state of the rims..
First step was lacquer off and I chose some good old Nitromors as it’s a thick gel and potent. It blistered the old lacquer off in minutes with a bit of agitation.
OMG – what was under that lacquer??
The next step was to brighten up the rims with 400, 800 and then 1200 grade paper. These quickly removed tarnish creating a smooth, void of any minor grazes, but a dull surface.
To get a mirror shine I opted to buy a specialist buffing kit from the very helpful people at Merlin Abrasives They assembled me a whole series of polishing pads, polish, arbor and Vienna Lime (don’t ask me but it removes excess polish).
As always I hate work, so I opted for a flexible drive off a bench stand drill, to create a powerful flexible buffer with the supplied 4” mop as the base tool
10 minutes per side of buffing and they turned to a mirror finish.
Advise from Merlin was to not lacquer, as for sure they would go again, as quite simply you can’t stop water getting under the lacquer from kerbing, even tyre fitting or a stone chip. On mine one major fault on one rim was a dented star point that had touched the rim. 3 coats of Poorboys now seal the rims so all they ever need is a once a month wipe around.
The inner faces were in good condition and just a few minor dings, but since these are ‘inside’ a couple of coats of steel wheel silver and then lacquer, had them pristine.
The stars I wanted different, so after Herminator did me a few photoshops which helped crystalise what I had in mind - a colour that was in harmony with Sterling grey, but not a flat paint finish. I tracked a local guy down who for £140, stripped back to bare, fixed minor imperfections, powder coated black and baked. That was followed by a transparent chrome wet paint and lacquered to create a wonderful smoked chrome look.
(Strangely he has in the last week purchased a 108 to do up in a similar way as a shop exhibit so I guess he liked the outcome)
So the exciting bit of putting them together. Matching the right casting to rim and bolting together with Locktite and torque up.
The end result I really like, but you’ll have to wait until the New Year when I’m allowed by Mrs CJ to get a set of Falkens and put them on. For now I’m putting them on the shelf and keeping the existing on as a Winter set.
I’ll try to get some better photos and substitute later, but for now you get the idea:
The indoor photo does make them look darker than in reality where they are much more shiny and reflective bringing a depth through and a great shade to work with the Sterling Grey.