Page 5 of 41
Liam's Z4C race car project
Posted: Sun Apr 28, 2019 9:18 pm
by Liam22
Picked up a set of aluminium bell housing bolts from BMW in the week (a tenner) and got the gearbox lined up with the engine. Then I noticed that the engine mounts still needed changing and this would probably be easier without the gearbox attached.
Couldn't see how to do it without removing the front cross member, and briefly considered taking it off for painting. But you have to draw the line somewhere, and I didn't fancy disconnecting the steering rack at this point.
With the engine supported with a trolley jack under the sump (weight spread with a block of wood) I was able to remove each engine mount without fully disconnecting the cross member. Replaced with another item from my Strongflex order - shiny aluminium mounts with a small amount of polyurethane.

- 20190428_144918_HDR.jpg (244.13 KiB) Viewed 3338 times
Back to the gearbox... Slid on easily enough but torquing up the bolts took ages. 25Nm + 130° + 20°. Impossible to use a dial gauge so sharpie marks it is.

- 20190428_144924_HDR.jpg (204.6 KiB) Viewed 3338 times
Rogue Engineering transmission mounts combined with the new engine mounts should keep that weight from shifting about in corners.

- 20190428_153830_HDR.jpg (222.23 KiB) Viewed 3338 times
Having had enough of lying on my back I switched to the engine for a change. New spark plugs and Bavarian Autosports ignition coils. Just a shame I can't fire it up while there's no exhaust on the car.

- 20190428_172340_HDR.jpg (292.45 KiB) Viewed 3338 times
Liam's Z4C race car project
Posted: Mon Apr 29, 2019 7:09 am
by blackabbot
cracking thread OP

Liam's Z4C race car project
Posted: Thu May 16, 2019 10:13 am
by Jembo
Been almost 3 weeks OP... love checking this thread quite regularly for tips & progress.
Trust all going to plan
Liam's Z4C race car project
Posted: Thu May 16, 2019 5:13 pm
by Liam22
Hit a few snags, mostly brake related.
Any recommended rear pads for track use? Standard discs/calipers.
Liam's Z4C race car project
Posted: Thu May 16, 2019 9:55 pm
by Brian H
Liam22 wrote: ↑Thu May 16, 2019 5:13 pm
Hit a few snags, mostly brake related.
Any recommended rear pads for track use? Standard discs/calipers.
I have used performance friction pads at the rear for a number of years and they suit me really well, not pricey either.
Liam's Z4C race car project
Posted: Thu May 16, 2019 11:54 pm
by Liam22
Brian H wrote: ↑Thu May 16, 2019 9:55 pm
I have used performance friction pads at the rear for a number of years and they suit me really well, not pricey either.
What compound?
Liam's Z4C race car project
Posted: Fri May 17, 2019 6:43 pm
by Brian H
Liam22 wrote: ↑Thu May 16, 2019 11:54 pm
Brian H wrote: ↑Thu May 16, 2019 9:55 pm
I have used performance friction pads at the rear for a number of years and they suit me really well, not pricey either.
What compound?
They are a carbon metallic Z rated pad.
https://pfc.parts/motorsports/pfc-compo ... ompound-2/
Liam's Z4C race car project
Posted: Sat Jul 06, 2019 11:12 pm
by Liam22
So… I had a bit of a nightmare with the brakes.
You see, they had been sprayed blue by the previous owner and that just isn't going to work with my planned race livery. Vanity got the better of me - I should really have focused on just putting everything back together.
I bought some nice "acid green" caliper paint - high temp, 2 pack. But I'm a novice when it comes to painting and I thought the second, clear pot was a top coat/laquer. But of course it was actually 2 pack hardener and I should have mixed it with the colour. The result? Ridiculously soft paint that never cured.
£137 for a full set of calipers. Expensive mistake. And of course I had to buy another pack of paint!

- 20190608_144032.jpg (168.65 KiB) Viewed 3053 times

- 20190608_154201.jpg (193.74 KiB) Viewed 3053 times

- 20190504_222034.jpg (182.47 KiB) Viewed 3053 times
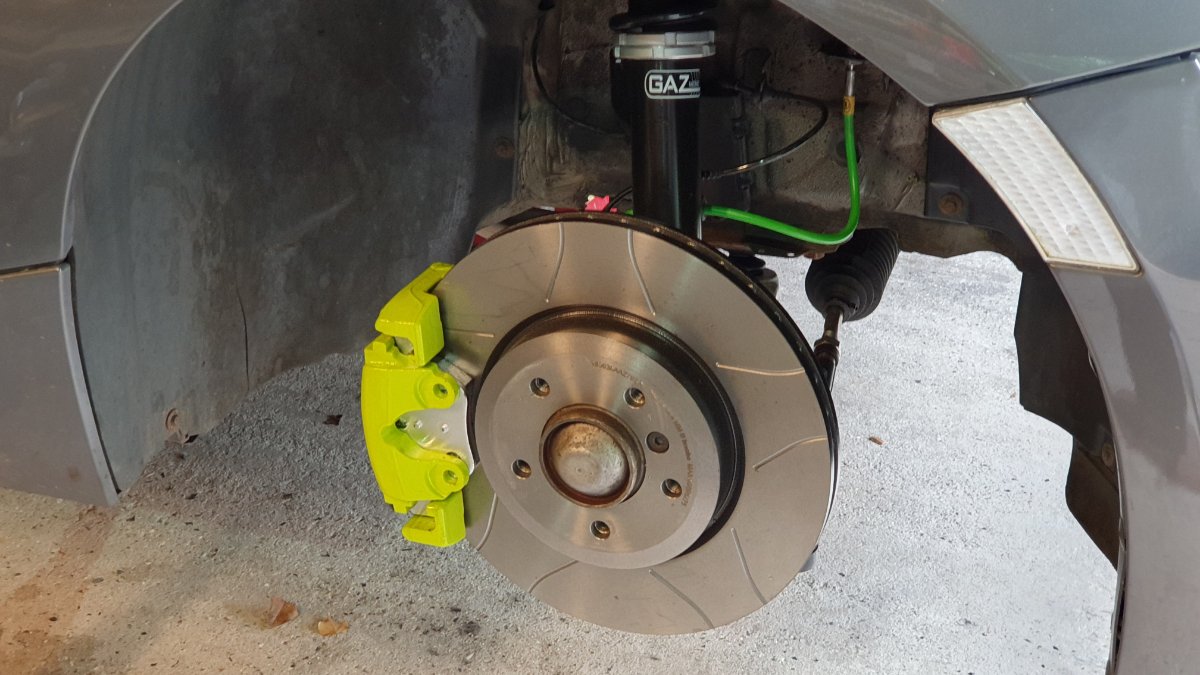
After curing in the oven for an hour, the final step was to fit solid brass sliders in place of the OEM rubber items. This should stop caliper twist and hopefully result in even pad wear.

- 20190609_165323.jpg (192.09 KiB) Viewed 3053 times
The fronts are fitted up with Carbotech XP8 pads and Brembo MAX grooved discs. The rears have Ferrodo DS2500 pads with Pagid OEM discs.
- 20190609_183230.jpg (203.79 KiB) Viewed 3049 times

- 20190609_183246.jpg (145.79 KiB) Viewed 3053 times
Liam's Z4C race car project
Posted: Sat Jul 06, 2019 11:27 pm
by Liam22
And with the brake lines fitted I could finally bleed the system and test the clutch. I had been waiting weeks since replacing the clutch/flywheel to get the brakes back on so that I could test the clutch action. Until then I did not want to replace the prop shaft (or anything else under the car).
Everything bled very nicely, and I didn't have to try to get the ABS unit into service mode or any of that nonsense. All it took was to wedge the brake pedal down for a few hours to get the last of the air out.
Liam's Z4C race car project
Posted: Tue Jul 09, 2019 10:10 pm
by Liam22
Obviously, with the brakes mounted the suspension is also fitted up.
New Meyhle HD front control arms fitted into the Powerflex Black Series eccentric lollipops.

- 20190615_112417.jpg (184.78 KiB) Viewed 2995 times
Cleaned up the front hub carriers and painted before bolting in the dampers.

- 20190426_092136_HDR.jpg (244.61 KiB) Viewed 2995 times

- 20190511_152444.jpg (290.51 KiB) Viewed 2995 times
I had purchased new outboard track rod ends for the steering rack. Remembering how much I hated the electric power steering when I first drove the car I am thinking that I will probably replace the rack, so didn't go the whole hog and also buy new inboard track rods. This was a mistake. Although I could loosen the lock nut, there was no way I could move the track rod, let alone separate the inboard/outboard parts. Slight delay while I ordered a pair of inboard track rods. Had to cut them apart with an angle grinder to get the tapered collar. Shame - could have been spares.
Picked up an E46 M3 convertible front anti roll bar from eBay which was in reasonable condition so just cleaned up and painted the bush/pivot area. Mounted onto Strongflex sport bushes.

- 20190426_084333_HDR.jpg (211.54 KiB) Viewed 2995 times
But when I went to mount the ARB I noticed that it sits directly below the water pump. I was going to replace this later but sensible to do it while I have easy access. So… new water pump and thermostat. Nice simple job and I was able to keep the original items as "known good" spares in case I run into problems later. Dumped and flushed the coolant while I was in the area. After much searching to do the right thing for the Magnesium in the N52 I replaced with Fuchs Maintain Fricofin long life (no nitrites, etc). I did enjoy the electric water pump "spin cycle" and self-bleeding process.

- 20190616_155101.jpg (208.12 KiB) Viewed 2993 times

- 20190616_161749.jpg (191.77 KiB) Viewed 2993 times
And then I could get the ARB fitted! At this point I hadn't ordered new drop links, not knowing what sort of gap I would have between the tab on the damper body and the ARB. Sure enough, too short for the OEM items so then ordered 16cm plastic(!) Peugeot items. 200g saved!

- 20190623_164245.jpg (159.55 KiB) Viewed 2992 times
Liam's Z4C race car project
Posted: Tue Jul 09, 2019 10:28 pm
by Liam22
The rear suspension was already in place as I attached it to the subframe before reassembly. Along with the rear coilovers I added strengthening brackets to the upper top mounts. Ultimately, I plan for the roll cage to pick up the rear towers.

- 20190606_194155.jpg (127.03 KiB) Viewed 2985 times
Then the prop shaft could finally go back on before all the heat shields, brackets and gubbins that covers up the mechanicals. Exhaust too!

- 20190615_112306.jpg (180.45 KiB) Viewed 2985 times
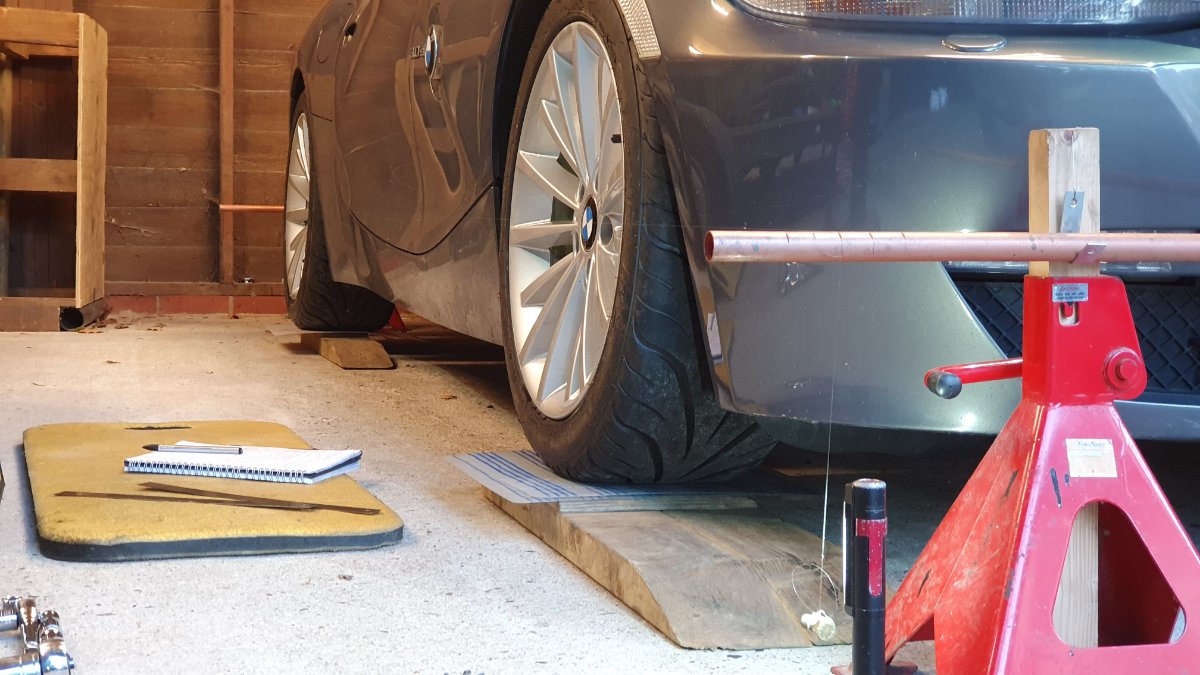
And so, after 6 full months up on axle stands I put it back on its wheels and drove it out into the daylight!

- 20190623_180256.jpg (290.6 KiB) Viewed 2985 times
Clearly some work to do with the ride height and suspension geometry

Took it for a short drive. No more than a mile. The dash is lit up like a Christmas tree! Airbag, ABS, DSC, brake wear, and no speedo...
But it drives, turns and stops. Happy days

Liam's Z4C race car project
Posted: Tue Jul 09, 2019 10:48 pm
by Mr Tidy
Liam22 wrote: ↑Tue Jul 09, 2019 10:28 pm
Clearly some work to do with the ride height and suspension geometry
Took it for a short drive. No more than a mile. The dash is lit up like a Christmas tree! Airbag, ABS, DSC, brake wear, and no speedo...
But it drives, turns and stops. Happy days
Great news - you've put some serious work into your car.
But I can see a coding session coming up soon!
Liam's Z4C race car project
Posted: Tue Jul 09, 2019 11:49 pm
by buzyg
Should have had a female do the the brake calipers for you.

They read the instructions first apparently.

Getting there though.
Liam's Z4C race car project
Posted: Wed Jul 10, 2019 10:38 am
by Liam22
In my defence - the instructions had been translated from Italian

Speedo and ABS lights were tracked down to the rear wheel speed sensors. One wasn't seated fully, and the other wasn't attached at all! If that's all I've forgotten to re-attach then I'll be happy!
For the brake wear indicator I figured it must work on an open-circuit trigger. So I cut the wires on the sensors and looped them together. Did the door open reset thing and now good.
That just left the airbag light. Figured it must have tripped when I removed the drivers seat to see if my race seat would fit. Dropped IAmOrion a PM and he sorted me out
So now just need to fix the suspension geometry before putting it through an MoT.

- 20190627_204328.jpg (233.21 KiB) Viewed 2939 times
Started with ride height. The rear springs are too short and dislocate at full droop. I'll see if I want to change the spring rates before ordering longer ones. Left it with sufficient ground clearance for road use and a slight rake front-to-rear.
I've gone for a conservative track setup to get started:
FRONT
Camber -3.5º (I can get -5.5º max)
Castor max'd out on the adjustable top mounts (not measured, too much of a faff)
Toe in just a tiny amount for road stability (I'll toe out for racing)
REAR
Camber -2.0º
Toe in 2.5mm each side (this is on 17" rims, I don't usually bother converting to degrees)
- 20190627_204406.jpg (223.14 KiB) Viewed 2939 times
Smacking the rear rims with a club hammer to adjust the alignment is amusingly crude. Everything else was straightforward enough.
Drives nicely. Got the brakes bedded in - they feel awesome. The biggest surprise is that the steering actually feels OK. No more tugging from the electric motor. Looks like removing all of the slop in the system has given the EPAS an easier life. Perhaps this is why they fail? Worn steering components gives the EPAS motor more work to do at the straight-ahead...
Liam's Z4C race car project
Posted: Wed Jul 10, 2019 10:55 am
by MrPT
Liam22 wrote: ↑Wed Jul 10, 2019 10:38 amWorn steering components gives the EPAS motor more work to do at the straight-ahead...
I think you are right. Same applies to lollipop bushes - was quite shocked at the state of mine when they came off (my old si). The EPAS had hidden most of the play (and
all of the feedback) until one day, almost overnight, the car developed a pronounced wandering while steering dead ahead on the motorway!
Looking great. I forgot how, err... "normal" it looks when bolted back together.