
Ah, that's interesting, although I can't quite visualise it. I did leave a protrusion, 3-4mm.
I did think about drifting it straight down and stacking the new one on top. But I didn't get as far as measuring for feasibility as adding weight, even 15g, is a no-no.
Not joined yet? Register for free and enjoy features such as alerts, private messaging and viewing latest posts and topics.
Liam's Z4C race car project
-
Liam22
- Member

- Posts: 645
- Joined: Thu Dec 06, 2018 2:28 pm
- Location: Herts/Cambs
-
Vanne
- Senior Member

- Posts: 1579
- Joined: Sun Jul 07, 2013 12:55 pm
- Location: Dubai
- Contact:
Liam's Z4C race car project
Just received my driveshaft back from the balance shop.  So the boot will be unable to be opened at all? I guess you’ve got nothing back there. My meth kit will be there, as will my batt, so that’s not an option for me.
Good work mate. Keep the updates coming
Good work mate. Keep the updates coming
2007 EuroSpec Z4///MC Building/Developing Z4 GT3
Powered by Severn Tuning

Powered by Severn Tuning
-
Wursle
- Member

- Posts: 140
- Joined: Thu Jun 06, 2019 5:58 pm
Liam's Z4C race car project
Makes total sense, car is looking amazing good sir! how did you find the setup after installing the rear wing? did you spec the coilovers for the rear wing or have you put the wing on before? i am looking at going to a GT wing and would like to upgrade my coilovers at the same time. i figured while im at it might aswell get them matched. now you have swapped to a true rear coilover are you planning to strengthen the rear top mount pickups?Liam22 wrote: ↑Thu Mar 04, 2021 6:10 pm These are 325mm discs.
Reasons:
1. The calipers expect 28mm thick discs and OEM is 25mm. While they would work, I don't want to risk pistons falling out with worn pads.
2. I didn't want to buy new 3 sets of rims - these will still fit under 17" rims
3. Weight. OEM is 8.9kg each, 325mm M3 discs are 7.64kg each. So that's a total 2.5kg saving and met my <£100/kg target.
-
Wursle
- Member
- Posts: 140
- Joined: Thu Jun 06, 2019 5:58 pm
Liam's Z4C race car project
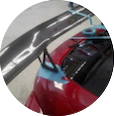
as yours is a non m how did you spec the K System brackets/brakes. did you request the M3 Brake kit with modified bracket or did you ask for the non-m3 kit and then bought the discs seperately?Liam22 wrote: ↑Sun Feb 28, 2021 6:40 pm The new brake adapter brackets turned up this week. Positions the caliper 1.5mm further outboard so the M3 discs run smack in the centre.
20210227_142759.jpg
The total saving over OEM is 6.3kg!!! Unbelievable...
The only snag with the new brackets is that I've now run out of wheel clearance. 3mm spacers now on order.
The brake pad position on the M3 discs is absolutely perfect. No underhang.
20210227_152722.jpg
-
Liam22
- Member
- Posts: 645
- Joined: Thu Dec 06, 2018 2:28 pm
- Location: Herts/Cambs
Liam's Z4C race car project
It opens by removing 2 bolts from the inside with *a lot* of extension bars! But yeah, there's nothing in there so I don't expect to do that very often.
I increased spring rates front and rear after getting the car to race spec and with the aero package.
The roll cage picks up the rear top mounts. See page 14.
The K-system.pro website said that the E46 brackets fitted both non-M and M3 discs. That was wrong so they made me a custom set. You would be able to order either now that they have the measurements I gave them! Great company to deal with.
-
Liam22
- Member
- Posts: 645
- Joined: Thu Dec 06, 2018 2:28 pm
- Location: Herts/Cambs
Liam's Z4C race car project
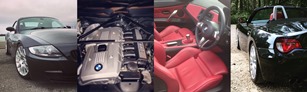
Forgot to update about the Lexan windows. I bought pre-cut and shaped replacements for the door and and rear tailgate glazing. The little quarterlights didn't look like good value for the weight saving.
Started by stripping the doors of the window regulators and motors. The glass itself comes out pretty easy so long as you drop the window to line up with the access hole before you remove the motor! Never fitted Lexan to frameless doors before but it wasn't too tricky to get the window lined up against the seals. Without the auto-drop/lift it needs to be a little lower than OEM.
(the blue tint is protection film - removed after I've finished with the install)
My technique for holding the window in position is to drill a hole through the door and continue carefully through the window itself. A bolt holds the window up, and a nut pushes it outward so that it's flush against the external seal. It's fiddly, but simple and effective.
The tailgate glass was more difficult. Never removed a bonded window before but bought some tools, watched some YouTube and it all worked out. Cleaned the old rubber trim with petrol to remove the adhesive and used some 3M trim tape I had lying around to attach it to the Lexan. A thick bead of Tiger Seal around the tailgate was mostly OK but I could have done with more. Noticed that some parts of the Lexan were not fully down. To apply some more pressure I laid the old glass over the top and popped a wheel/tyre to weight it down. Seems to have worked, but I've not done a hosepipe test yet...
Looks like a worthwhile endeavour though:
- 8.75kg saved across both doors
- 3.89kg saved on tailgate
- 12.6kg TOTAL SAVING
That's 22.3kg saved so far during the off-season (aka lockdown). And I've not finished yet.
Started by stripping the doors of the window regulators and motors. The glass itself comes out pretty easy so long as you drop the window to line up with the access hole before you remove the motor! Never fitted Lexan to frameless doors before but it wasn't too tricky to get the window lined up against the seals. Without the auto-drop/lift it needs to be a little lower than OEM.
- 20210314_145558.jpg (140.18 KiB) Viewed 1198 times
My technique for holding the window in position is to drill a hole through the door and continue carefully through the window itself. A bolt holds the window up, and a nut pushes it outward so that it's flush against the external seal. It's fiddly, but simple and effective.
- 20210313_171700.jpg (110.1 KiB) Viewed 1198 times
- 20210320_180928.jpg (137.1 KiB) Viewed 1198 times
- 8.75kg saved across both doors
- 3.89kg saved on tailgate
- 12.6kg TOTAL SAVING
That's 22.3kg saved so far during the off-season (aka lockdown). And I've not finished yet.
-
Vanne
- Senior Member
- Posts: 1579
- Joined: Sun Jul 07, 2013 12:55 pm
- Location: Dubai
- Contact:
Liam's Z4C race car project
great idea using the old rear window as weight while the lexan window cures.. sadly mine blew on removal  the last frigging 2 cm.. I havent installed mine yet, ill wait till the car is painted for that. Are you reinstalling the side window rubbers? I havent removed the blue stuff yet. did you go with the club side windows? or no windows? bit hard to tell..
2007 EuroSpec Z4///MC Building/Developing Z4 GT3
Powered by Severn Tuning
Powered by Severn Tuning
-
Liam22
- Member
- Posts: 645
- Joined: Thu Dec 06, 2018 2:28 pm
- Location: Herts/Cambs
Liam's Z4C race car project
Sliders? Nope. No need.
I have good ventilation inside the car and always run with the windows fully up. The only time I would drop the windows was to stick my head out of when driving onto the trailer. That's gonna be trickier now!
-
Wursle
- Member
- Posts: 140
- Joined: Thu Jun 06, 2019 5:58 pm
Liam's Z4C race car project
Thats interesting regarding the pick ups i didnt think of doing it that way, im scheduled to get my half cage redone as the last person didnt give the best finishLiam22 wrote: ↑Mon Mar 29, 2021 9:52 pmIt opens by removing 2 bolts from the inside with *a lot* of extension bars! But yeah, there's nothing in there so I don't expect to do that very often.
I increased spring rates front and rear after getting the car to race spec and with the aero package.
The roll cage picks up the rear top mounts. See page 14.
The K-system.pro website said that the E46 brackets fitted both non-M and M3 discs. That was wrong so they made me a custom set. You would be able to order either now that they have the measurements I gave them! Great company to deal with.
-
Liam22
- Member
- Posts: 645
- Joined: Thu Dec 06, 2018 2:28 pm
- Location: Herts/Cambs
Liam's Z4C race car project
ZCars springs are 600/400 lbs (front/rear). I went approx 20% stiffer. Not sure it's optimal yet.
I'll wait to see what it drives like before messing further with the brakes. I was careful to select a caliper with small-ish pistons so I don't expect the balance to change much. I don't run a handbrake, so swapping to a 2-pot caliper would be interesting if there's an easy option.
I'll wait to see what it drives like before messing further with the brakes. I was careful to select a caliper with small-ish pistons so I don't expect the balance to change much. I don't run a handbrake, so swapping to a 2-pot caliper would be interesting if there's an easy option.
-
Liam22
- Member
- Posts: 645
- Joined: Thu Dec 06, 2018 2:28 pm
- Location: Herts/Cambs
Liam's Z4C race car project
The off season is over, and I'll be back racing at Silverstone next weekend: )
So a quick update on the final jobs.
The plan was to take advantage of the relative flat underbody and build a rear diffuser. Not expecting much in the way of downforce but even if it is partly effective it should allow me to run a lower rear wing angle and reduce drag. But I also need to minimise weight...
Step 1 was to delete the underbody bracing. It does two jobs: exhaust mount and prevents the diff from moving in pitch. I figured I could replace with struts that I could make from 13mm tubular steel.
I bought a 1m length from eBay which was just enough for all three lengths. Squeezed the ends flat in my press and drilled holes in the right places.
At 200g each, I also saved 2.5kg over the OEM brace/panel.
Next I had to replace the exhaust back box with a straight through pipe so that I can run a complete diffuser without holes for the silencer can. Got very lucky here. I have an Ebay stainless exhaust and took a punt on a pair of 45⁰ bends and one clamp. This allows for a bit of twisting to get a lot of adjustments. Also saved 5kg in the process.
Step 3 was to make a plywood template for the diffuser/floor. I had a sheet of 4'x4' which was not quite long enough, but good enough to make a template.
Primary mountings are from rivnuts inserted into the diagonal "pullrods" at the rear of the car. Added 4 c-clips across the rear bumper and also picked up existing holes in the battery box.
The real thing is made from 2mm aluminium. I bought a 2.5x1.5m sheet and had it cut to 1.4x1.2m which is the biggest I can fit in the car!
I may have gone overboard on the fences!
After painting the visible parts with BBQ paint (exhaust heat) the final job was to fit a large NACA duct to direct air over the diff. Also drilled holes in the rear bumper to allow that air to leave.
Back on the ground it looks pretty decent. The finished article weighs 10kg (ouch!) but is a net increase of only 2.5kg. I'm still 20kg lighter than when I went into the off season.
So a quick update on the final jobs.
The plan was to take advantage of the relative flat underbody and build a rear diffuser. Not expecting much in the way of downforce but even if it is partly effective it should allow me to run a lower rear wing angle and reduce drag. But I also need to minimise weight...
Step 1 was to delete the underbody bracing. It does two jobs: exhaust mount and prevents the diff from moving in pitch. I figured I could replace with struts that I could make from 13mm tubular steel.
- 20210101_215557.jpg (191.12 KiB) Viewed 1054 times
- 20210327_184115.jpg (198.4 KiB) Viewed 1054 times
- 20210401_140548.jpg (224.08 KiB) Viewed 1054 times
Next I had to replace the exhaust back box with a straight through pipe so that I can run a complete diffuser without holes for the silencer can. Got very lucky here. I have an Ebay stainless exhaust and took a punt on a pair of 45⁰ bends and one clamp. This allows for a bit of twisting to get a lot of adjustments. Also saved 5kg in the process.
- 20210330_180156.jpg (154.43 KiB) Viewed 1011 times
Primary mountings are from rivnuts inserted into the diagonal "pullrods" at the rear of the car. Added 4 c-clips across the rear bumper and also picked up existing holes in the battery box.
The real thing is made from 2mm aluminium. I bought a 2.5x1.5m sheet and had it cut to 1.4x1.2m which is the biggest I can fit in the car!
- 20210402_182414.jpg (135.59 KiB) Viewed 1054 times
- 20210403_144320.jpg (112.2 KiB) Viewed 1054 times
- 20210403_175839.jpg (141.04 KiB) Viewed 1054 times
- 20210417_112715.jpg (160.44 KiB) Viewed 1054 times
- 20210417_121150.jpg (76.65 KiB) Viewed 1054 times
- 20210417_181103.jpg (182.65 KiB) Viewed 1054 times
Last edited by Liam22 on Mon Apr 19, 2021 8:01 pm, edited 1 time in total.
-
Homer
- Member

- Posts: 98
- Joined: Tue Feb 05, 2019 9:39 pm
- Location: Troon
- Contact:
Liam's Z4C race car project
Top work, looks so aggressive with the diffuser and spoiler
Replacement braces are a simple and functional chance
Replacement braces are a simple and functional chance
Sapphire Black E86
-
Liam22
- Member
- Posts: 645
- Joined: Thu Dec 06, 2018 2:28 pm
- Location: Herts/Cambs
Liam's Z4C race car project
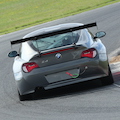
One final tweak before testing at Snetterton. Used a kitchen knife on the plastic sill to allow hot, turbulent air to exit the wheel arch.
Testing went well. Everything still works, and the winter's modifications all did what they were supposed to. Definitely getting downforce from the diffuser, to the point where I had to reduce the rear wing angle by 3⁰ to bring the balance back.
The CSL front ARB is also awesome. High speed turn-in is now much more positive.
Net result is that I went 2.5s faster than this time last year (2:08.79). Pretty huge gain so excited for tomorrow's race at Silverstone.
- 20210418_172102.jpg (168.36 KiB) Viewed 969 times
The CSL front ARB is also awesome. High speed turn-in is now much more positive.
Net result is that I went 2.5s faster than this time last year (2:08.79). Pretty huge gain so excited for tomorrow's race at Silverstone.
-
enuff_zed

- Lifer

- Posts: 14760
- Joined: Wed Oct 26, 2016 11:05 am
- Location: Attleborough, Norfolk
Liam's Z4C race car project
Yet again I missed seeing you! Not sure public would be allowed in yet though?Liam22 wrote: ↑Fri Apr 23, 2021 8:31 am One final tweak before testing at Snetterton. Used a kitchen knife on the plastic sill to allow hot, turbulent air to exit the wheel arch.
20210418_172102.jpg
Testing went well. Everything still works, and the winter's modifications all did what they were supposed to. Definitely getting downforce from the diffuser, to the point where I had to reduce the rear wing angle by 3⁰ to bring the balance back.
The CSL front ARB is also awesome. High speed turn-in is now much more positive.
Net result is that I went 2.5s faster than this time last year (2:08.79). Pretty huge gain so excited for tomorrow's race at Silverstone.
Good luck for Silverstone.
Sounds like you're going to be much quicker.
I know it's not exactly F1, but will be interesting to see how your aerodynamics are affected by other cars in front.
(Of course, if the improvements are that good, you'll only have that issue with back-markers
HQ of 'Norfolk Zed Rescue'.
Always happy to help if I can.
If the forum helped you, why not help the forum back. Thats the Z4 way!

Always happy to help if I can.
If the forum helped you, why not help the forum back. Thats the Z4 way!
-
Darkangelv2

- Senior Member
- Posts: 1277
- Joined: Fri Apr 10, 2015 1:20 pm
- Location: Southampton
Liam's Z4C race car project
Just fantastic! This is literally my favourite thread to follow on here. Best of luck this weekend!Liam22 wrote: ↑Fri Apr 23, 2021 8:31 am One final tweak before testing at Snetterton. Used a kitchen knife on the plastic sill to allow hot, turbulent air to exit the wheel arch.
20210418_172102.jpg
Testing went well. Everything still works, and the winter's modifications all did what they were supposed to. Definitely getting downforce from the diffuser, to the point where I had to reduce the rear wing angle by 3⁰ to bring the balance back.
The CSL front ARB is also awesome. High speed turn-in is now much more positive.
Net result is that I went 2.5s faster than this time last year (2:08.79). Pretty huge gain so excited for tomorrow's race at Silverstone.
BMW Z4 2006 2.5SI - 437M Wheels - Strut Brace - H&R ARBs
3.0si Brake Conversion - Custom Nappa Sport Interior - Z4M Bumper+Bonnet -
BC Racing BR Coilovers - AFE Stage 2
3.0si Brake Conversion - Custom Nappa Sport Interior - Z4M Bumper+Bonnet -
BC Racing BR Coilovers - AFE Stage 2