
If you are looking to give your tired Z4 a facelift, then here is instructions on how to convert your standard Z4 front bumper to a Z4M front bumper. The Z4M front bumper is a direct fit onto a standard Z4, with the exception of the brake air ducts. These are simply bolt-on pieces that require minimal modification.
This DIY will cover tools and parts needed, and instructions on how to install the new hardware and bumper. A separate DIY on how to remove the front bumper can be found here:
http://www.z4-forum.com/forum/viewtopic.php?t=1071
So without further adieu, let's get this DIY started!
Tools required:
-(see bumper removal DIY for tools to remove bumper)
-8mm socket/wrench
-10mm socket/wrench
-13mm socket/wrench
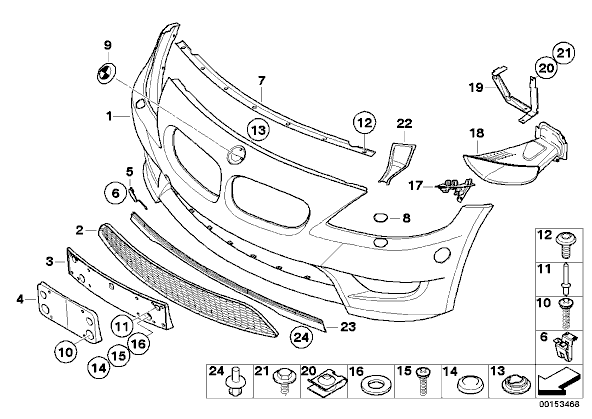
Diagram from Realoem.com
Parts needed:
Part Number__Qty__Description + approx. dealer price
51-11-8-040-340 1 Primed Front Bumper {1} - [cost may vary if new/used]
51-11-7-895-842 1 Grid, Center {2} - [$86.69]
51-11-8-044-701 1 Front Left Brake Air Duct {18} - [$40.56]
51-11-8-044-702 1 Front Right Brake Air Duct {18} - [$40.56]
51-71-7-837-531 1 Bracket Left {19} - [$22.07]
51-71-7-837-532 1 Bracket Right {19} - [$22.07]
07-11-9-904-269 2 Hex Bolt {21} - [$.78/ea]
51-11-7-078-261 1 Cover, Spray Nozzle Left Primed {8} - [$38.88]
51-11-7-078-262 1 Cover, Spray Nozzle Right Primed {8} - [$38.88]
63-14-6-944-879 1 Side Reflector Left (round) - [$30.04]
63-14-6-944-880 1 Side Reflector Right (round) - [$30.04]
The Spray Nozzle covers and side reflectors can really be considered as optional. You could decide to have a body shop fill out those holes and have a smooth look, but they may charge a lot for labor. Then again, these four parts alone will probably run you about $150 at the dealer (seriously!!), so you can weigh the options on your own. I opted to buy the parts and have them painted.
Pictures of the parts:
Grid (center grill)

Brake Ducts. Notice they replace the fog-lamp access panels completely


Bracket. This holds the brake duct securely to the chassis. It attaches to the duct by locking tabs. This one pictured is the passenger side bracket.


Hex Bolt (8mm). These attach the bracket to the chassis.

Front bumper side reflector. If you have an '05, you could just reuse your reflectors.

Headlight washer covers. These little things are RIDICULOUSLY expensive. Also, they do not really attach to the front bumper, so you may need to use some super glue or contact cement to stick them on.

And last, but not least -- A Z4M front bumper cover, painted to match your vehicle. I purchased the bumper used off ebay, and it was originally painted Interlagos Blue. There were a few surface scratches and front lip scrapes, but the paint shop did an excellent job of feathering out the damage and making it look good as new!!! I also had them paint the washer covers and reflectors as well, which are affixed to the bumper in this picture.

Don't mind the cats -- they are curious little creatures. And that is NOT a piece of poop in the upper right. It's a catnip cigar.
STEP 1:
Remove the old front bumper as directed here:
http://www.z4-forum.com/forum/viewtopic.php?t=1071
STEP 2:
We need to mount brackets that hold the brake air ducts in place. If you look under the headlight area, this is what you will see (passenger side):

The mounting points are circled in pink.
As you can see from the picture, the horn module is occupying the space where the bracket is supposed to mount. This will need to be relocated to another spot in order to make room.
Using your 13mm socket, remove the nut holding it in place. Save the nut -- you will reuse it later.

If you look back towards the corner, there is an available bolt sticking out with an 8mm nut. Remove this and affix the horn module to this mounting point:

With the horn removed, you can see how the bracket fits into this spot. It is mounted on the right side using the existing bolt and 13mm nut, and then on the left side using a newly supplied 8mm hex bolt. (in this pic, i removed the horn, but know that it is supposed to be there).

STEP 3:
To mount the brake air ducts, first remove the old fog-light access panels. To insert the new brake ducts into the same spot, you could either:
(a) jack up the car, remove the tire, and go from the inner fender well.
-or-
(b) carefully force the brake duct through the hole from the front side, without removing the tire.
I opted for option (b). If you gently bend the new access panel and fender lining, you should be able to push it through from the front side. Much easier than plan (a).
Once the brake duct is secured at the access panel, the top is secured to the braket via locking tabs that snap into place.

Repeat on the other side.

NOTE:
I discovered that the brake air ducts are actually quite secure when held only by the access panel without the bracket. The bumper itself also holds the front of the scoop in place, so it is quite sturdy. I would say the these brackets could be considered an OPTIONAL part if you want to save a few dollars (more like ~$60). But if you want peace of mind, then go ahead and purchase them with hex bolts.
STEP 4:
Now to put some necessary hardware on the new bumper. First you'll want to snap the center grill in place from the back side. Unfortunately i didn't take any pictures, but it's self explanatory. Make sure you do this on carpet or a soft surface -- the grill takes a few smacks to secure the roughly 20 or so tabs that need to snap into place.
Next, transfer the kidney grills to the new bumper. The old grills just pull off using some firm force. Pretty straightforward.
Finally, you'll want to transfer the bumper emblem. It is attached to the bumper from the underside using 10mm retaining bolts.

If your old roundel is faded and chipped (like mine), now would be a good time to replace it. It is a specially made 70mm hood emblem, which you can get at your dealer (or elsewhere). Part Number 51-14-7-044-207.

The emblem screws back into place using the same 10mm bolts. They etch into the plastic pins as they are screwed on.
STEP 6:
Last step is to mount the front bumper. Here's a comparison of the two bumpers. Out with the old, and in with the new

Reinstall the bumper in the reverse order that you removed it. The brake ducts should line up with the openings. Be sure the underside of the bumper is pushed in all the way by tucking the splash guards into the bottom edge.
The sides of the bumper where it meets the fender may need a few good hard smacks to set it in place, so give it some patience. It'll eventually budge.
Attach the bumper using the 7 hex screws along the top edge and the 8 expanding tabs along the fender wells.
Since the Z4M bumper is a tad lower than the standard Z4 bumper, the underside does not completely line up with the splash guards. You won't be able to reuse the 7 8mm screw/bolts along the underside. But the bumper is actually held quite securely by the top hex screws and fenderwell expanding tabs, so the underside hardware won't be necessary. Just put them away in a safe place as spare parts.
Now you are finished, and can sit back and admire your newly facelifted Z. This bumper truly makes the car look so much more aggressive.
Before:

After:


And that is how it's done!
Best,
-Roger