Not joined yet? Register for free and enjoy features such as alerts, private messaging and viewing latest posts and topics.

Cup Holder Arm Replacement

Post Reply
User avatar
wattsie
Member
Member
Posts: 191
Joined: Fri May 18, 2012 4:06 pm

Cup Holder Arm Replacement

Post by wattsie » Wed May 27, 2015 1:42 pm

This fix is for the left or right hand cup holder when the arm either doesn’t spring out or doesn’t grip the cup properly. Once you have the cup holder apart, it will be simple to see if this is the problem piece that needs replacing.

Tools needed:

New cup holder arm
Cross head screwdriver
Thin drill (1mm approx.) and thin screwdriver / nail to go though the hole made.
Pliers
Grease
Flat head screwdriver
Hammer

Approx 30 minutes

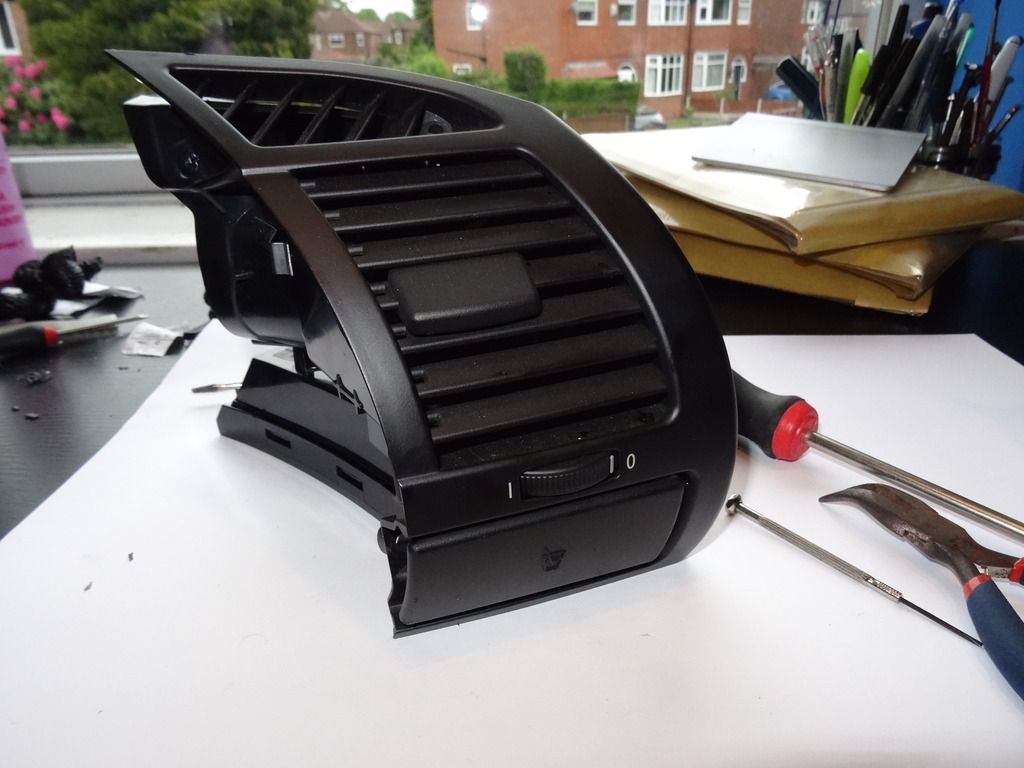
Step 1: Remove the vent / cup holder.

This is done by popping the cup holder open and removing the screw at the bottom and the screw in the top corner of the vent. Give the unit a tug and it will pop out:
Image

Step 2: Dismantle the cup holder.

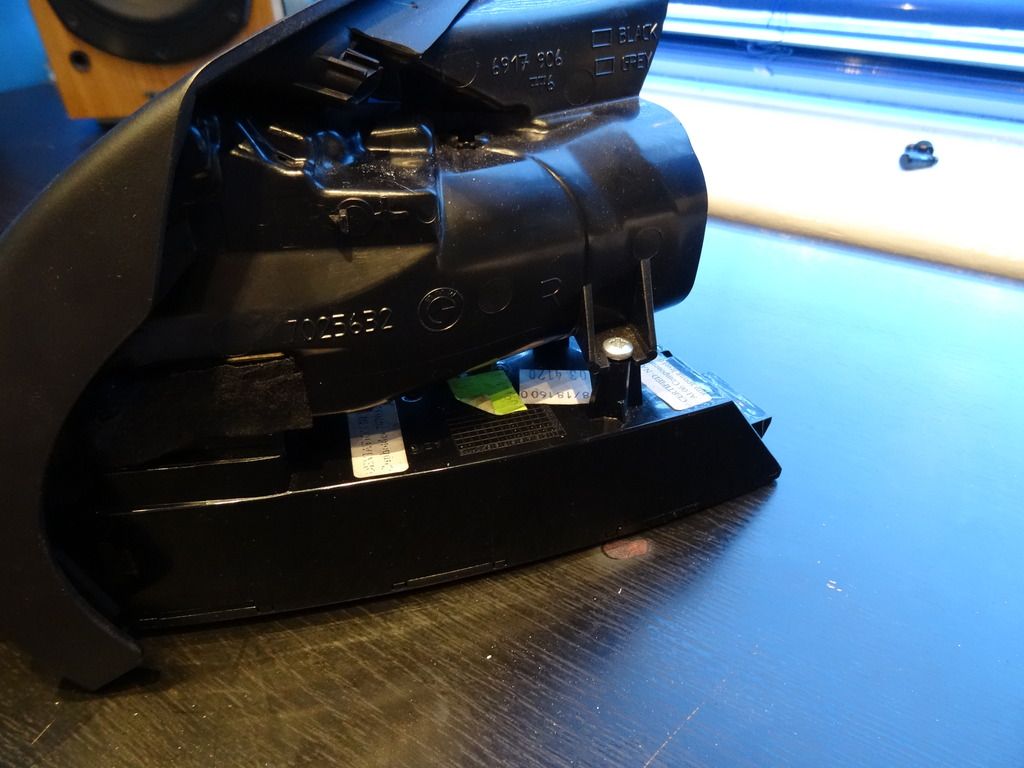
Remove the screw at the back of the vent unit, this will let you pull out the cup holder, it comes out through the front, so pop the cup holder out as if you were going to use it maneuver it out.
Image

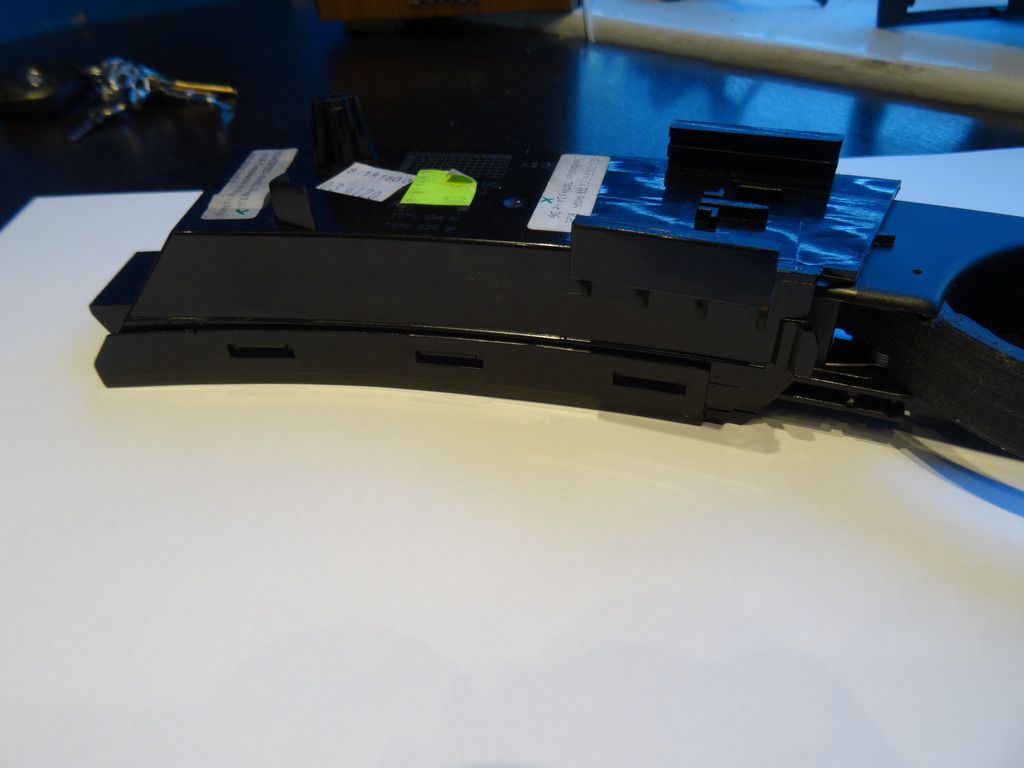
Snap the cup holder unit open along its edge and turn upside down.
Image

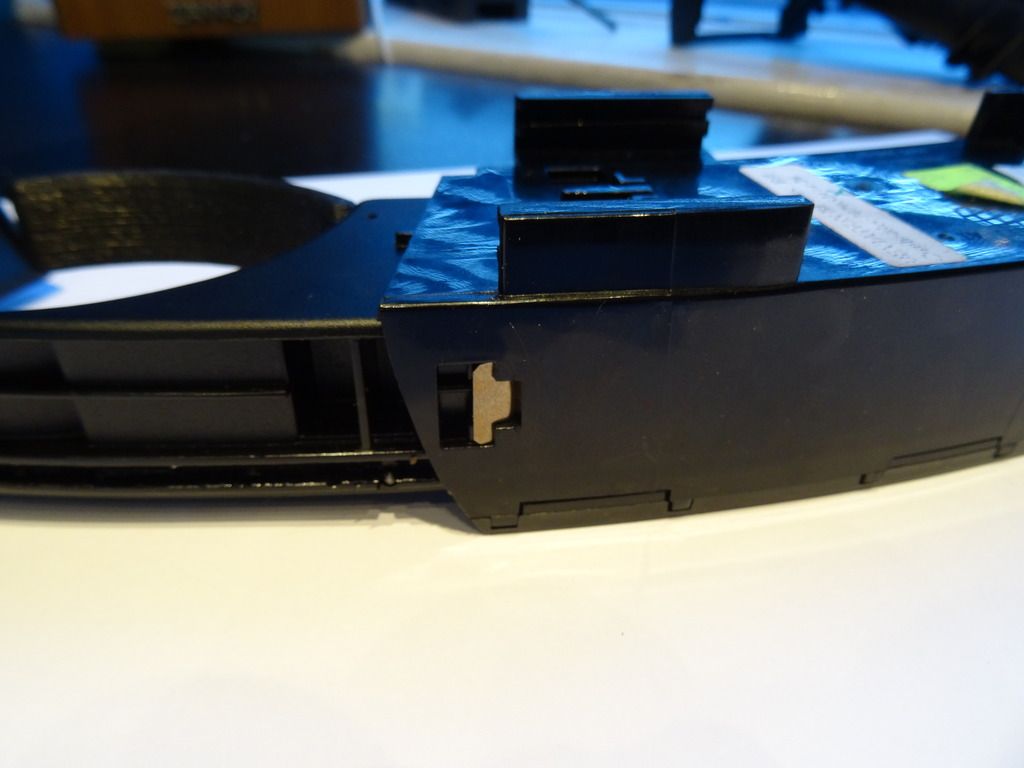
At this point there is nothing stopping the two pieces sliding apart, but try not to let this happen as relocating this spring is a pain…
Image

Step 3: Assess the problem.

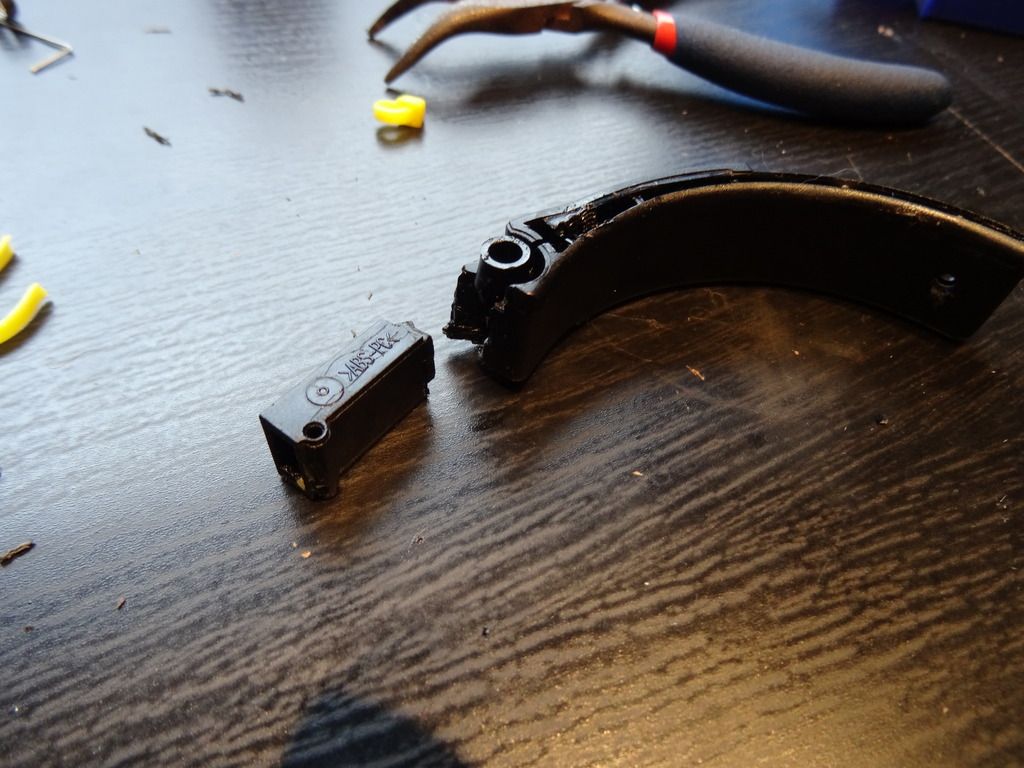
If the arm has broken and looks like this, then this fix can help you, if not, Sorry, your on your own…..
Image

Step 4: Pivot pin removal.

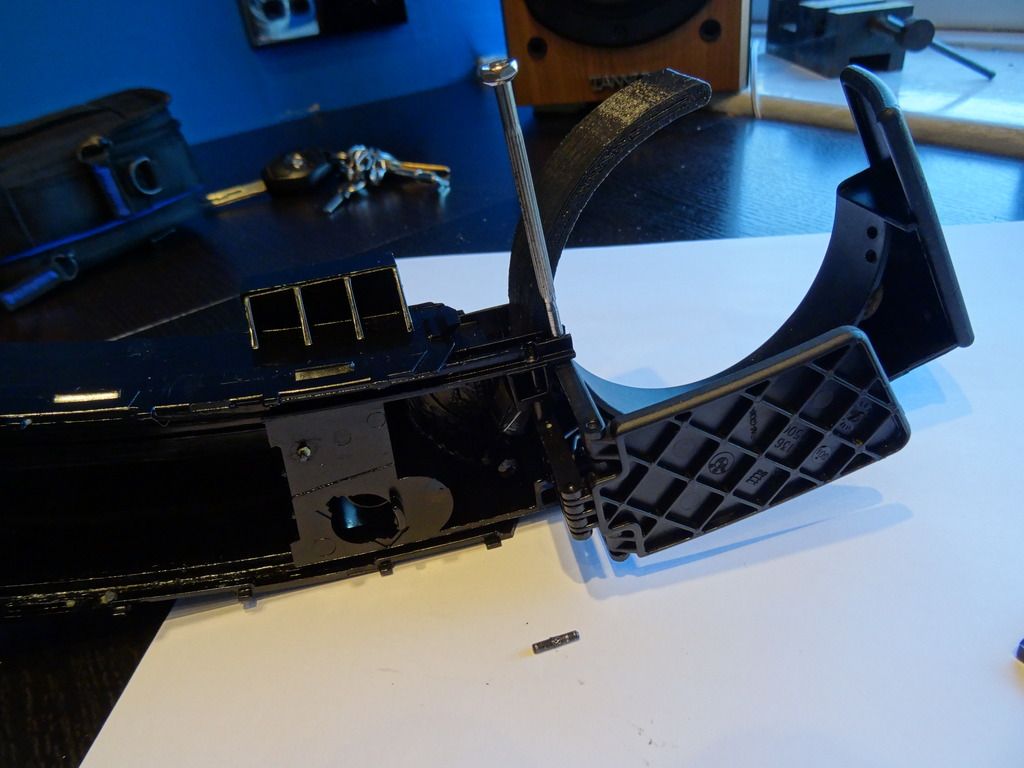
To get the arm out, you need to remove two pins, firstly the one holding the drop down part of the cup holder in place….
Image
This is pretty straight forward and just knocks out with a little force.

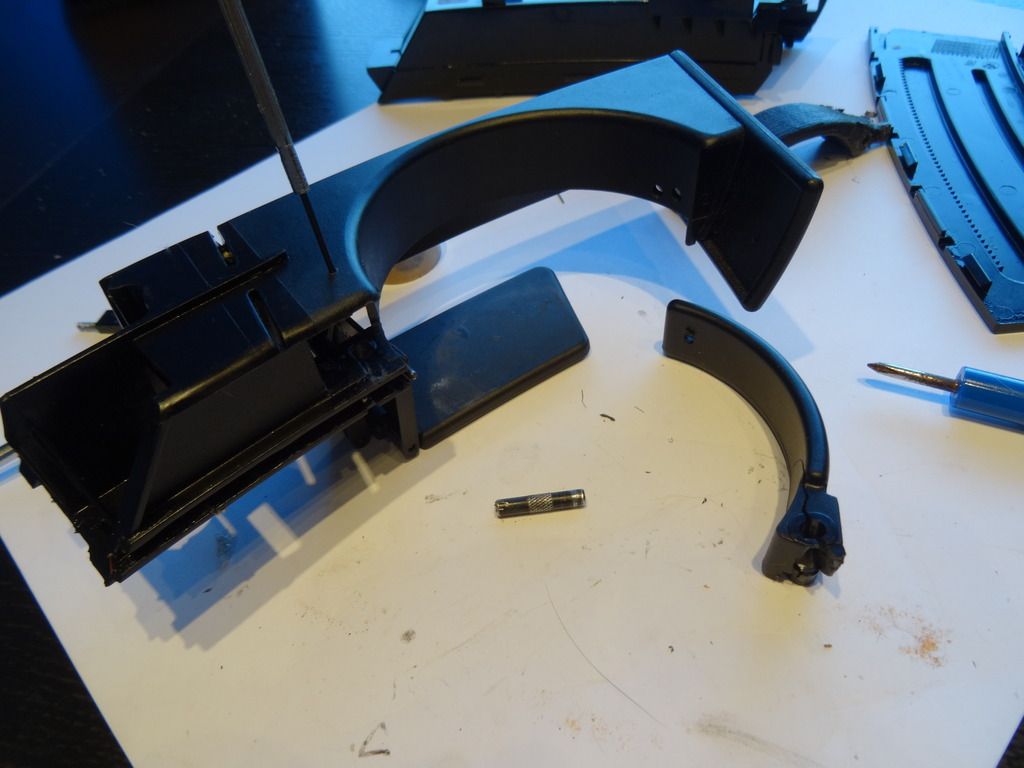
The next pin, holding the arm in place, is a bit more tricky, it needs to be knocked out from the top, which means drilling a tiny hole, smaller the better above it and using a nail or small screwdriver to knock it out. Careful as there is a spring in the assembly and once the pin is out, it pings off…
Image

Step 5: Collect the bits.

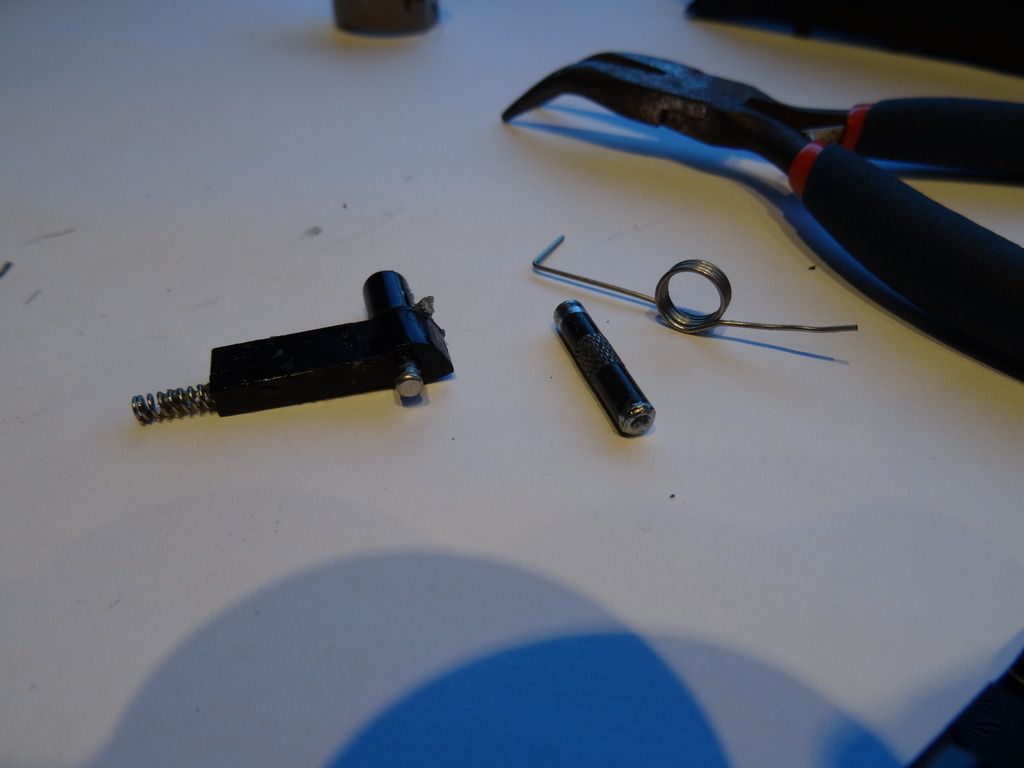
Pull the cam and spring out of the end of the arm. Retain these as well as the two pins you have just removed.

Image

Step 6: Checks.

At this point its time to get your new cup holder arm, PM for details, and check that the cam arm moves in and out of the hole in the end, it is intended to be loose due to tolerancing of 3D printed thin wall parts. Check that the spring slips into the grove around the pivot pin and that the pivot pin itself is a good snug fit in the hole. It may be necessary to trim off any offending plastic inplaces.
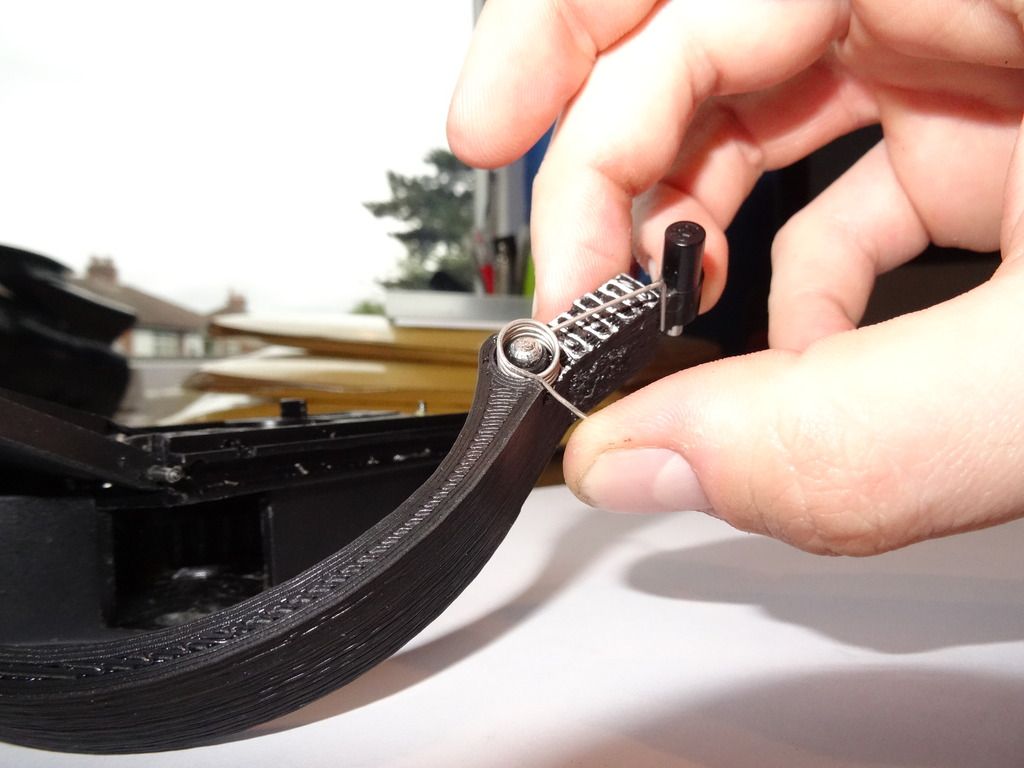
Image

Step 7: Assembly.

Stick some lubricant / grease in the end of the arm for the cam, and assemble the spring and cam shown here:
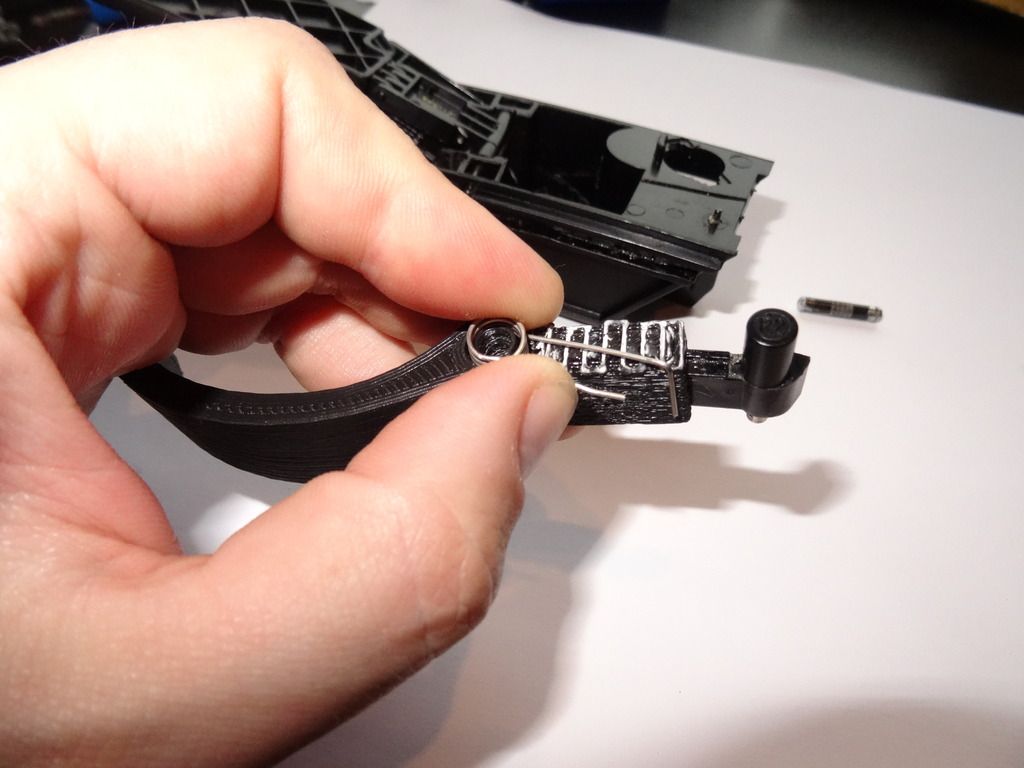
Image


Now just push the assembly through the gap in the holder and ensure that the cam lines up with one of the groves inside the holder body and the spring pushes against the side wall.
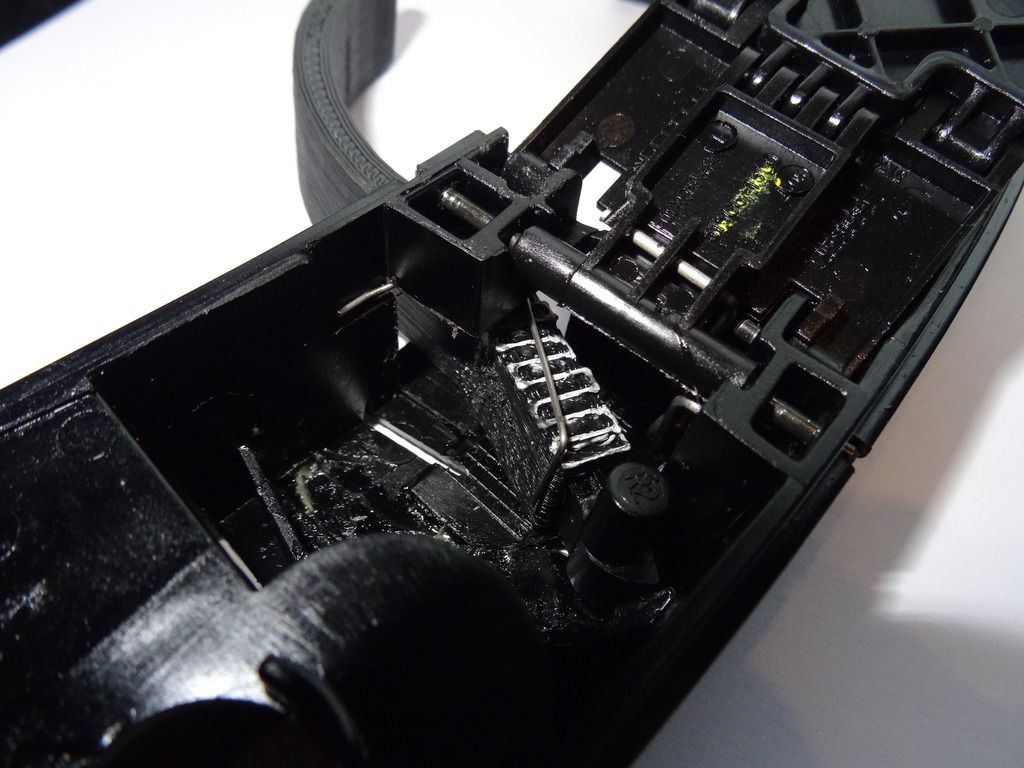
Image

Step 8: Pivot pin.

This is a little fiddly, but does work! Push the pivot pin through the hole in the bottom of the holder where it came out. You should feel the pin meet some resistance about half way in. Keep pushing it in until the assembly starts to feel solid. Cycle the arm through its range of movement a few times to check all has been installed correctly…
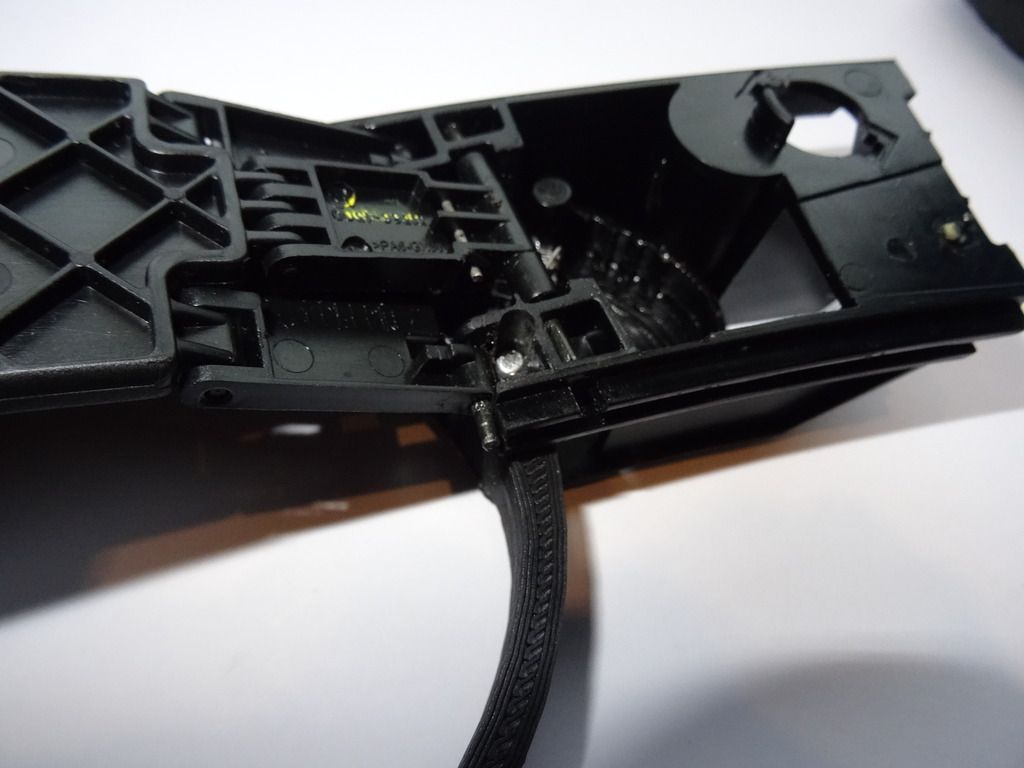
Image

Now, and this is the fiddly bit, we have to get the pivot pin to go through the arm enough to fit into its location notch on the top face (where you drilled the tiny hole). The method I used was to slide a thin screwdriver between the top face of the arm and underside of where the tiny hole was drilled, to give a little extra depth for the pin. Once it is knocked into place and located in the notch, remove the screwdriver and it should be a good snug fit. If the pin doesn’t line up with this notch, the arm will wobble.

Replace the thin pin on the drop down section now that the pivot pin is in place. This little pin stops the big one coming loose.

Step 9: Test 1

The whole thing should work fine now. Apply some more lubricant / grease to the internals near the cam and its track.

Step 10: Reassemble and reinstall

Shouldn’t have to explain this one, just put it back together and screw it back in to the car!

Step 11. Test 2

Turn on ignition, put drink in cup holder, go for drive.

User avatar
srhutch
Moderator
Moderator
Posts: 26959
Joined: Tue Jun 19, 2007 1:22 pm
Location: East Sussex, UK
Contact:

Re: Cup Holder Arm Replacement

Post by srhutch » Wed May 27, 2015 1:51 pm

Love this 3D printing :thumbsup:
Image

simonlpearce
Senior Member
Senior Member
Posts: 1251
Joined: Fri Jul 18, 2014 3:07 pm

Re: Cup Holder Arm Replacement

Post by simonlpearce » Wed May 27, 2015 2:12 pm

Excellent work.

You have my order and i look forward to making a mess of the installation :D
Simon's Ruby Black Z4 MC Journal
viewtopic.php?t=70563

E36 M3 Evolution - Individual Journal
http://www.bmwowner.com/forum/viewtopic ... 6&t=209427

The closer you are to death, the more alive you feel!

User avatar
rjsimmons
Member
Member
Posts: 172
Joined: Tue Nov 10, 2015 8:56 pm
Location: Virginia
Contact:

Re: Cup Holder Arm Replacement

Post by rjsimmons » Tue Nov 24, 2015 8:50 pm

Great solution. I did this very repair on my Zed the day after I purchased her. My solution was to simply afix a metal band around the broken shaft (mine did not break off as yours did, just had one side give way) and everything works 4.0 now.

cagatay87
Newbie
Newbie
Posts: 4
Joined: Tue Sep 20, 2016 9:00 pm

Cup Holder Arm Replacement

Post by cagatay87 » Tue Sep 20, 2016 9:05 pm

wattsie wrote:This fix is for the left or right hand cup holder when the arm either doesn’t spring out or doesn’t grip the cup properly. Once you have the cup holder apart, it will be simple to see if this is the problem piece that needs replacing.

Tools needed:

New cup holder arm
Cross head screwdriver
Thin drill (1mm approx.) and thin screwdriver / nail to go though the hole made.
Pliers
Grease
Flat head screwdriver
Hammer

Approx 30 minutes

Step 1: Remove the vent / cup holder.

This is done by popping the cup holder open and removing the screw at the bottom and the screw in the top corner of the vent. Give the unit a tug and it will pop out:

Image

Step 2: Dismantle the cup holder.

Remove the screw at the back of the vent unit, this will let you pull out the cup holder, it comes out through the front, so pop the cup holder out as if you were going to use it maneuver it out.

Image

Snap the cup holder unit open along its edge and turn upside down.

Image

At this point there is nothing stopping the two pieces sliding apart, but try not to let this happen as relocating this spring is a pain…

Image

Step 3: Assess the problem.

If the arm has broken and looks like this, then this fix can help you, if not, Sorry, your on your own…..

Image

Step 4: Pivot pin removal.

To get the arm out, you need to remove two pins, firstly the one holding the drop down part of the cup holder in place….

Image
This is pretty straight forward and just knocks out with a little force.

The next pin, holding the arm in place, is a bit more tricky, it needs to be knocked out from the top, which means drilling a tiny hole, smaller the better above it and using a nail or small screwdriver to knock it out. Careful as there is a spring in the assembly and once the pin is out, it pings off…

Image

Step 5: Collect the bits.

Pull the cam and spring out of the end of the arm. Retain these as well as the two pins you have just removed.


Image

Step 6: Checks.

At this point its time to get your new cup holder arm, PM for details, and check that the cam arm moves in and out of the hole in the end, it is intended to be loose due to tolerancing of 3D printed thin wall parts. Check that the spring slips into the grove around the pivot pin and that the pivot pin itself is a good snug fit in the hole. It may be necessary to trim off any offending plastic inplaces.

Image

Step 7: Assembly.

Stick some lubricant / grease in the end of the arm for the cam, and assemble the spring and cam shown here:

Image


Now just push the assembly through the gap in the holder and ensure that the cam lines up with one of the groves inside the holder body and the spring pushes against the side wall.

Image

Step 8: Pivot pin.

This is a little fiddly, but does work! Push the pivot pin through the hole in the bottom of the holder where it came out. You should feel the pin meet some resistance about half way in. Keep pushing it in until the assembly starts to feel solid. Cycle the arm through its range of movement a few times to check all has been installed correctly…

Image

Now, and this is the fiddly bit, we have to get the pivot pin to go through the arm enough to fit into its location notch on the top face (where you drilled the tiny hole). The method I used was to slide a thin screwdriver between the top face of the arm and underside of where the tiny hole was drilled, to give a little extra depth for the pin. Once it is knocked into place and located in the notch, remove the screwdriver and it should be a good snug fit. If the pin doesn’t line up with this notch, the arm will wobble.

Replace the thin pin on the drop down section now that the pivot pin is in place. This little pin stops the big one coming loose.

Step 9: Test 1

The whole thing should work fine now. Apply some more lubricant / grease to the internals near the cam and its track.

Step 10: Reassemble and reinstall

Shouldn’t have to explain this one, just put it back together and screw it back in to the car!

Step 11. Test 2

Turn on ignition, put drink in cup holder, go for drive.
dear friend it very very good share , i have same problem on my e85 z4 and new items are so expensive...
2 weaks before i bought a 3d printer and i hope i will print and repair mines if you share stl file with me.

Bovey
Newbie
Newbie
Posts: 1
Joined: Sat Jul 14, 2018 11:59 am

Cup Holder Arm Replacement

Post by Bovey » Sun Jul 15, 2018 1:34 am

Hi
I have just bought my Z4 3lt and love it, I need to fix the cup holder but don't see a way of pm you. I don't have a 3 D printer can you or print arm and supply it ?

Angelo
Newbie
Newbie
Posts: 1
Joined: Tue Aug 21, 2018 5:23 am

Cup Holder Arm Replacement

Post by Angelo » Sun Sep 29, 2019 8:11 pm

Hey,

Do you still have a project of this arm? could you please share it?
:roll:

pwnsweet
Newbie
Newbie
Posts: 6
Joined: Wed Nov 21, 2018 1:45 am

Cup Holder Arm Replacement

Post by pwnsweet » Sat Nov 30, 2019 3:31 am

I'd also like the STL file for this

Post Reply