Radar Detector Install
Posted: Mon Aug 22, 2011 11:02 pm
I ran power to my radar detector over the weekend. Simple mod -- good first project.
2007 M Roadster; Escort X-50 Radar Detector with the little remote module (2 LEDs and a mute button)
This is what it looked like:

I didn't like the black cord; I didn't like leaving the ashtray door open; and the detector gets better performance when mounted higher. I will eventually move it up under the grill, but for now I just want it mounted high and without cords. The box on the cigarette lighter plug has the same functionality as the remote module.
First step is to remove the visors:

Take out the Phillips head screw (there's on just like it on the other side). Then the center trim pops off, with a bit of tugging:

Remove the one plug (circled). Then pull the pillar trim pieces out and up. There are no clips (like in the door panels); the rubber gasket holds these things on. Picture of the right side with the trim removed:

The remote module has a power and ground wire, and a phone line that connects to the detector. The phone line is a 4-conductor cable terminating in a RJ-11 modular plug (it's what hooks up telephones in the US). The power line has a 2A in-line fuse. I cut that off, since I tap power using an Add-A-Circuit gadget in the fuse box, and I put a 2A fuse in that. So, the circuit is protected, and I won't have to remove any panels to replace a fuse. The power and ground lines are too short for my configuration, so I added some hook-up wire. I used Posi-Lock connectors http://www.posi-lock.com/ the best way to hook up wires. These provide a connection as reliable as soldering, and much easier to undo. Since space wasn't a constraint, I used the slightly cheaper "posi-twist" connectors here, which operate more like wire nuts:

I positioned the remote module in what seemed like a good location (turns out it wasn't; more on that later). I had a feeling I might want to move it around, so I left a coil of pwr/gnd wire (red circle) and phone line (blue circle), zip-tied to the cable already routed up the left pillar:

Up the left side and around the corner:

Across the top to the center. I ran both wires through an existing metal bracket. Here I dropped out the phone cord, and continued the power line across the top:

Then down the right pillar:

I removed the right vent cover -- one Phillips head screw in the upper right corner, and one in the lower left, behind the drink holder (the holes for both are circled in red). I found a nice place to tie off the ground line: a 10mm nut secures the air passage tube to a bolt that connects to the frame (blue circle). I cut off the ground wire here and crimped on a ring connector:
Open the glove compartment; push in two tabs in the top, and the whole compartment swings down, revealing the fuse panel (unplug the glove box light). There's a passage from the fuse panel area to the area behind the right vent, so I ran the power line through there, zip-tying it out of the way of the retracted drink holder:

I tapped power using an Add-A-Circuit fuse tap http://www.amazon.com/Littelfuse-FHA200 ... B0002BGELQ I installed it in fuse slot 6 -- a 10A, ignition-switched line that runs power to the reversing light switch. Slot 2 is actually a switched spare, but the dealer used that one when they installed heated seats. Here, I used an in-line Posi-Lock connector:

Test functionality, and put all the panels back in place. I thought I was done, with the remote module right on top of the instrument cluster, where I can't miss an alert indication (which I thought would be important, if/when I move the detector under the hood and lose the audio):

BAD IDEA. First, the remote module, and its wire tail (which I ran straight forward to the windshield, then in the slot between the dash and the windshield over to the left pillar) reflected in the dashboard. All the time. Worse, at night, I got two reflections (from parallax) of the green LED on the windshield right at eye level. Plus, the wire tail snaking across the dash just didn't look clean. So, pull the visors, center panel, and left pillar trim back off, and reposition the remote module to the far left:

Perfect. Here's the whole set-up:

With the detector right there, I don't even need the remote module (there's a mute button on the detector as well). With this particular model, though, it's the only way to remotely power the detector, without probing out the phone line to figure out which lines are power and ground.
Next project: Find a place to punch through the firewall, and move the detector up under the grill. Any ideas on that?
2007 M Roadster; Escort X-50 Radar Detector with the little remote module (2 LEDs and a mute button)
This is what it looked like:
I didn't like the black cord; I didn't like leaving the ashtray door open; and the detector gets better performance when mounted higher. I will eventually move it up under the grill, but for now I just want it mounted high and without cords. The box on the cigarette lighter plug has the same functionality as the remote module.
First step is to remove the visors:
Take out the Phillips head screw (there's on just like it on the other side). Then the center trim pops off, with a bit of tugging:
Remove the one plug (circled). Then pull the pillar trim pieces out and up. There are no clips (like in the door panels); the rubber gasket holds these things on. Picture of the right side with the trim removed:
The remote module has a power and ground wire, and a phone line that connects to the detector. The phone line is a 4-conductor cable terminating in a RJ-11 modular plug (it's what hooks up telephones in the US). The power line has a 2A in-line fuse. I cut that off, since I tap power using an Add-A-Circuit gadget in the fuse box, and I put a 2A fuse in that. So, the circuit is protected, and I won't have to remove any panels to replace a fuse. The power and ground lines are too short for my configuration, so I added some hook-up wire. I used Posi-Lock connectors http://www.posi-lock.com/ the best way to hook up wires. These provide a connection as reliable as soldering, and much easier to undo. Since space wasn't a constraint, I used the slightly cheaper "posi-twist" connectors here, which operate more like wire nuts:
I positioned the remote module in what seemed like a good location (turns out it wasn't; more on that later). I had a feeling I might want to move it around, so I left a coil of pwr/gnd wire (red circle) and phone line (blue circle), zip-tied to the cable already routed up the left pillar:
Up the left side and around the corner:
Across the top to the center. I ran both wires through an existing metal bracket. Here I dropped out the phone cord, and continued the power line across the top:
Then down the right pillar:
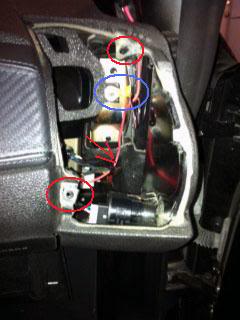
I removed the right vent cover -- one Phillips head screw in the upper right corner, and one in the lower left, behind the drink holder (the holes for both are circled in red). I found a nice place to tie off the ground line: a 10mm nut secures the air passage tube to a bolt that connects to the frame (blue circle). I cut off the ground wire here and crimped on a ring connector:
Open the glove compartment; push in two tabs in the top, and the whole compartment swings down, revealing the fuse panel (unplug the glove box light). There's a passage from the fuse panel area to the area behind the right vent, so I ran the power line through there, zip-tying it out of the way of the retracted drink holder:
I tapped power using an Add-A-Circuit fuse tap http://www.amazon.com/Littelfuse-FHA200 ... B0002BGELQ I installed it in fuse slot 6 -- a 10A, ignition-switched line that runs power to the reversing light switch. Slot 2 is actually a switched spare, but the dealer used that one when they installed heated seats. Here, I used an in-line Posi-Lock connector:
Test functionality, and put all the panels back in place. I thought I was done, with the remote module right on top of the instrument cluster, where I can't miss an alert indication (which I thought would be important, if/when I move the detector under the hood and lose the audio):
BAD IDEA. First, the remote module, and its wire tail (which I ran straight forward to the windshield, then in the slot between the dash and the windshield over to the left pillar) reflected in the dashboard. All the time. Worse, at night, I got two reflections (from parallax) of the green LED on the windshield right at eye level. Plus, the wire tail snaking across the dash just didn't look clean. So, pull the visors, center panel, and left pillar trim back off, and reposition the remote module to the far left:
Perfect. Here's the whole set-up:
With the detector right there, I don't even need the remote module (there's a mute button on the detector as well). With this particular model, though, it's the only way to remotely power the detector, without probing out the phone line to figure out which lines are power and ground.
Next project: Find a place to punch through the firewall, and move the detector up under the grill. Any ideas on that?
